Wednesday, February 10, 2016

Lighting setup 2 assignment for my class: 3:1 Lighting Ratio

Photo by: Maile Powell
The first assignment I gave the students this week with one light gave us wonderful Rembrandt lighting. The downside to this type of lighting is sometimes you need to fill in those shadows.

The second assignment for the students in my photo class this week is 3:1 Lighting Ratio.

Nikon D4, Nikon 85mm ƒ/1.8G, ISO 100, ƒ/5, 1/200
Here is the setup


Assignment Description:
3:1 lighting ratio.  This photo is classic lighting.

Items:

Octobox closest to subject
This light is your main light. Get a light reading with just this first. The light should be 45 degrees off the axis of the camera and 45 degrees above the subjects eyes.

Subject
Your subject should have the main light lighting only part of the face and the shadows should be just a little to show the 3:1 ratio.

(D)SLR
Choose the lowest ISO.  Ideally on full-frame camera a lens close to 85mm and on cropped sensor a 50mm. Set your shutter speed to the sync speed for your camera [in your camera manual] or slower. My camera was 1/250 but I shot at a slower speed of 1/200.

Octobox behind the camera
This is your fill light and get just a reading of this 2nd.  Be sure it is 1/2 the power (1 f/stop less) than the main light. After this is done get a 3rd light reading of both lights which will be the setting for the camera. It can be level with the eyes, but you may have to move up with glasses to avoid glare.

First set the main light and here is what that will look like:


Due to using such a large soft box the shadows are not as severe as in our first assignment using the grid light. Some of the light is bouncing off a white wall a few feet to the left of the model or right of the camera position.

Turning the main light off after finding out your setting you need to take a reading and get the fill light to 1 stop less than the main light. The main light was ƒ/4 so the fill light should read ƒ/2.8.

This is what it looks like without the main light on. You can see a little darker but no real shaping of the face as the main light which is 45º to the side.


When you combine them you get the first photo of the model we started with.


The main light is twice as bright as the fill light. So to show this using math we would say the main light has value of 2 and the fill light has the value of 1.

Where both the main and fill light fall on the face is getting the combined value of the 2 + 1 = 3. However in the shadows only the fill light is hitting those and therefore the value is only 1.

So the bright areas get 3 and the shadows 1 giving you a 3:1 lighting ratio.

Now I showed the students how they can add a background light. I put a blue gel over it to show them they can also color the background.


Monday, February 08, 2016

Seeing Rembrandt lighting and then creating it

Nikon D750, Sigma 24-105mm f/4 DG OS HSM Art Lens, ISO 2200, ƒ/4, 1/500
This morning while eating breakfast at Ken's House of Pancakes in Hilo, Hawaii I noticed what appeared to be a mother and daughter together. Now analyzing the photograph I know that the reason they caught my eye was the lighting on the mother's face.

It is what we call Rembrandt lighting, which is named after the famous painter known for using this lighting technique in many of his paintings.

Add caption

There is a little triangle of light on the dark side of the face when a light is 45º to the side of the subject as well as 45º above the subject.

Tomorrow the students in the class will learn how to create the triangle on a person's cheek to create Rembrandt lighting. This is my first lesson in lighting, which I think is a great place to start.

Nikon D4, AF NIKKOR 85mm f/1.4D, , ISO 200, ƒ/8, 1/200–four Alienbees
To get this triangle the students will use a similar setup to this shot. For this shot I used four lights. the students will only use one.


They will use just the one light with a spot grid on it.

Here is there assignment they will get tomorrow. How about you try it yourself.

Rembrandt Lighting Assignment

I gave the class an assignment on making a Rembrandt light portrait using just one light with a 10º or 20º spot grid.

Most everyone in the class has never even turned on a studio strobe before.

Here is the assignment:

Description:
Rembrandt portrait using one grid light

Items:

Subject
Please get the best possible expression.  You need to see a triangle on their cheek.  Be sure the triangle includes lighting their eye.

Monobloc with 10 or 20 degree grid
You may use any power setting you choose.  Be sure skin tone is properly exposed and correct white balance.

Camera
Choose the lowest ISO setting for your camera.  Use a portrait lens 85mm - 100mm or if you don't have full frame then 50mm will be OK.

Backdrop
You may use a black background as well.  No other lights to be used in this assignment.

Here one of the students shot from the past:
Photo by: Lauren R. Tercero

Friday, February 05, 2016

Success is most often in the nuance of the details

Nikon D4, Sigma 24-105mm f/4 DG OS HSM Art Lens, ISO 2500, ƒ/6.3, 1/18000
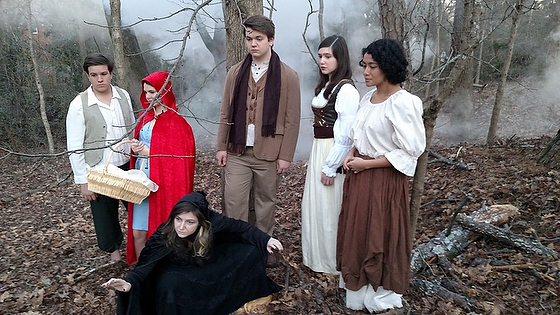
Success of a photo is often in the nuance of the details. For this photo shoot it was very important that I not only have the subjects in their costumes and makeup but that I was lighting the subjects during the daylight to look like night time.

I wanted to create a mood that said "spooky". To help take it to that level we got a fog machine to help create this look above.

Now to see how important details are in a photo shoot look at the photo without the fog.

Nikon D4, Sigma 24-105mm f/4 DG OS HSM Art Lens, ISO 2500, ƒ/7.1, 1/15000
For me the difference isn't minor but rather quite major in the impact of creating the "spooky" mood that I was going for in the photo.

We often talk about just moving the camera ever so slighting to left or right can make a difference as well.

If you are creating something like I did here versus capturing your subject you can plan ahead and think of all the small nuances that you can control to make your photo a success.

Wednesday, February 03, 2016

Why I chose my Nikon D4 over my D750

Nikon D750, Sigma 24-105mm f/4 DG OS HSM Art Lens, ISO 200, ƒ/4, 1/500
While in Florida at a family reunion all of a sudden we were in the backyard watching our kids enjoying Go Karting.  I started shooting this with my Nikon D750 with a Sigma 24-105mm f/4 DG OS HSM Art Lens. Very quickly I realized the performance was not what I was used to with my Nikon D4.

Nikon D4, Sigma 70-200mm f/2.8 EX DG APO OS HSM, ISO 1250, ƒ/2.8, 1/2000
I went back to the car and got my Nikon D4 and Sigma 70-200mm f/2.8 EX DG APO OS HSM. I immediately went to the "Shooting menu bank" and picked what I saved as my sports settings.

Next I went to my "Custom menu settings" and picked the setting which I saved as my sports settings.

Lastly I put the shutter release on continuous high.

Now to see what each of these settings are on my Nikon D4 you can read this earlier blog post on my Sports Settings for the Nikon D4.

There is a good possibility that the Nikon D750 could have performed much better, but the point of this blog post is how important it is to concentrate on the action when you need to capture a moment and not your camera.

The one major advantage of the Nikon D4 over the D750 was 11 fps. The focus tracking and 11 fps gave me more moments to choose my best shot from. The buffer is bigger so you can shoot more frames before the buffer fills as well.

The best thing to know is that if you need to get the shot you need to know that you have maximized your camera settings. You don't do this when you need a shot, you do this when you take your camera and go and just practice. Maybe you go by a busy road and practice shooting moving traffic so you can tweak your focus settings. After you get that set then you move to another setting to set.

Once you get all the settings just right then save them. My Nikon D4 gives me 4 different memory banks to save my settings.

Nikon D4, Sigma 70-200mm f/2.8 EX DG APO OS HSM, ISO 1250, ƒ/2.8, 1/2000
The payoff for taking the time to maximize my cameras settings is having a moment like this to remember my daughter and her cousin having fun.

You will pick the camera you are most comfortable with to get the photo you need, so take the time and calibrate the camera for the situations you will shoot.

Sunday, January 31, 2016

Creating the promotional poster for a theater production

Nikon D4, Sigma 24-105mm f/4 DG OS HSM Art Lens, ISO 1250, ƒ/8, 1/50
Just the other week I teased you with some test shots. These are some of the final shots from our shoot.
Editorial Note: Due to the contract signed to put on the play we cannot promote the name of the play until February 23rd. Another theater company is putting it on right now and has rights to PR and Advertising in our market.
Now to give you a feel for the before and after here is a shot my wife took on her phone.


Yes we are shooting during the daylight. So you cannot get this photo with your smart phone or for that matter any camera.

This is about lighting and controlling it.


This is me earlier setting up 3 Alienbees B1600 flashes with CTO gels on the lights. The camera is white balanced for tungsten. This means wherever the flashes orange light hits will be neutral tone and give good skin tones. All the available daylight will now be blue.

Nikon D4, Sigma 24-105mm f/4 DG OS HSM Art Lens, ISO 2500, ƒ/6.3, 1/8000
For the individual cast member shots I just used one Flash off to the side about 45º right of the camera and about 45º above the cast members head.

You should notice the the shutter speed is 1/8000. To make this work I am using the PocketWizard TT5 on the flash with an AC-9 adapter plugging into the phone cord connection on the Alienbee B1600. This will let me shoot at any shutter speed. This is call high speed sync.

I have the PocketWizard TT1 transmitter with the AC-3 which lets me control the power of the flashes from the camera remotely. I just turn up or down the power from -3 to +3 in 1/3 increments.

There are three groups A, B, C and two Channels 1 & 2. Each flash was on a different group setting and all were on the same channel to fire at the same time.

Nikon D4, Sigma 24-105mm f/4 DG OS HSM Art Lens, ISO 2500, ƒ/5.6, 1/5000

Nikon D4, Sigma 24-105mm f/4 DG OS HSM Art Lens, ISO 2500, ƒ/7.1, 1/5000

Nikon D4, Sigma 24-105mm f/4 DG OS HSM Art Lens, ISO 2500, ƒ/6.3, 1/8000

Nikon D4, Sigma 24-105mm f/4 DG OS HSM Art Lens, ISO 2500, ƒ/6.3, 1/8000

Nikon D4, Sigma 24-105mm f/4 DG OS HSM Art Lens, ISO 2500, ƒ/6.3, 1/8000
Now we moved the group around in our backyard trying different locations and lighting.

Nikon D4, Sigma 24-105mm f/4 DG OS HSM Art Lens, ISO 1600, ƒ/5, 1/8000
Now the biggest changes from my test shots, which you can see in the earlier blog post was 1) Costumes, 2) Makeup & 3) smoke machine.


As you can see here we had to really work to get the right shot with the smoke. Often it was overpowering the photo.

Here is a view of the photo without the strobes going off.


Now you know how sometimes they film those night time scenes in so many movies.

Friday, January 29, 2016

Shooting wireless tethered for headshots

Nikon D4, Nikon 85mm ƒ/1.8G, ISO 50, ƒ/4.5, 1/160
Yesterday I did headshots for my daughter's theater. I used a very simple setup that I have shown here before.


Here you can also see the setup with my wife helping with putting the names into the metadata fields as I was shooting.


Now I was shooting wireless tethered by using CamRanger system.


To see how to use this system you can look at my earlier blog post on the system. I shot all these as RAW this time and didn't shoot JPEGs.

There is a delay from time shot is taken to the time it pops up on the computer.

Here is the workflow outlined for you:

You can see here in the screen shot of adding the subject's names to the caption field using PhotoMechanic.


Here the client can download with a password I provided to them or order prints online.


Here you can see the screen when they add it to their cart:


Tuesday, January 26, 2016

A Director of Photography is your organizations parachute and/or translator

Nikon D3S, AF-S NIKKOR 28-300mm f/3.5-5.6G ED VR, ISO 400, ƒ/5.6, 1/2000
No one in our military jumps out of plane without a parachute. It is pretty self explanatory as to why you need support or you will crash to the ground.

The parachute is a device used to slow the motion of an object through an atmosphere by creating drag. When it comes to jumping out of a plane it is more important that you are alive when you land than how fast it took you to get to the ground.

Nikon D3S, AF-S NIKKOR 28-300mm f/3.5-5.6G ED VR, ISO 450, ƒ/5.6, 1/2000
Our son Nelson is on the left in this photo. He had just finished his first jump at the Army's Airborne School in Fort Benning, Georgia. After they land each soldier is required to repack their parachute.

They will use the same parachute again and again during the school. You see you don't use the parachute once to help you navigate the jump and then you abandon it later.

Director of Photography is like a parachute to the organization that hires photographers. They are there to help protect the organization and the photographers so that the mission is safely accomplished.


Here Patrick Murphy-Racey talks with Lily Wang the way sometimes a director of photography does with their photographers. Sometimes they coach their photographers about things they need done for the organization.

Another metaphor is to think of the Director of Photography like a translator. They deal with the details to be sure nothing is left out of the translation so that the goal is achieved.

To be a translator you cannot just speak both languages. You have to take tests and prove that you understand the nuances of the languages or you get those translations we call Chinglish.


Cecil B. De Mille wrote:
"The Director of Photography is the custodian of the heart of film making... as the writers are of its soul... his tool is a box with a glass window, lifeless until he breathes into it his creative spirit and injects into its steel veins, the plasma of his imagination... the product of his camera, and therefore of his  magic, means many things to many persons - fulfillment of an ambition... realization of dreams."
The Director of Photography for a movie has a similar role as a Director of Photography has for still photography projects.

Here are some things that a Director of Photographer should do for your organization:
  • Is in the meetings where projects are created to help determine if photography is a good solution
    • Generates ideas for the organization
    • Helps refine ideas by suggesting different treatments for projects
    • Continues to remind the team to remember visuals in their projects
  • Finds the best photographer for the job
  • Communicates with the photographer all the needs and expectations of the project
  • Negotiates rates based on
    • Difficulty of the job
    • Rights management
    • Scope of the project
  • Insures metadata is embedded properly into all images
    • Proper caption information
    • Keywording
    • Rights are spelled out
    • Model/Property Release
    • Filenaming
  • Works with the photographer to get all model and property releases as needed and that they are also digitally filed with the photos into the image database

James Dockery, works as a lead video editor for ESPN, and is here talking with student about their project during our workshop last year in Romania. Often the director of photography wears this hat where they are helping the photographer flesh out an idea or treatment of the story.

They serve as a sounding board for both the organizations communications staff and the photographers as well.

Maybe from your experience you can add other aspects that I might have left out in the comments section.

Monday, January 25, 2016

How to make your family photos more valuable

Nikon D750, Sigma 24-105mm f/4 DG OS HSM Art Lens, ISO 200, ƒ/6.3, 1/160–Neewer T850, Neewer 433MHz Wireless 16 Channel Radio system
This past weekend our family flew down to Jupiter, Florida to surprise my wife's oldest sister for her 80th birthday.

Some of the family my wife had never met and some of the family she hadn't seen for more than 39 years.

After taking this photo I didn't wait till I got home to work on it in the computer. I wanted to be sure to make this photo the most valuable asset it can be to our family going forward.


Here is a video to help you know how to do this in Adobe Lightroom:


After I had the photo in Adobe Lightroom editing software I used the Face Recognition technology to help identify each and every person in all the photos I took this weekend. Now the software while not perfect did a great job. I did have to force it to tag some of the faces.


The good thing is now inside the metadata of the image is everyone's name that is in this photograph.
Metadata is "data that provides information about other data". Two types of metadata exist: structural metadata and descriptive metadata. Structural metadata is data about the containers of data. Descriptive metadata uses individual instances of application data or the data content.
Metadata was traditionally in the card catalogs of libraries. As information has become increasingly digital, metadata is also used to describe digital data using metadata standards specific to a particular discipline. Describing the contents and context of data or data files increases their usefulness. For example, a web page may include metadata specifying what language the page is written in, what tools were used to create it, and where to find more information about the subject; this metadata can automatically improve the reader's experience.
The main purpose of metadata is to facilitate in the discovery of relevant information, more often classified as resource discovery. Metadata also helps organize electronic resources, provide digital identification, and helps support archiving and preservation of the resource. Metadata assists in resource discovery by "allowing resources to be found by relevant criteria, identifying resources, bringing similar resources together, distinguishing dissimilar resources, and giving location information."

This is one of my family photos from my dad's side of the family. I know the man on the far left (even this is sketchy to me) is my great grandfather who owned the blacksmith. He is H. P. Sewell.

Who are the rest of the people? We don't know.

Make your photos from your family more valuable. Take the time to identify who is in the photo.

Nikon D750, Sigma 24-105mm f/4 DG OS HSM Art Lens, ISO 100, ƒ/4, 1/200
This is the three sisters from the weekend and my wife's great niece. Just imagine a few generations later where they are telling the stories to their children about who their ancestors were.

Now putting the names of the people on the back of the print as was done by many people in the past is the same as today embedding that information using metadata.


In PhotoShop just go to the menu item File>File Info...

Under the basic table in the description box put the people's names in the photo. You can even put them in left to right and row 1, 2 and so on to help people in the future who will not know who anyone is in the photograph.


Now this is the Spotlight search on a Mac, but you can do a text search on a PC and get the same results. Because the names are embedded in a photo you can now search and find those people. Here I put the last name in for Teubner. I didn't even have to finish spelling it before the photos started listing for me in the search box.


I setup two umbrellas with hotshoe flashes to make the group photos this past weekend. Once I had them setup we had one our family members to take a photo of our family, which rarely happens. Like the cobbler we have few photos of us as a family.

Nikon D750, Sigma 24-105mm f/4 DG OS HSM Art Lens, ISO 180, ƒ/4, 1/250–fill flash
While we did setup and take some posed photos, we enjoy just as much those moments capturing the family having fun.

Nikon D4, Sigma 70-200mm f/2.8 EX DG APO OS HSM, ISO 1250, ƒ/2.8, 1/2000
Nikon D750, Sigma 24-105mm f/4 DG OS HSM Art Lens, ISO 12800, ƒ/5.6, 1/60
I feel great about this past weekend. I not only got to meet family members I didn't know we had, but I can now look back at the photos and tell my family who is who and help them know what a wonderful family heritage we have.