
 |
| Sepia Tone filter |
 |
| Bleach Bypass filter |
 |
| Aged Photo filter |
 |
| Auto Color with camera. |
The color of a photograph can take you back in time, create a mood, or make your work look amateurish.
 |
On the other end of creating a mood is the amateur look. This is where you have color caste to your photos. If under fluorescent light they may look green. While inside with incandescent lights you have an orange effect.
If you mix flash with the available light you may have proper light on the objects closest to the camera and then the background has a color shift.
How do you know if your color is off?
 |
| Macbeth color chart |
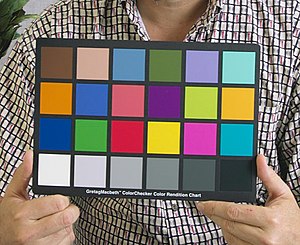 |
| You can see each square can then be checked to match the known numbers. |
Skin Tone: The telling sign of good color
The first giveaway to the human eye that the color is off will most likely be skin tone. Look at these photos here. I let the camera figure it out for the first one, which is acceptable on Auto White Balance. Look at the ones following.
 |
| Temp 5100, Tint +14, Camera setting Auto White Balance |
 |
| Temp 4950, Tint +12, Camera setting Sunny White Balance |
 |
| Temp 3100, Tint +10, Camera setting Incandescent White Balance |
 |
| Temp 4700, Tint +75, Camera setting Fluorescent 1 White Balance |
 |
| Temp 7250, Tint +29 Camera setting Fluorescent 2 White Balance |
 |
| Temp 5250, Tint +22 Camera setting Custom White Balance off the coffee cup top |
I have done photo shoots where I used strobes and still needed to do a custom white balance because the ceiling, floor or walls were all creating a color cast that made the skins tones not look correct.
 |
| Skin Tone Swatch |
Here is a link to the Curvemeister website showing you how to use the skin swatch system to see if you are close for the right white balance in a photograph.
My recommendation is to shoot RAW but in every situation always get a custom white balance.
My favorite way for getting a custom white balance is using my ExpoDisc.
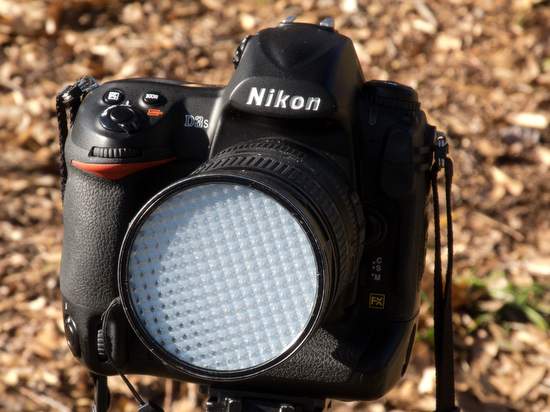 |
| ExposDisc goes in front of the lens and then you use it to get an incident reading rather than a reflective reading of the light. |
 |
| Notice the direction of the light hitting the subject. You move to the same position to get the light reading below. |
 |
| Point the camera toward the direction of the light that is falling on the subject. |
One way you can modify it is as long as the light is the same where you are standing, then you could cheat and take a reading from where you are. The problem that can arise is if they are lit by Window light and the camera position is in the shade then your color balance will be off if you do not take it from the subject's perspective.
Use the wrong color sometimes
Yes, I just said to not use the proper color sometimes.
Night scene
Most all Hollywood movies that show night time scenes are often shot during daytime. How do they achieve that look? Set the camera to incandescent which will give you a blue cast making everything look like it is lit by moon light. Next underexpose the scene. I find this is where a spotlight on the subject and underexposing the rest of the scene can help you set the mood for a night scene.

High Tech Look
If you have daylight in the scene and you light the subject with bright incandescent light and set the camera to incandescent then the subject with be the correct skin color and the area lit by daylight will be blue.
CSI Miami uses the technique of letting the fluorescent light go blue by lighting the cast with incandescent and setting the camera to white balance for the incandescent. This way everything lit by the fluorescent goes blue while skin tones look natural.
Sunset
You can fake a sunset by putting a CTO filter over the camera lens making the scene look orange. Then you can use a flash and put a CTB filter over the flash which puts out a blue light. The subject looks correct with the skin tones but the rest of the scene is orange like a sunset.
Amateur Look
When you are not sure what you are going for and you just let the camera do it all, this is the surest way to have the color of your photos announce you are an amateur. Want to take your game up to the next level, learn how to get correct skin tones and when to go for an effect.
Why so many photographers choose to
shoot Black and White
One of the biggest signs for pros who don't know how to get good skin tones is to go to black and white. This is the easiest way to eliminate the sign they are still an amateur when it comes to color balance.
This is why I think so many wedding photographers shoot black and white. I think they are not using it so much for an effect or creating a mood, but they don't know how to get the color correct. Most likely they shot everything in JPEG and if you are off with the color in JPEG correcting it in post production is very difficult as compared to working with a RAW image.
2 comments:
Thanks Stanley! I was actually just contemplating the ExpoDisc today, glad to know you like it. That seals the deal for me. Thanks for sharing!
Post a Comment