Showing posts with label skin tones. Show all posts

Friday, May 11, 2012

Shooting under fluorescent requires you to slow down

Shooting under fluorescent lights can give you very unpredictable results if you do not slow down.

Fluorescent lamps using a magnetic mains frequency ballast do not give out a steady light; instead, they flicker at twice the supply frequency. This results in fluctuations not only with light output but color temperature as well, which may pose problems for photography and people who are sensitive to the flicker.

When the fluorescent light is at the end of its life it can flicker more and for those with photosensitive epilepsy it can trigger a seizure.

Today there are a range of types of fluorescent lights. You may have gone into a HomeDepot or Lowe's and noticed displays showing you different color temperature fluorescent lights.


Color Temperature

Typical incandescent lighting is 2700 K, which is yellowish-white. Halogen lighting is 3000 K.

Fluorescent lamps are manufactured to a chosen color by altering the mixture of phosphors inside the tube. Warm-white fluorescents have color spectrum of 2700 K and are popular for residential lighting. Neutral-white fluorescents have a color spectrum of 3000 K or 3500 K. Cool-white fluorescents have a color spectrum of 4100 K and are popular for office lighting. Daylight fluorescents have a color spectrum of 5000 K to 6500 K, which is bluish-white.


On my Nikon D4 in the menu for White Balance you can choose up to seven different presets for fluorescent.  There is a major problem I have found trying this method, it isn't easy to pick the right color, because the monitor on the back of the camera isn't that easy to see color in all situations.

Flicker problem

Incandescent lights burn constantly and therefore your color temperature is pretty consistent no matter your shutter speed. However, since fluorescent tubes are actually acting light a flash and flickering you will get an affect different than with flash where above your sync speed part of the frame is dark.

Look at these two different photos and see the color difference.


Everything is set the same (Nikon D4, ISO 12,800, f/5.6, 1/500) in each photo, but you can see the difference in color is due to the flickering of the fluorescent.

Now besides a color shift on the whole picture you may end up with a band across the photo.  Personally this is more annoying since it isn't as easy to fix in post production. Have this happen a few times and you are screaming at that computer and camera.

Slow Down

You can get very consistent color under fluorescent if you shoot at 1/100 or slower shutter speed.

Anytime you are under Fluorescent, Sodium-Vapor, or High Temp Mercury-Vapor be sure you shoot slower than 1/100.  You may need to shoot at 1/60 with some of the older model lights.

Why Strobes Are Used

There are times when shooting at 1/100th of a second isn't going to cut it. A great example of this is shooting sports inside under those Sodium-Vapor lights in most arenas. This is why many pro photographers are using strobes for shooting sports. They need a consistent color without streaks or bands of color shift in the photograph.

If it were not for this problem of flickering with these types of lights it would be a lot more practical with today's high ISO cameras to not use strobes.

Custom White Balance

The best solution I have found shooting under these lights that flicker like fluorescent is to do a custom white balance.

My favorite way for getting a custom white balance is using my ExpoDisc.
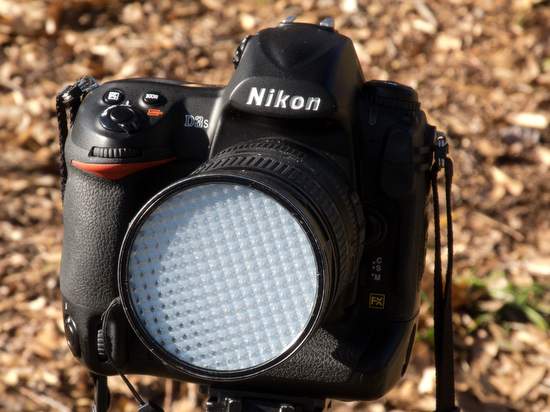

ExposDisc goes in front of the lens and then you use it to get an incident reading rather than a reflective reading of the light.

Notice the direction of the light hitting the subject.  You move to the same position to get the light reading below.

Point the camera toward the direction of the light that is falling on the subject. 
I have found if the subject is facing me and the light is from the side, I face the camera with the ExpoDisc on it so it is pointing towards the camera position.  The chart above is to help you understand the concept, but you can modify it.

Now if you are shooting in an arena with Sodium-Vapor lights. Do a custom white balance. However, be sure you do the custom setting at a shutter speed lower than 1/100.  You can then raise your shutter speed to higher than that for shooting, but this will give you more consistent color over your images. Even doing this will still cause you problems on about 5 - 10% of the images.

Now you know to slow down your shutter speed when shooting under this light source.

Friday, January 27, 2012

Attaining good skin tones with digital cameras


Sepia Tone filter

Bleach Bypass filter

Aged Photo filter

Auto Color with camera.

The color of a photograph can take you back in time, create a mood, or make your work look amateurish.
Instagram
Instagram, in an homage to both the Kodak Instamatic and Polaroid cameras, confines photos into a square shape.  It lets you apply a filter and combined with edge effects and the square format can make a photo taken today look like a nostalgia piece.  You can make it look like the 1920s, 1950s, or 1970s.  The reason for the transformation in time is the photo triggers memories for those who lived during this time or for those people who have found a shoebox or old family albums and looked through the photos.

On the other end of creating a mood is the amateur look.  This is where you have color caste to your photos.  If under fluorescent light they may look green. While inside with incandescent lights you have an orange effect.

If you mix flash with the available light you may have proper light on the objects closest to the camera and then the background has a color shift.

How do you know if your color is off?

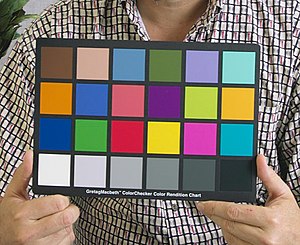
Macbeth color chart
 
You can see each square can then be checked to match the known numbers.
There are a few ways to know if your color is off. You can take a picture using the Macbeth Color Checker Chart as I did in the photo above. Then you can use the densitometer built into PhotoShop or Lightroom to compare each color patch the numbers for RGB.

Skin Tone: The telling sign of good color

The first giveaway to the human eye that the color is off will most likely be skin tone.  Look at these photos here. I let the camera figure it out for the first one, which is acceptable on Auto White Balance.  Look at the ones following.

Temp 5100, Tint +14, Camera setting Auto White Balance
Temp 4950, Tint +12, Camera setting Sunny White Balance

Temp 3100, Tint +10, Camera setting Incandescent White Balance

Temp 4700, Tint +75, Camera setting Fluorescent 1 White Balance

Temp 7250, Tint +29 Camera setting Fluorescent 2 White Balance

Temp 5250, Tint +22 Camera setting Custom White Balance off the coffee cup top
There are times when a person is surrounded by a dominate color, like a red wall.  This will tell your camera that you are seeing in red light and will try an compensate giving your subject a cyan tone to their face.

I have done photo shoots where I used strobes and still needed to do a custom white balance because the ceiling, floor or walls were all creating a color cast that made the skins tones not look correct.

Skin Tone Swatch
You can find online skin tone swatches that you can compare a person's skin to an approximate ethnicity color swatch.  The RGB value for caucasian skin is: R:239, G:208, B:207.  Now the numbers may be darker or lighter do the the light on the skin, but the numbers will generally go up and down uniformly. 

Here is a link to the Curvemeister website showing you how to use the skin swatch system to see if you are close for the right white balance in a photograph.

My recommendation is to shoot RAW but in every situation always get a custom white balance.

My favorite way for getting a custom white balance is using my ExpoDisc.

ExposDisc goes in front of the lens and then you use it to get an incident reading rather than a reflective reading of the light.

Notice the direction of the light hitting the subject.  You move to the same position to get the light reading below.

Point the camera toward the direction of the light that is falling on the subject. 
I have found if the subject is facing me and the light is from the side, I face the camera with the ExpoDisc on it so it is pointing towards the camera position.  The chart above is to help you understand the concept, but you can modify it.

One way you can modify it is as long as the light is the same where you are standing, then you could cheat and take a reading from where you are.  The problem that can arise is if they are lit by Window light and the camera position is in the shade then your color balance will be off if you do not take it from the subject's perspective.

Use the wrong color sometimes

Yes, I just said to not use the proper color sometimes.

Night scene

Most all Hollywood movies that show night time scenes are often shot during daytime.  How do they achieve that look?  Set the camera to incandescent which will give you a blue cast making everything look like it is lit by moon light. Next underexpose the scene.  I find this is where a spotlight on the subject and underexposing the rest of the scene can help you set the mood for a night scene.


High Tech Look

If you have daylight in the scene and you light the subject with bright incandescent light and set the camera to incandescent then the subject with be the correct skin color and the area lit by daylight will be blue.

Under florescent lights if you have the camera set to incandescent they will turn blue as well, just a different blue than with daylight. If you light the subject with incandescent you get that blue affect.

CSI Miami uses the technique of letting the fluorescent light go blue by lighting the cast with incandescent and setting the camera to white balance for the incandescent.  This way everything lit by the fluorescent goes blue while skin tones look natural.

Sunset 

You can fake a sunset by putting a CTO filter over the camera lens making the scene look orange.  Then you can use a flash and put a CTB filter over the flash which puts out a blue light.  The subject looks correct with the skin tones but the rest of the scene is orange like a sunset.

Amateur Look

When you are not sure what you are going for and you just let the camera do it all, this is the surest way to have the color of your photos announce you are an amateur.  Want to take your game up to the next level, learn how to get correct skin tones and when to go for an effect.

Why so many photographers choose to 
shoot Black and White

One of the biggest signs for pros who don't know how to get good skin tones is to go to black and white. This is the easiest way to eliminate the sign they are still an amateur when it comes to color balance.

This is why I think so many wedding photographers shoot black and white. I think they are not using it so much for an effect or creating a mood, but they don't know how to get the color correct.  Most likely they shot everything in JPEG and if you are off with the color in JPEG correcting it in post production is very difficult as compared to working with a RAW image.