These are the steps I went through yesterday teaching the camp photographers for WinShape Camps. These were photographers with all levels of skill. We wanted all of them to have a good starting point.
Step One: Quality set to highest
Set your camera to the biggest and best quality. For most of the people and the cameras they had setting the camera to JPEG Fine on the Nikon cameras and JPEG "L" on the Canon cameras. The reason for this choice is if there is a great shot they want to use later for poster, then it needs to be the best quality. If you can edit RAW images I recommend this over the JPEG setting. You can go back and fix white balance if you screw that up when you shoot RAW.
You cannot up size a photo without the possibility of pixelation.
Step Two: Use Auto ISO
AUTO ISO
Since the quality of the ISO really has little impact on the quality of the image AS COMPARED to the major quality shift with film, I have my camera normally set to AUTO ISO most of the time.
I will go in to the menu and change this AUTO ISO settings.
| Nikon D3S menu ISO settings |
What is the take away?
Before the digital camera, to use ISO in a creative way meant to change film stock. You also could not shoot AUTO ISO. Due to this no longer being a hindrance I now see the ISO setting the way I see aperture and shutter-speed. It is another creative tool giving me more options to get photos that in the past were not possible.
Step Three: White Balance
Before taking any photos of a new situation we make a custom white balance to get the best possible skin tones.
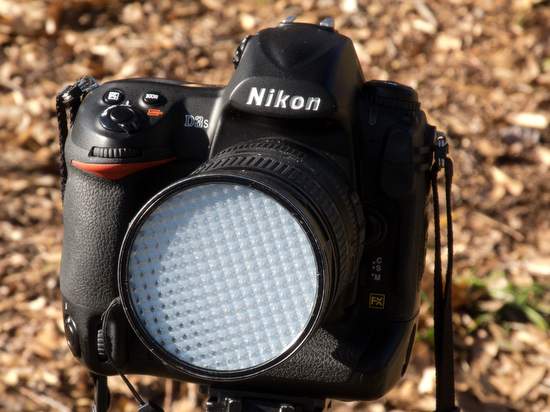
My favorite way for getting a custom white balance is using my ExpoDisc.
 |
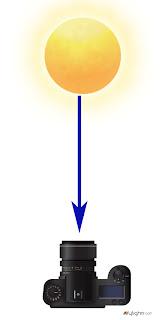
| ExposDisc goes in front of the lens and then you use it to get an incident reading rather than a reflective reading of the light. |
 |
| Notice the direction of the light hitting the subject. You move to the same position to get the light reading below. |
 |
| Point the camera toward the direction of the light that is falling on the subject. |
One way you can modify it is as long as the light is the same where you are standing, then you could cheat and take a reading from where you are. The problem that can arise is if they are lit by Window light and the camera position is in the shade then your color balance will be off if you do not take it from the subject's perspective.
You can use a White Card and get the reading off of this to set your camera. Since every camera has a different process I recommend reading your camera manual for how to set the White Balance.
Better than the white card is a 18% Grey Card. Many of the camera stores sell this as a cloth to clean your lenses as well.
Step Four: Use Flash
Many times outside you have people with poor light on their face. One of the best examples of this is baseball caps. The easiest way to fix this is to use fill flash.
Refer to your camera's manual on how to adjust the power of your flash. I recommend starting about -1 stops under with the flash. You need to experiment with this to get the results you like. Remember for the most part most pop up flashes on cameras are only good up to about 10 feet outside.
If you use the flash where you have done a custom white balance you could do another one with the flash or just use the flash preset white balance which often is a lightning bolt icon.
Flash with high ISO
I have discovered a couple of things about using flash with a high ISO.
Once I discovered the affects flash has on shadow, I
started to shoot with it in situations where noise was a real
possibility and I wanted to diminish the affect of it. I will often
shoot with the flash -1 to -3 stops under on the flash compensation
setting.
Step Five: Starting Shutter Speeds
Sports
One of the settings I change in the AUTO ISO is the minimum shutter speed. When I am shooting sports I prefer shutter speeds of 1/2000. So I will set this and then shoot in Aperture mode.
The camera will override the shutter speed of 1/2000 and go lower if the ISO gets maxed out at ISO 12,800. If you prefer not to shoot at such a high ISO then you can choose something lower like ISO 5,000 and then shutter speed would drop from 1/2000 much sooner than it would for me.
Flourescent and Sodium Vapor
When shooting under Florescent and Sodium Vapor I normally set the minimum shutter speed to 1/100. You see both of these type of lights are really like flashes. They are flashing about 60 times a second and if you shoot faster than 1/100 you will get color shifts due to catching the light in between cycles.
Tips for the official photographer of an event
We went out to roam the campus shooting different situations and even did one where 500 people were in a gym listening to the speaker.
Most everyone of the photographers I had to go and talk to them about going up front and taking pictures not just of the speaker, but the audience listening.
If you stay in the back you end of with the back of the heads of the audience and the speaker is all you can see of their face.
If you are the "official photographer" then people expect you to be moving around. If you are there as a participant this can be distracting and make people wonder what you are doing.
I shot photos as well to show the camp photographers how to go to the front of the room and what to photograph.
We also talked about once the meeting is over or not yet started are the best photos. People hanging out and just enjoying each other.
More tips on photos to take to tell the story are here on my earlier blog Variety is the spice of life.
Better than the white card is a 18% Grey Card. Many of the camera stores sell this as a cloth to clean your lenses as well.
 |
| Nikon P7000 shot with -1 fill flash |
Step Four: Use Flash
Many times outside you have people with poor light on their face. One of the best examples of this is baseball caps. The easiest way to fix this is to use fill flash.
Refer to your camera's manual on how to adjust the power of your flash. I recommend starting about -1 stops under with the flash. You need to experiment with this to get the results you like. Remember for the most part most pop up flashes on cameras are only good up to about 10 feet outside.
If you use the flash where you have done a custom white balance you could do another one with the flash or just use the flash preset white balance which often is a lightning bolt icon.
Flash with high ISO
I have discovered a couple of things about using flash with a high ISO.
- With TTL flash and high ISO I can easily balance these so I can shoot with my 85mm f/1.4 for example.
- When you use flash and it is illuminating most of the scene the dynamic range of the photo is compressed. What this means is most of the time the f-stop range of exposure from the highlight to the shadow is more compressed and therefore the noise is the shadows is much less than when shot without the flash.
| Nikon D3 - ISO 200 - f/1.4 - 1/160 and Nikkor 85mm f/1.4. Also off camera flash using the Nikon SU800 to trigger the Nikon SB900 flash in TTL mode. The flash is set for -1 stop compensation. In addition I also was using the Radio Popper system to be sure the signal was consistently getting from the SU800 to the SB900. |
| Nikon D3S - ISO 6400 - f/4.8 - 1/100 and Nikon 28-300mm. Also off camera flash using the Nikon SU800 to trigger the Nikon SB900 flash in TTL mode. The flash is set for -1 stop compensation. In addition I also was using the Radio Popper system to be sure the signal was consistently getting from the SU800 to the SB900. |
| Nikon D3S - ISO 6400 - f/5.6 - 1/100 and Nikon 28-300mm. Also off camera flash using the Nikon SU800 to trigger the Nikon SB900 flash in TTL mode. The flash is set for -1 stop compensation. In addition I also was using the Radio Popper system to be sure the signal was consistently getting from the SU800 to the SB900. |
Step Five: Starting Shutter Speeds
Sports
One of the settings I change in the AUTO ISO is the minimum shutter speed. When I am shooting sports I prefer shutter speeds of 1/2000. So I will set this and then shoot in Aperture mode.
The camera will override the shutter speed of 1/2000 and go lower if the ISO gets maxed out at ISO 12,800. If you prefer not to shoot at such a high ISO then you can choose something lower like ISO 5,000 and then shutter speed would drop from 1/2000 much sooner than it would for me.
Flourescent and Sodium Vapor
When shooting under Florescent and Sodium Vapor I normally set the minimum shutter speed to 1/100. You see both of these type of lights are really like flashes. They are flashing about 60 times a second and if you shoot faster than 1/100 you will get color shifts due to catching the light in between cycles.
| Nikon D3 - ISO 6400 - f/2.8 - 1/100 and Sigma 120-300mm f/2.8 |
Tips for the official photographer of an event
We went out to roam the campus shooting different situations and even did one where 500 people were in a gym listening to the speaker.
Most everyone of the photographers I had to go and talk to them about going up front and taking pictures not just of the speaker, but the audience listening.
If you stay in the back you end of with the back of the heads of the audience and the speaker is all you can see of their face.
If you are the "official photographer" then people expect you to be moving around. If you are there as a participant this can be distracting and make people wonder what you are doing.
I shot photos as well to show the camp photographers how to go to the front of the room and what to photograph.
We also talked about once the meeting is over or not yet started are the best photos. People hanging out and just enjoying each other.
More tips on photos to take to tell the story are here on my earlier blog Variety is the spice of life.


No comments:
Post a Comment