Monday, January 30, 2012

Ambient Light and Flash Combined

Hey Stanley, can you back up and explain this Ambient Light and under 3 stops thing you mentioned in that last post?

Available Light only (Nikon D3S, ISO 12,800, f/5.6, 1/40, 28-300mm)
I had a few people write to me asking similar questions. So, let's delve into this subject of ambient light and under or over exposing with a flash.

Without a flash point the camera at the subject.  I have my camera set for Matrix Metering, Aperture Priority and this gives me a reading of f/3.5 with 1/10 shutter speed and ISO 200. FYI this is not what the setting was in the above photo, this just shows you where to find the reading on the camera.
Step One: Get An Ambient Reading

You need a starting place to be your base exposure. Everything else will relate to this exposure.  I took a picture of the top of my Nikon D3S with a 28-300mm Nikkor lens.  I just pointed across the room for this example. With ISO 200 I have a f/3.5 aperture at 1/10 shutter speed. This is my Ambient Reading with no flash.

Step Two: Use your Nikon SB900

You can use whatever hotshoe flash for your manufacturer you have, but it must be a TTL flash or this will not work as easily.

Step Three: Slow or Rear Curtain Sync

You need to set your flash setting as I have done in the above photo to Slow or Rear Curtain Sync. This tells the flash and the camera that please use the Ambient setting on the camera and then add the flash to the exposure without over exposing the photo.

Fill Flash normal setting (Nikon D3S, ISO 12,800, f/5.6, 1/20, 28-300mm)
Take a photo with this setting as I did in the photo above here.  This will basically light everything up.  I am bouncing my flash with the diffusion dome on the flash for this photo.  It is still getting light from the window, but the flash is filling in everything thing closest to the camera.  The background is brighter, but since it is further from the flash it is not as bright as the statue.

Step Four: Adjust the flash power under 3 stops

The reason I choose to go 3 stops under is this is as low as I can go in TTL mode and the camera figuring it all out for me. 

On the Nikon SB900 you push the button in the far upper left and it will cycle all the way through under and over exposures. Stop on the -3.0 EV.  EV stands for Exposure Value.
With the camera not changing the setting and then telling the flash to underexpose by -3.0 stops you get the results here.

Fill Flash set -3.0 (Nikon D3S, ISO 12,800, f/5.6, 1/30, 28-300mm)


You can also adjust the camera exposure and the flash exposure and get even more results.
Silhouette

Reveal

Silhouette and Reveal

Again I must give credit to Dave Black for coining this terminology.  I have been doing this for years, but loved how he made this sound very artistic, by using a french word it really sounds artistic.

Here is how you do this photo.

Step One: Take a normal ambient reading

Very similar to the above example.  Everything will look normal.

Step Two: Underexpose the photo by 2 or three stops

On the Nikon D3S the button to the right of the shutter you depress which lets you stay in Auto setting like Aperture Mode and underexpose or overexpose an image.

When you depress it should look like this if you have never done it before.  If you see something else, this maybe why your photos are under or overexposed.

With it depressed turn the wheel on the back of the camera.  Here it is at -1 stop.  I would shoot -1 stop, one at -2 stops and even -3 stops and pick the one that the subject is best silhouetted.

Step Three: Set flash setting to just the opposite + stops


If you picked three stops under then you are going to set your flash to three stops over.  You see now where the flash hits the subject will give you a perfect exposure. 

[-3] + [+3] = 0

For the photo above I had the Nikon SB900 off the camera being fired by the SU800 on my camera.

Nikon SU800 triggers your SB900 off camera using infrared signal. Here you can control up to 3 different settings of multiple flashes.  Here if I had three flashes and each one of them setup to work on A, B or C then I can control them from the camera individually.  For the above example I used a SB900 and SB800 both going off with +3 Flash setting as compared to the -3 on the camera setting.  It doesn't matter if I had 100 flashes the camera will only let them fire all together only +3 stops.  I love this technology.
Silhouette

Reveal

Sunday, January 29, 2012

12,800 ISO noise looks different with flash

Dave Black was speaking at a seminar about using his Nikon Speedlight SB900 flashes instead of his Studio heads to light a basketball court and an ice rink.

I was on the edge of my seat absorbing what he was talking about.  I didn't go out and buy more SB900 flashes and use them instead of my strobes for one reason, clients were not paying for sports coverage as in years past.

But what I was listening to was some of the reasons it was working for Dave Black.

First, by just having his strobes just a little over ambient light level he was able to get better color and avoid the problem with sodium vapor lights. Dynamic range under flash is the greatest light spectrum. Dave Black was shooting his flash just enough over the ambient to affect the color and help shift it to the 5000º Kelvin range.

Sodium vapor lights flicker and when you are shooting above 1/100 shutter speed you can get color shifts to all or just a band through a photo.

Another thing of shooting with the Nikon Speedlights was the ability to shoot at just about any shutter speed.  So in ice hockey Dave was able to freeze the puck by shooting at 1/2000.  The basketball was sharper as well for his basketball.

Available Light only (Nikon D3S, ISO 12,800, f/5.6, 1/40, 28-300mm)
I began to experiment with using strobes with high ISO since then and found some things that it benefits other than just for sports.

I shot here the same photo three different ways. I have the statue lit by window light.  I shot it with nothing but the window light and any bounce back fill is just from the room.  I shot it at ISO 12,800.

As you can see the highlights look good and it is in the shadows that you will notice more noise. 
Fill Flash set -3.0 (Nikon D3S, ISO 12,800, f/5.6, 1/30, 28-300mm)
By putting my SB900 with the dome on the camera and just bounce flashing I was able to get a little different results.  I underexposed the flash by -3 stops.  I did this by adjusting the setting on the back of the flash.

As you can see the shadows are now not totally black as in the first photo.

Then I shot also one more photo with the flash at a normal setting which gave me a lot more light.  This wipes out the shadow detail completely.  However, since I am using it in rear sync mode it was still complementing the window light and not over powering it.

Fill Flash normal setting (Nikon D3S, ISO 12,800, f/5.6, 1/20, 28-300mm)
You really need to zoom in to see some of the noise issues with each photo.The place the noise shows up the most is in the green in the background.  You can see a lot of noise the more it is in the shadow.
Available Light only (Nikon D3S, ISO 12,800, f/5.6, 1/40, 28-300mm)
Fill Flash set -3.0 (Nikon D3S, ISO 12,800, f/5.6, 1/30, 28-300mm)
As you add more fill light (-3 stops) the noise diminishes a great deal.
Fill Flash normal setting (Nikon D3S, ISO 12,800, f/5.6, 1/20, 28-300mm)
What I noticed is when you add Nikon Speedlights to high ISO photos like these shot at 12,800 ISO noise diminishes. 

Less Flash output at High ISO

When you raise the ISO setting on your camera, every stop you raise it the flash only needs to put out half as much light as it did.  If you leave a Nikon D3S on auto ISO and the lowest ISO is 200, then the minute you put on your flash and turn it on the ISO will drop to 200.

You will need to manually set your ISO to the high ISO you desire.  Here I chose ISO 12,800.

The amount of light needed by the flash to put out at this setting is 7 stops less than at 200.  This also means your flash can increase it's distance of throw by 7 times as well.  This means if your flash only would work at 10 feet at f/4 and ISO 200 you can now get f/4 at 640 feet away at ISO 12,800.

Color Temperature affects noise

I have found from my experience that whenever you shoot with flash you have the greatest dynamic range.  Therefore the noise is less with flash than say incandescent, fluorescent or sodium vapor light. 

Slow and Rear Shutter setting 

On the Nikon system, when you have the flash balance with the existing light then the flash only needs to do a little work, because it is complementing the light not being the primary light.

Why do I shoot with Nikon?

The Canon speedlight system is similar to the Nikon TTL Speedlight system.  You can use Slow and Rear Shutter settings, BUT the higher you go with the shutter speed the flash gets darker and not as consistent as the Nikon system.

My point is if you want to shoot with shutter speeds of 1/8000 with your speedlights, then you better have the Nikon.

Friday, January 27, 2012

Attaining good skin tones with digital cameras


Sepia Tone filter

Bleach Bypass filter

Aged Photo filter

Auto Color with camera.

The color of a photograph can take you back in time, create a mood, or make your work look amateurish.
Instagram
Instagram, in an homage to both the Kodak Instamatic and Polaroid cameras, confines photos into a square shape.  It lets you apply a filter and combined with edge effects and the square format can make a photo taken today look like a nostalgia piece.  You can make it look like the 1920s, 1950s, or 1970s.  The reason for the transformation in time is the photo triggers memories for those who lived during this time or for those people who have found a shoebox or old family albums and looked through the photos.

On the other end of creating a mood is the amateur look.  This is where you have color caste to your photos.  If under fluorescent light they may look green. While inside with incandescent lights you have an orange effect.

If you mix flash with the available light you may have proper light on the objects closest to the camera and then the background has a color shift.

How do you know if your color is off?

Macbeth color chart
 
You can see each square can then be checked to match the known numbers.
There are a few ways to know if your color is off. You can take a picture using the Macbeth Color Checker Chart as I did in the photo above. Then you can use the densitometer built into PhotoShop or Lightroom to compare each color patch the numbers for RGB.

Skin Tone: The telling sign of good color

The first giveaway to the human eye that the color is off will most likely be skin tone.  Look at these photos here. I let the camera figure it out for the first one, which is acceptable on Auto White Balance.  Look at the ones following.

Temp 5100, Tint +14, Camera setting Auto White Balance
Temp 4950, Tint +12, Camera setting Sunny White Balance

Temp 3100, Tint +10, Camera setting Incandescent White Balance

Temp 4700, Tint +75, Camera setting Fluorescent 1 White Balance

Temp 7250, Tint +29 Camera setting Fluorescent 2 White Balance

Temp 5250, Tint +22 Camera setting Custom White Balance off the coffee cup top
There are times when a person is surrounded by a dominate color, like a red wall.  This will tell your camera that you are seeing in red light and will try an compensate giving your subject a cyan tone to their face.

I have done photo shoots where I used strobes and still needed to do a custom white balance because the ceiling, floor or walls were all creating a color cast that made the skins tones not look correct.

Skin Tone Swatch
You can find online skin tone swatches that you can compare a person's skin to an approximate ethnicity color swatch.  The RGB value for caucasian skin is: R:239, G:208, B:207.  Now the numbers may be darker or lighter do the the light on the skin, but the numbers will generally go up and down uniformly. 

Here is a link to the Curvemeister website showing you how to use the skin swatch system to see if you are close for the right white balance in a photograph.

My recommendation is to shoot RAW but in every situation always get a custom white balance.

My favorite way for getting a custom white balance is using my ExpoDisc.

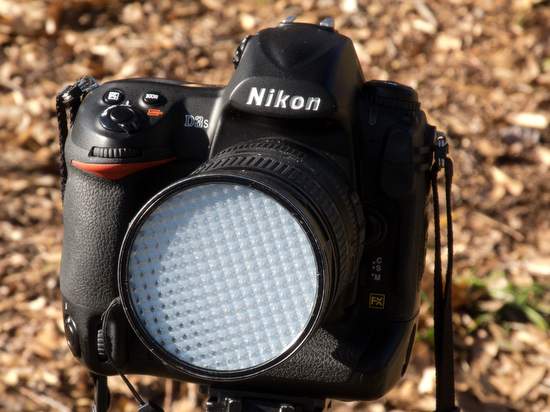
ExposDisc goes in front of the lens and then you use it to get an incident reading rather than a reflective reading of the light.

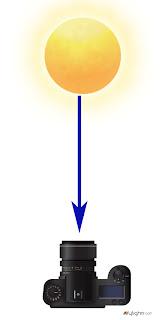
Notice the direction of the light hitting the subject.  You move to the same position to get the light reading below.

Point the camera toward the direction of the light that is falling on the subject. 
I have found if the subject is facing me and the light is from the side, I face the camera with the ExpoDisc on it so it is pointing towards the camera position.  The chart above is to help you understand the concept, but you can modify it.

One way you can modify it is as long as the light is the same where you are standing, then you could cheat and take a reading from where you are.  The problem that can arise is if they are lit by Window light and the camera position is in the shade then your color balance will be off if you do not take it from the subject's perspective.

Use the wrong color sometimes

Yes, I just said to not use the proper color sometimes.

Night scene

Most all Hollywood movies that show night time scenes are often shot during daytime.  How do they achieve that look?  Set the camera to incandescent which will give you a blue cast making everything look like it is lit by moon light. Next underexpose the scene.  I find this is where a spotlight on the subject and underexposing the rest of the scene can help you set the mood for a night scene.


High Tech Look

If you have daylight in the scene and you light the subject with bright incandescent light and set the camera to incandescent then the subject with be the correct skin color and the area lit by daylight will be blue.

Under florescent lights if you have the camera set to incandescent they will turn blue as well, just a different blue than with daylight. If you light the subject with incandescent you get that blue affect.

CSI Miami uses the technique of letting the fluorescent light go blue by lighting the cast with incandescent and setting the camera to white balance for the incandescent.  This way everything lit by the fluorescent goes blue while skin tones look natural.

Sunset 

You can fake a sunset by putting a CTO filter over the camera lens making the scene look orange.  Then you can use a flash and put a CTB filter over the flash which puts out a blue light.  The subject looks correct with the skin tones but the rest of the scene is orange like a sunset.

Amateur Look

When you are not sure what you are going for and you just let the camera do it all, this is the surest way to have the color of your photos announce you are an amateur.  Want to take your game up to the next level, learn how to get correct skin tones and when to go for an effect.

Why so many photographers choose to 
shoot Black and White

One of the biggest signs for pros who don't know how to get good skin tones is to go to black and white. This is the easiest way to eliminate the sign they are still an amateur when it comes to color balance.

This is why I think so many wedding photographers shoot black and white. I think they are not using it so much for an effect or creating a mood, but they don't know how to get the color correct.  Most likely they shot everything in JPEG and if you are off with the color in JPEG correcting it in post production is very difficult as compared to working with a RAW image.


Thursday, January 26, 2012

Burned once not twice

LSU #7 burns the UNC defense in the Chick-fil-A Kickoff game.

LSU's #7 burned the defense of UNC a few times that day and that is why they defeated UNC.
Editorial Note: This is written to help photographers and I hope this helps you to learn from something I do when I am in a difficult situation.

I have just been burned again by a client.  It happens and will probably happen again. I am writing about this because I have watched not just other photographers screw up in these situations, but I have as well.

Why?

In this business I have come to see that even with using solid business practices and doing everything right you can still get burned. The reason is simple you can be right and exercise that right only to burn yourself.

Micah Solomon's blog today talks about "Digging in your heels… to destroy the customer experience." I have stood up for certain principles in the past and was right and the customer was wrong. I lost some of those customers.  You need to be very careful when you decide to dig in your heels.

There are times when you must think strategically. Where do you want to go in your life? How will you grow your business if you are always right?

Just like the football game photos, if you get burned once you can still win the game, get burned too many times and you loose. 

My latest experience

I have a couple of agencies that call me for work. The way this works is they get a cut of the gross, because they booked the job and found the client.

The agency was courting a new client. They contacted me before they had a signed contract to see my availability.

They then sent me a terms and conditions document that outlined the Usage Rights last Friday. I agreed to these terms.

I get the contact names and time they are available Tuesday afternoon.  I then shoot the assignment Wednesday morning and transmit the images on Wednesday late afternoon to my agency.

Within a few minutes of the images transfering to New York I send an email letting them know everything is there, the photos and model releases. I get this email:
hi Stanley,

You are great !!! made us look good.. here..:)  I finally landed this corporate account, hoping she would give us more work, they just want to try us out to see how we do regarding our services, good photographers and professional.. !!! she is talking about a potential another round of 4 or 5, finger crossed

Re:  Rights
The client couldn't do __________. . .
There was a change in the agreement after the images were delivered. I was furious and steaming mad. I had to get up from my desk and take a walk outside.  I knew from past experiences like this I needed to calm down and really think this through before formulating a response, which was needed.
I let her know that the rights change needed to normally be compensated and was very disappointed.  Then she responded to my email:

You are right.. this was just came to me last night before we signed the contract, we did not sign it as of yesterday, so either I pulled the plug or take the job..

Going forward with this client.. this is the rights !
I can and still have the right to say they cannot use the photos, because this is not what I agreed to as the terms.

My choices and possible outcomes

I have the right to say they can not use the photos. The terms and conditions that I agreed to are still in place, but if they are not going to live up to them, then I can refuse the use of the images for their purposes.

I can say nothing and just take the deal. For many struggling photographers this is where they are often caught.  They have bills to pay and don't have much room to turn down any offer--at least that is what they think.

Phone call

Robin Nelson
I picked up the phone and called my good friend Robin Nelson who is also a very talented photographer. Both of us do work for similar clients and when I am booked and someone calls for an assignment, Robin is one of the names I give to my clients.

Robin and I need each other as sounding boards.  I think without someone like Robin that I can call and helps me think through the scenarios I would have screwed up even more relationships with clients than I have ever done.

This is why it is so important for photographers to join organization like American Society of Media Photographers. This is where you find colleagues who can be your sounding board and you can be theirs.

When you are called by a photographer you will soon realize you have an ability to see the solutions that when you are the one in the quandary cannot see. The reason is you have nothing usually at stake and you are not emotionally involved.

Who is to blame here?

The client isn't the real problem here it is the agency where the ball was dropped.  They had time to communicate to the photographer.

This is important to understand what relationship is at stake here. The agency needs two thing to survive. They need clients and they need photographers to do the work.

I have lived long enough to now understand how negotiations take place. I have accepted terms and conditions that I normally wouldn't do because I just had a car repair I didn't expect or an unexpected medical expense.

I talked with the agency and wanted to be sure they understood I was quite upset with the change in the terms. I also let this one go because I want an ongoing relationship with the agency.

Perfection wanted--Mercy needed

The agency hires me and expects me to deliver every time, which I do for them. However, I have had cameras fail me in the past.

I had a Hasselblad camera screw up a photo shoot in the days of film.  The lens had been left in a car and got so hot that the oil that lubricates the lens became like a liquid and flowed onto the aperture blades and made them stick.  All of my photos using studio strobes were over exposed.

It was some portraits that we had to reschedule and shoot again, but it wasn't a pleasant experience.

Friends of mine have shot weddings and the film was dropped off on a Monday at the post office to be delivered to the lab.  The semi truck of a lot of photographers weddings was on it's way to the lab that week and caught fire.  Hundreds of weddings were lost that week.

Thank goodness for digital both of those scenarios can't happen now, but other things can go wrong.

If you want some mercy extended to you in the future you too need to be careful as to how you deal with forgiveness yourself.

The agency apologized and while I still am disappointed I am able to move on with my life.

"Burn me once shame on you, burn me twice shame on me" is what my good friend Tony Messano reminded me a few years ago.  He too gets burned by clients. There is a certain amount of trust that you have to have in a business relationship.  Tony said I will take a risk once, but not twice.

Next Time

I will have it understood that I will not allow changes in our terms without compensation.  If it happens a second time and I do not take actions then I will be communicating that I can be bought at any price.

I do not believe I have sold out by letting my agency slide on this one, but if I continue to let this same behavior continue then I am a fool.

When it happens again, you will be better prepared. Football teams watch game footage of the teams they will play so they will have seen most of the plays before. It is one thing to be beaten by a new play and another thing to loose by something you have seen before.

Got to be flexible

While you can try and run your business by a set of rules, everything is not so black and white. When you are flexible you are communicating your willingness to work with someone. You are taking into account the situation and not selling out, but trying to make things work.

I hope by sharing this with you that you are now aware that negotiating is an art and not a science. You have to use your heart, mind and as I do often a community of other creatives to be my sounding board.

Tuesday, January 24, 2012

Roasting Coffee and Multimedia have a lot in common

This is Arabica coffee on the plant just before it is picked.  The pickers go through the plant picking the red berries leaving the green for later. (Nikon D3S, ISO 8000, f/8, 1/400, 28-300mm)
I went to Mexico last year to cover the coffee growers and help them tell their story. The story was to talk about how they were able to turn around the industry in their communities. Prior to Café Justo (the Coffee Cooperative group) being formed the coffee growers were going North to cross the border to look for work so they could feed their families.

Photographers I think are struggling like the coffee growers when they were not roasting their coffee but selling to intermediaries who then sold to the roasters.  They were struggling.

Photographers I think are going through a similar opportunity when it comes to multimedia. I define multimedia as combining still images with audio and/or video.  In the old days we had slide shows where multiple projects were being synced for conferences and workshops. With the web today the world is your audience so you no longer are restricting the audience as we did in the past.
This is the Arabica Coffee in the bushell before it has the outer shell stripped off. (Nikon D3S, ISO 12,800, f/5.6, 1/125, 28-300mm)
The coffee growers of Just Coffee cooperative were exploited by the coyotes before they formed.  They were being paid $35 a sack.  Once they formed they paid themselves $130 a sack and today they pay themselves $160 that is $1.60 per pound.

You see he who roasts the coffee makes the money.  The cooperative bought a roaster and due to this expense they went from only 20% of the total price that went to the farmer to 100%. Watch the video below to understand their story.


Photographers are similar in that who publishes a story is where the money rests.  When photographers are putting together the complete package they can increase their income dramatically just like the coffee farmer.  Multimedia is the roasting process for the journalist.

When I started putting these packages together is when I truly started to feel like a visual journalist.  I no longer was handing over raw material.  When you do the interviews and put the whole package together you really feel like you are telling the story on a whole different level than just producing the elements for a story.

While the learning curve is quite steep the rewards are even greater.  As you start to produce packages it will influence how you shoot and make you a better photographer.

Becoming a producer made me a better photographer

You learn to shoot more.  You realize you need more images to tell a story than you needed for a print piece. You need transition shots, details and sometimes more variety to help move the story visually while the audio is laying the foundation.

You listen more. For the most part it is the audio that drives the story and not the visual. You learn how important a good quote is from a person.

You ask better questions. When you realize you need good audio for the story you start to ask questions and when editing realize what you would change. This changes the next time you interview someone.  You are more present and forming the story much earlier in the process.

You are aware of verticals and horizontals more. When you have a rectangle screen to fill you don't want to waste that space with nothing, so you learn to shoot even more horizontals. Since most of my material is also going to print, I still need good verticals.  Now if I see a photo that I might have just shot as a vertical, I now make sure I have it as a horizontal.


The coffee growers of Café Justo. (Nikon D3, ISO 500, f/5, 1/1600, 14-24mm)
You are aware of the quality of sound. I have learned to close doors and not interview people in front of a water fountain. I hear little noises that I didn't hear before. While this helps me get better audio it also impacts how I see. When you cannot get rid of a noise you then need a visual to help the audience resolve the noise. If you hear a chicken in the background then having a photo with the chicken will help the audience not hear this as an annoying noise, but to give context because you helped with a visual.

If you are like the coffee growers looking for work somewhere else because your pay for your work is low, look to become the roaster like they did--learn a new skill. I recommend multimedia, but it could be web design and helping people put together websites.

WARNING!!!

You are not going to go and buy the software and tomorrow start charging clients for this work.  I believe it takes about a year or two to master the software the sound gathering and most importantly developing the visual storytelling ability at a different level--the final product.


Monday, January 23, 2012

Website Tips for Photographers

It is important to me to have the navigation always visible so people can quickly find what they need.
If a potential customer were to find your website would they hire you?

A photographer’s website is to showcase their work and help them book jobs. I have been designing my website for 17 years and I have learned a few things through those years.

Here are some tips I have for a photographer’s website.

Contact Information


Email: stanley@stanleyleary.com
LinkedIn: Stanley Leary
Skype:  StanleyLeary
Twitter: Stanley Leary
Facebook: Stanley Leary

How does someone reach you? This should be all through the website and not something hidden. Remember at any point when the customer is ready to hire you after reviewing your work they need to be able to find out how to do so with ease. Sometimes people already are wanting to hire you and go to your website to find your contact information, don’t make them jump through hoops to find it.


I think there are two ways a customer wants to contact you, email and by phone. Remember you need this to be easy and not cumbersome. If you fear getting spam email and do a lot to protect yourself, but in the process make it burdensome for the potential customer—you may not have a customer.


Examples of your photography

I think people are searching for very specific needs to fill. If they need a headshot they want to see some headshots. If they need an event photographer, they want to see examples of events you have covered.

I recommend dividing your work into categories that make it easy for someone to find example of what they are looking to hire a photographer to do for them.


Tear Sheets

Having a few examples of your work being published by clients helps the potential customer know they are not the first to take a risk on you.  This helps build some credibility.

Client Comments


Having a few of your past clients writing about your work also helps. There are a few things that can help make these better.  When a customer talks about how you solved a problem they are helping potential clients understand something beyond your portfolio. They understand something about how you work and your customer service.

Having comments that talk about how nice your are and easy to work with are nice, but not as compelling as description of how you made their day.
The inverted pyramid is a metaphor used by journalists and other writers to illustrate the placing of the most important information first within a text. The format is valued because readers can leave the story at any point and understand it.
Inverted Pyramid

Put your strongest photos first. When they go to the next photo let is show another skill. Look at these two examples for portraits.  See how I would lead with the little boy and then follow with the lady.

I would most likely lead with this photo on portraits.
I might follow the photo with this one because now this shows I can use strobes and mix it with daylight. Art directors would like to see the variety of skills.
This photo shows my ability to create a concept out of nothing and make it happen in the studio.
This photo helps to show how I can use light to photograph a very dark subject (the hand gun) and grab your attention.
This photo shows I know how to photograph lasers in a research lab.  This is a skill few photographers have.
To get this photo I had to get access. This shows I can be trusted in very intimate moments. The family gave me their permission.
Remember your portfolio shows more than just that you can make pleasing photos.  As you can see each of the above photos tells more about me than I can get a cool photo.


Client List

If you have been working with a variety of clients this is good to showcase.  It helps to separate you from the photographer just starting out and not having much experience.  It also helps clients call their friends at those companies and see what experience they had with you and would they hire you again.  Don’t list a company if they are not in good standing with you.

Bio

You need to introduce yourself to your audience. This is where you help set yourself apart from other photographers in ways that your pictures cannot. This is where you may give some of the reasons why you pursue certain subjects. This is where you may want to tell everyone you have degrees in the topics that you cover regularly. This helps them understand how you are a expert on maybe what they want to hire you to photograph.

Some clients will hire you because of things you have in common in your bio. All clients that visit this page are wanting to know as much as they can about you to help them feel more comfortable about the decision to hire you.  This will give them talking points when they justify to their superiors why they are hiring you.

Wait there's more

I like using that phrase. When we moved to our new house our daughter enjoyed taking some of our close friends through the house.  The house is larger than our previous home, so she was excited to say after a few rooms, but wait there's more.

There is more things to do but I will stop here for now and blog about other tips later.