Showing posts with label fill flash. Show all posts

Monday, April 21, 2014

How did your Easter family photo come out yesterday?

Fujifilm X-E2, 18-55mm, ISO 200, ƒ/8, 1/180, flash is set for -1 EV
If you look closely you will notice another family on the opposite side taking photos.  They get the direct sunlight. By standing on this side of the cross we were not staring into the sun and our faces were in the shade. All I did was to add fill-flash with the pop-up camera flash on camera. While not my preferred placement of a flash did work OK for this family photo after church.

The photo was taken at 12:34 pm. One of the worst times to take a portrait of people outside.

Fujifilm X-E2, 18-55mm, ISO 5000, ƒ/5, 1/500
Now last Thursday our family went to the Alive After Five event that we have from April till next fall every Thursday in downtown Roswell. After we ate at Mac McGees went strolled around and found these two Union Soldiers. I took this photo without a flash. The main difference is the time of day I took the photo. This is taken at 7:17 pm and the sun sets at 8:10 pm.  Due to the sun being below the buildings there was no direct sunlight—just tent light effect. This is where the whole sky is lighting the subject with equal light from all directions. Even under the hat the guys face is OK without a flash.

With off-camera flash 

Without flash
Remember that when taking pictures outside, especially during the midday sunlight, be sure and use a flash. Don't think of flash inside as much as outside.

Tuesday, June 25, 2013

Flash or not to flash

Nikon D4, 70-200mm,  ISO 10000, ƒ/2.8, 1/800 with Nikon SB900 on camera flash fired at slow sync
While at first glance this photo is quite acceptable the main light is now my flash and not the stage lighting.

Nikon D4, 70-200mm, ISO 2500, ƒ/2.8, 1/100
The second shot is available light and shot only 1 minute prior to the flash shot. This is around 9 pm and on one of the longest days of the year, so there is still some sunlight as the sun sets.

There is not as much "Stage Light" as there will be after the sun sets.

Nikon D4, 70-200mm, ISO 2200, ƒ/2.8, 1/320 with fill flash from SB900.
Here I went to the other side of the stage and shot a similar comparison of the flash and no flash.

Nikon D4, 70-200mm ISO 12,800, ƒ/2.8, 1/400
The one reason I was using the flash to begin with is the singer Marc Broussard's hat is casting a nasty shadow and most of the time his eyes are hard to see.  You can see the shadow in the second available light shot.

While the flash fixed this issue as long as it was on my camera it just ruined the mood of the stage lighting.

Nikon D4, 70-200mm, ISO 12800, ƒ/2.8,  1/100
While I now decided to shoot the rest of the performance with available light I now had another problem the light on the lead singer's face only looked good occasionally   Most all the time the light looked like this when he sang.  You see a bright spot on his chin and his eyes are in a shadow.

Nikon D4, 70-200mm, ISO 12800, ƒ/2.8,  1/80
Now to get the best photos of the lead singer Marc Broussard I had to pick the best moments where the light and the emotion came together. I think I have this here when Marc looked up into the light and also the emotion in his face worked really well.

Now you know why so often a spot light is used to follow the main character on a stage with stage lighting. You also can see why many theaters have foot lights. These are lights on the floor of the stage at the front aimed up at the actors to get rid of the shadows under hats and those with deep set eyes.

When there is still not enough light at ISO 12800

I have been in the darkest places like Swayze's Venue in Marietta.  Here the punk band moved around so much that I needed flash.

Nikon D4, 14-24mm, ISO 4000, ƒ/5.6, 1/60
Here is an earlier post in case you want to see when I do use flash and how I used it off camera: http://blog.stanleyleary.com/2012/08/nikon-d4-iso-12800-still-not-enough.html.

Tuesday, June 05, 2012

Studio strobes or Hot Shoe Flash outside

Walk and Talk with Hot Shoe Flash 

One of my favorite shots to do for organizations is doing what I call the "Walk and Talk." This is where I have two or more people walk next to each other towards me.

I encourage them to barely feel each other next to each other. This keeps them from walking further and further from each other. The closeness to each other also helps communicate they are friends. This is using the body language of touching or almost touching to help communicate their relationship.

Now here are examples I did while teaching in Kona, Hawaii in February this year. These first ones I was showing the students how to use two hot shoe flashes as fill lights.  I have included the assistant carrying the lights for these examples to show you what they are doing as well.

I am talking to the subjects and explaining what I want them to do. No flash went off here.

The photo assistant is carrying a Nikon SB900 and a Nikon SB800.  They are zoomed out to 200mm for the SB900 and 120mm with the SB800.  This helps the light go farther, but also keeps the light mainly on their faces.

Notice the assistant must be pretty close to the subjects for the flash to work properly. In addition to the flashes I am using the RadioPoppers PX system to help relay the infrared signal from the Nikon SU800 on my camera to the flashes.

We switched out the subjects so everyone could experience what it felt like doing this exercise and see it being done.

While showing the class how to use the hot shoe flashes there were a few times where I got ahead of the flashes recycling. By not waiting long enough between flashes (2 sec) the flash wouldn't fire.
Walk and Talk with Studio Strobe

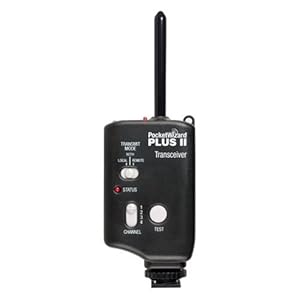
To help everyone see the difference in flashes I also used an AlienBee 1600 being powered by a Vagabond Mini Lithium battery. I was borrowing the Photo Schools radio remotes, but most of the time I now use Pocket Wizard Mini TT1 Transmitter on my Nikon Camera  and have the Pocket Wizard Plus II transceiver on the flashes.


The MiniTT1 will let me shoot at 1/500 sync speed rather than just 1/250.


Now another thing you will notice that is different in these examples is how far away the photo assistant is from the subjects. 


The AlienBee 1600 has the reflector that comes with them on it. So notice that the flash is lighting more of the subjects.  I can change that by just adding a grid, but didn't for these photos.


The flash is set at about 1/8 power. I can almost shoot on motor drive setting for these photos. The reason is the recycle time is so short.


When I shot these photos not a single time did the flash not fire. I think that when it comes to getting the best expression you need to be able to shoot at any moment and not just when your flashes are ready. 


I would highly encourage using the studio strobe over the hot shoe flash for this reason alone.
Just like I did above, I talk to the subjects and do a few test shots before I have them walk towards me.

After we did some tests to get them moving I then had the start over where they are talking to one another.

As you can see it doesn't take long for people to relax and the photos to look pretty natural.  I would have changed one thing in these photos. I would have had the assistant put the light on a light stand and get the light up a little higher to help avoid the glare in the glasses.

This is just to show that the flashes fired every time. 
Now look at the photos where the flashes didn't fire. Besides there faces in the shade the color on their faces isn't as good. I think that using flashes helps you get the best skins tones outside possible.

Go out and try this yourself.

Often when I am flying around the world it is easier to carry the Nikon SB900 and a Nikon SB800 than carrying the AlienBee 1600 and the Vagabond Mini Lithium battery.  So, depending on the situation I find myself in I can still get the photo with either system.

Monday, January 30, 2012

Ambient Light and Flash Combined

Hey Stanley, can you back up and explain this Ambient Light and under 3 stops thing you mentioned in that last post?

Available Light only (Nikon D3S, ISO 12,800, f/5.6, 1/40, 28-300mm)
I had a few people write to me asking similar questions. So, let's delve into this subject of ambient light and under or over exposing with a flash.

Without a flash point the camera at the subject.  I have my camera set for Matrix Metering, Aperture Priority and this gives me a reading of f/3.5 with 1/10 shutter speed and ISO 200. FYI this is not what the setting was in the above photo, this just shows you where to find the reading on the camera.
Step One: Get An Ambient Reading

You need a starting place to be your base exposure. Everything else will relate to this exposure.  I took a picture of the top of my Nikon D3S with a 28-300mm Nikkor lens.  I just pointed across the room for this example. With ISO 200 I have a f/3.5 aperture at 1/10 shutter speed. This is my Ambient Reading with no flash.

Step Two: Use your Nikon SB900

You can use whatever hotshoe flash for your manufacturer you have, but it must be a TTL flash or this will not work as easily.

Step Three: Slow or Rear Curtain Sync

You need to set your flash setting as I have done in the above photo to Slow or Rear Curtain Sync. This tells the flash and the camera that please use the Ambient setting on the camera and then add the flash to the exposure without over exposing the photo.

Fill Flash normal setting (Nikon D3S, ISO 12,800, f/5.6, 1/20, 28-300mm)
Take a photo with this setting as I did in the photo above here.  This will basically light everything up.  I am bouncing my flash with the diffusion dome on the flash for this photo.  It is still getting light from the window, but the flash is filling in everything thing closest to the camera.  The background is brighter, but since it is further from the flash it is not as bright as the statue.

Step Four: Adjust the flash power under 3 stops

The reason I choose to go 3 stops under is this is as low as I can go in TTL mode and the camera figuring it all out for me. 

On the Nikon SB900 you push the button in the far upper left and it will cycle all the way through under and over exposures. Stop on the -3.0 EV.  EV stands for Exposure Value.
With the camera not changing the setting and then telling the flash to underexpose by -3.0 stops you get the results here.

Fill Flash set -3.0 (Nikon D3S, ISO 12,800, f/5.6, 1/30, 28-300mm)


You can also adjust the camera exposure and the flash exposure and get even more results.
Silhouette

Reveal

Silhouette and Reveal

Again I must give credit to Dave Black for coining this terminology.  I have been doing this for years, but loved how he made this sound very artistic, by using a french word it really sounds artistic.

Here is how you do this photo.

Step One: Take a normal ambient reading

Very similar to the above example.  Everything will look normal.

Step Two: Underexpose the photo by 2 or three stops

On the Nikon D3S the button to the right of the shutter you depress which lets you stay in Auto setting like Aperture Mode and underexpose or overexpose an image.

When you depress it should look like this if you have never done it before.  If you see something else, this maybe why your photos are under or overexposed.

With it depressed turn the wheel on the back of the camera.  Here it is at -1 stop.  I would shoot -1 stop, one at -2 stops and even -3 stops and pick the one that the subject is best silhouetted.

Step Three: Set flash setting to just the opposite + stops


If you picked three stops under then you are going to set your flash to three stops over.  You see now where the flash hits the subject will give you a perfect exposure. 

[-3] + [+3] = 0

For the photo above I had the Nikon SB900 off the camera being fired by the SU800 on my camera.

Nikon SU800 triggers your SB900 off camera using infrared signal. Here you can control up to 3 different settings of multiple flashes.  Here if I had three flashes and each one of them setup to work on A, B or C then I can control them from the camera individually.  For the above example I used a SB900 and SB800 both going off with +3 Flash setting as compared to the -3 on the camera setting.  It doesn't matter if I had 100 flashes the camera will only let them fire all together only +3 stops.  I love this technology.
Silhouette

Reveal

Sunday, January 29, 2012

12,800 ISO noise looks different with flash

Dave Black was speaking at a seminar about using his Nikon Speedlight SB900 flashes instead of his Studio heads to light a basketball court and an ice rink.

I was on the edge of my seat absorbing what he was talking about.  I didn't go out and buy more SB900 flashes and use them instead of my strobes for one reason, clients were not paying for sports coverage as in years past.

But what I was listening to was some of the reasons it was working for Dave Black.

First, by just having his strobes just a little over ambient light level he was able to get better color and avoid the problem with sodium vapor lights. Dynamic range under flash is the greatest light spectrum. Dave Black was shooting his flash just enough over the ambient to affect the color and help shift it to the 5000º Kelvin range.

Sodium vapor lights flicker and when you are shooting above 1/100 shutter speed you can get color shifts to all or just a band through a photo.

Another thing of shooting with the Nikon Speedlights was the ability to shoot at just about any shutter speed.  So in ice hockey Dave was able to freeze the puck by shooting at 1/2000.  The basketball was sharper as well for his basketball.

Available Light only (Nikon D3S, ISO 12,800, f/5.6, 1/40, 28-300mm)
I began to experiment with using strobes with high ISO since then and found some things that it benefits other than just for sports.

I shot here the same photo three different ways. I have the statue lit by window light.  I shot it with nothing but the window light and any bounce back fill is just from the room.  I shot it at ISO 12,800.

As you can see the highlights look good and it is in the shadows that you will notice more noise. 
Fill Flash set -3.0 (Nikon D3S, ISO 12,800, f/5.6, 1/30, 28-300mm)
By putting my SB900 with the dome on the camera and just bounce flashing I was able to get a little different results.  I underexposed the flash by -3 stops.  I did this by adjusting the setting on the back of the flash.

As you can see the shadows are now not totally black as in the first photo.

Then I shot also one more photo with the flash at a normal setting which gave me a lot more light.  This wipes out the shadow detail completely.  However, since I am using it in rear sync mode it was still complementing the window light and not over powering it.

Fill Flash normal setting (Nikon D3S, ISO 12,800, f/5.6, 1/20, 28-300mm)
You really need to zoom in to see some of the noise issues with each photo.The place the noise shows up the most is in the green in the background.  You can see a lot of noise the more it is in the shadow.
Available Light only (Nikon D3S, ISO 12,800, f/5.6, 1/40, 28-300mm)
Fill Flash set -3.0 (Nikon D3S, ISO 12,800, f/5.6, 1/30, 28-300mm)
As you add more fill light (-3 stops) the noise diminishes a great deal.
Fill Flash normal setting (Nikon D3S, ISO 12,800, f/5.6, 1/20, 28-300mm)
What I noticed is when you add Nikon Speedlights to high ISO photos like these shot at 12,800 ISO noise diminishes. 

Less Flash output at High ISO

When you raise the ISO setting on your camera, every stop you raise it the flash only needs to put out half as much light as it did.  If you leave a Nikon D3S on auto ISO and the lowest ISO is 200, then the minute you put on your flash and turn it on the ISO will drop to 200.

You will need to manually set your ISO to the high ISO you desire.  Here I chose ISO 12,800.

The amount of light needed by the flash to put out at this setting is 7 stops less than at 200.  This also means your flash can increase it's distance of throw by 7 times as well.  This means if your flash only would work at 10 feet at f/4 and ISO 200 you can now get f/4 at 640 feet away at ISO 12,800.

Color Temperature affects noise

I have found from my experience that whenever you shoot with flash you have the greatest dynamic range.  Therefore the noise is less with flash than say incandescent, fluorescent or sodium vapor light. 

Slow and Rear Shutter setting 

On the Nikon system, when you have the flash balance with the existing light then the flash only needs to do a little work, because it is complementing the light not being the primary light.

Why do I shoot with Nikon?

The Canon speedlight system is similar to the Nikon TTL Speedlight system.  You can use Slow and Rear Shutter settings, BUT the higher you go with the shutter speed the flash gets darker and not as consistent as the Nikon system.

My point is if you want to shoot with shutter speeds of 1/8000 with your speedlights, then you better have the Nikon.

Friday, October 07, 2011

Example of shooting an event to tell the story

1
This is our family at Nelson's graduation from the US Army Armor School at Fort Benning, GA. 
The event: Our Son Graduation from The US Army Armor School at Fort Benning

I wanted to lead with the most common photo many of us take at a graduation. The family has a group photo with the graduate. I setup the photo before I got into it, so there are some things I did for this first photo that I recommend.
  1. Turn the flash on. In this photo you will quickly notice that had we not had the flash on you would have not seen our graduate's face due to the shadow of the hat covering his face.  If you look closely you will also see how on my daughter the shadows would have been worse around her eyes without the flash.
  2. I used the background to help our family remember a little about the event. Nelson is part of the Cavalry and the statue behind him helps capture that as well as his hat.  In addition the building is the main building for the Armor Division and is called Maneuver Center for Excellence.
  3. Spacing of the group is done so you can see everyone's face but we are not too far apart so that when you take the photo the faces are too small.  
  4. The front to back is well used. We have the family closest to the camera and not right next to the statue or the building.  This is a common mistake many make, because to then show the statue for example and the family you would back up and everone's face would be like the size of a dot in the photo.  
  5. Some angling to not be perfectly parallel to the building.  This helps create depth to the photo.
2
Statue to help communicate this building is the home of the Cavalry.
Detail shots help round out the coverage for the day.  I took a moment and walked around the statue until I found an angle that helped to communicate the power of the statue.  Shooting up really close made it where I was shooting almost straight up.  This helped make the statue look powerful.  Further away would have taken away the emotion of the power.

Look for details and then notice I had a purpose for the photo.  I wanted communicate something.  If you don't know neither will your audience.  Take a moment and think why you want the photo.

3
Capturing emotions helps to communicate
I know that if you go through some of the intense training the military, then you most likely have developed some emotional connections to others on the team.  This was not an event for me, this was our son's graduation.  I needed to show what this school meant to him.  One of the ways to do this is to show people reacting to their friends. 
4
While this was not my son, capturing others enjoying each other help to communicate the bonds formed in the school.
5
When a subject looks into the camera they are looking at the audience.  While I prefer unposed photos of subjects reacting to people and not the camera, sometimes their a moments where the subject engages the viewer.
I notice people using their cameras probably more than most since I do this for a living. What I think this captures is how important an event is to a community.  When I take a photo of others taking photos it shows that to these "photographers" this is important to them. 
6
His role is to help update the social media pages for the unit and here he is getting some visuals for his next post.
7
At attention for the national anthem.
Patrick Lencioni, author of the New York Times best seller "The Five Dysfunctions of a Team" says ceremonies are important for people to move on in life.  He even said that weddings are as much a funeral for those leaving single life as it is about the joining together. 

After hearing Lencioni speak on this topic I realized how important the symbolic ceremony is to helping us with changes in our lives.  The simple act of listening to the national anthem changes everything when you are at a military ceremony. It brings to your mind and heart the commitment of soldiers for our country.
8
Capturing not just a prayer, but for me I see the elected official and the military in this photo.
In the middle of the two officers on stage was the Governor of the State of Georgia. Our elected officials are responsible for calling for war on a country.  It highlights the importance of going to our polls to elect not just someone because they may believe in similar ideals that we want fostered. It means electing someone to office you trust will have the mind and heart to carefully consider what the right thing to do is when we ask these soldiers to lay their lives on the line.
9
I shot this as tight as I could and tried to use the American flag to help communicate this is an elected official.  This is Governor Nathan Deal of Georgia giving the keynote address to the graduating class.
10
Our son Nelson is being given the Iron Man Physical Fitness Award for having the highest Physical Training score in the graduating class.  Nelson scored a 347.  Presenting him the award is Governor Nathan Deal.
The moment Nelson reached out to take his plaque and give a handshake to the Governor is the pinnacle moment in the ceremony for our family.  "The Decisive Moment" was when I thought would be the moment that helped tell the story of the day.  While this is what I thought prior to the days event as the story telling moment, I am not sure that some of the other photos don't do just as good of a job.

If I were transmitting the photos to the Associated Press this would be one of the ones I transmitted, because it is something you would expect to be in the group of photos. While you want to be sure you have it, the editor may pick another photo that works.

A good reason not to use the photo is because it is what you expect--that's right.  Sometimes the reason you don't use a photo is because it is cliche.  Does this photo really make you want to know what is going on?  I think not. Our family likes it, but you reading this article may be just as happy with another photo that is stronger in your opinion.
11
Get the 2nd fiddle as well. While the first handshake by the Governor was cool others should still be photographed. My son didn't spend one moment with the Governor during his schooling, but he did spend time with this leader. Which one will mean more to the graduate? Get both and he will love them both.
12
The standard establishing photo.
Sometimes we get to focused and just get the photo of the handshake at a graduation and then one more photo of the family. Round out the story.  Show where the event took place. It gives some context to the situation.  The thing this photo does better than all the other photos is it gives an idea as to the size of the class and how many of the soldiers families came for the event.
13
This is the only graduation that the Governor has come to this year. It was newsworthy because he came. How do you tell the audience how important it was that the governor was there? Show the media coverage and you help communicate how big of a deal this is to the state of Georgia and the country by taking this photo.

14
When you get the award for "Iron Man" you want your photo to show the "big guns." Putting him in front of the tank works for the Armor Graduate. Notice the flash was used here.
While you can have people pose for you, you can get some cool photos of when they are not posing for you but for someone else. One of the reasons these photos work is they are different.  Look through all these photos again. Count how many of these photos you would always expect most people to get, then count those that are different.  What did you notice?
15
When people are posing for others get those photos too, but from a different perspective.
Okay if you are reading this you made it to the end. Did this give you some ideas for your next event? If so please take the time to let me know by writing below your comments. It is through your comments that others will get more out of this than just from my words alone.