Showing posts with label portrait lighting for newspaper. Show all posts

Wednesday, February 08, 2017

Ideal lighting for PR Headshots

Nikon D5, Nikon 85mm ƒ/1.8G, ISO 100, ƒ/5.6, 1/200, 4–Alienbees B1600, Pocketwizards to trigger flashes

I am teaching lighting class in Kona, Hawaii with the Youth With A Mission School of Photography class.

This is one of the lighting exercises I do each year. This is teaching the 3:1 Lighting Ratio. I started by showing the class the final photo and then walked them back through how to get this lighting. This is all done with a White Background. See below for the same example but a Black Background.


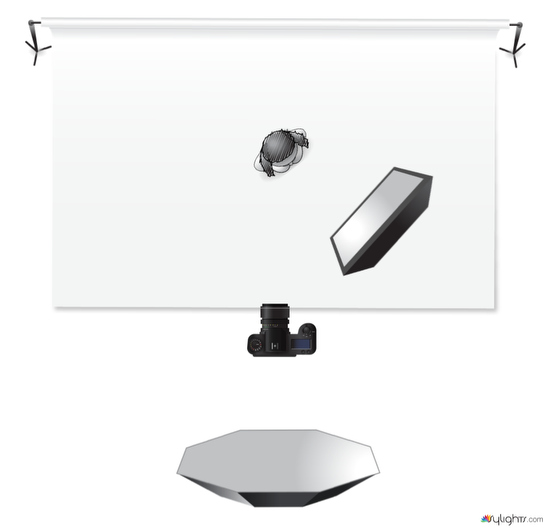
Here is the setup that I used from above. Now here you can see one of the students later with the setup we were using.


While we have all the lights in generally the places they will be at the end, I turn them all off except the main light. The main light is 45º to the left of the subject and right of the camera as well as closest to the subject. Then I took a light reading and also set the white balance. The aperture was set to ƒ/5.6. Then I took this photo.

Nikon D5, Nikon 85mm ƒ/1.8G, ISO 100, ƒ/5.6, 1/200
Then we turned this light off and turned the fill light on. This is the one closest to the camera. Ideally it would be right behind the camera, but I put it a little off to the side so while operating the camera I am not blocking the light.

I set the light to be one stop less than the main light. The light is set to give me ƒ/4, but I kept the camera set to ƒ/5.6 which meant the photo will be under exposed by one stop.

Here is this photo with the same settings as the main light.


Next we turned both of those lights on and double checked the exposure with a light meter which still was ƒ/5.6. It might have been a 1/10th of a stop brighter, but we kept the camera set to ƒ/5.6.

Here is the combined light photo.


Lastly I turned two more lights on that are just hitting the background and trying to get an even light across it. I made this light just one stop brighter than the main light of ƒ/5.6, so this light was set to ƒ/8.  Here is this photo.


Hope you enjoyed this step-by-step tutorial on how to shoot a 3:1 Lighting Ratio portrait.


This is basically the same exercise using a black background. Now just one thing you need to understand is that the 3:1 lighting ratio allows this photo to be used in so many places. The one thing is where it looks the best in a Newspaper as compared to other lighting which can make those shadows lose all detail and go pitch black. This allows for you to see some modeling of the light to highlight the cheek bones and contours of the face without over doing it and creating a photo with too much contrast.
Nikon D4, Nikon 85mm ƒ/1.8G, ISO 100, ƒ/5, 1/200
Here is the setup


Assignment Description:
3:1 lighting ratio.  This photo is classic lighting.

Items:

Octobox closest to subject
This light is your main light. Get a light reading with just this first. The light should be 45 degrees off the axis of the camera and 45 degrees above the subjects eyes.

Subject
Your subject should have the main light lighting only part of the face and the shadows should be just a little to show the 3:1 ratio.

(D)SLR
Choose the lowest ISO.  Ideally on full-frame camera a lens close to 85mm and on cropped sensor a 50mm. Set your shutter speed to the sync speed for your camera [in your camera manual] or slower. My camera was 1/250 but I shot at a slower speed of 1/200.

Octobox behind the camera
This is your fill light and get just a reading of this 2nd.  Be sure it is 1/2 the power (1 f/stop less) than the main light. After this is done get a 3rd light reading of both lights which will be the setting for the camera. It can be level with the eyes, but you may have to move up with glasses to avoid glare.

First set the main light and here is what that will look like:


Due to using such a large soft box the shadows are not as severe as in our first assignment using the grid light. Some of the light is bouncing off a white wall a few feet to the left of the model or right of the camera position.

Turning the main light off after finding out your setting you need to take a reading and get the fill light to 1 stop less than the main light. The main light was ƒ/4 so the fill light should read ƒ/2.8.

This is what it looks like without the main light on. You can see a little darker but no real shaping of the face as the main light which is 45º to the side.


When you combine them you get the first photo of the model we started with.


The main light is twice as bright as the fill light. So to show this using math we would say the main light has value of 2 and the fill light has the value of 1.

Where both the main and fill light fall on the face is getting the combined value of the 2 + 1 = 3. However in the shadows only the fill light is hitting those and therefore the value is only 1.

So the bright areas get 3 and the shadows 1 giving you a 3:1 lighting ratio.

Now I showed the students how they can add a background light. I put a blue gel over it to show them they can also color the background.


Saturday, June 02, 2012

Why Learn Ratio Lighting?

First of all there are times you need to be sure your photos can be reproduced properly. The most used photo I know of in publications is the head shot.

There are some pretty cool lighting setups you can use, but if you not aware of how this will affect the photo in print then your client will be sorely disappointed with your photos.

Take this first photo where I am lighting the person with one light on a grid. This is a classic Rembrandt Lighting that gives you a nice triangle on a the cheek.

All the photos here were taken during a class I taught in Hawaii on lighting.


You can do this assignment yourself to understand how to understand ratio lighting. You need to first start with one light and then add other lights. Use this lighting diagram and the instructions below to duplicate this with your camera and off camera flash.
Description:
Rembrandt portrait using one grid light


Items:
  • Monobloc with 10 or 20 degree grid
    • You may use any power setting you choose.  Be sure skin tone is properly exposed and correct white balance.
  • White backdrop
    • You may use a black background as well.  No other lights to be used in this assignment.
  • Woman
    • Please get the best possible expression.  You need to see a triangle on their cheek.  Be sure the triangle includes lighting their eye.
  • (D)SLR
    • Choose the lowest ISO setting for your camera.  Use a portrait lens 85mm - 100mm or if you don't have full frame then 50mm will be OK.
The first place that the above photo becomes a problem is with your newspaper. Especially when it runs in black and white. You see for the most part everything without light on it in the subject will be black in newspaper print.

So as to still get the nice shape that takes place with an off camera flash you need to add a fill light to help soften those harsh shadows so you can still see detail.

To get the second photo here you need to use the lighting diagram below and follow the instructions. Go ahead and shoot your subject with your camera and two lights.

Description:
1:3 lighting ratio.  This photo is classic lighting.


Items:
  • Woman
    • Your subject should have the main light lighting only part of the face and the shadows should be just a little to show the 1:3 ratio.
  • (D)SLR
    • Choose the lowest ISO.  Use a portrait lens 50mm if you don't have full frame camera can work.  No more than 100mm.
  • Octobox
    • This is your fill light and get just a reading of this 2nd.  Be sure it is 1/2 the power (1 f/stop less) than the main light. After this is done get a 3rd light reading of both lights which will be the setting for the camera. It can be level with the eyes, but you may have to move up with glasses to avoid glare.
  • Softbox
    • This light is your main light. Get a light reading with just this first. The light should be 45 degrees off the axis of the camera and 45 degrees above the subjects eyes.
  • White backdrop
    • Keep the subject a few feet from the background and do not use more lights to light it.

How to figure the Ratio

You need to change your f/stops into ratios.  What I do is first understand that your main light is putting out twice the light as your fill.  You would think that this means you have a 2:1 ratio, but this isn't the case.

The reason is you must figure not by what each light is putting out, but how much light is hitting the subject. 

Everywhere the main light is hitting so to is your fill light from the camera's angle. You then need to add the main light and the fill for all those places which is adding 2 + 1 = 3. The shadow is only being lighted by the fill so no need for addition or subtraction.

On the subject the brightest areas being lighted by the main and fill get 3 times the light as compared to the shadows getting lighted by just the fill which we say is 1 amount of light.

This is what we call the 3:1 lighting ratio and very printable in a newspaper.

Adding a hair light

Go ahead and then shoot this third shot and add a hair light. Use the diagram below and play with the exposure of the hair light till you get something you like.

Description:
1:3 lighting ratio.  This photo is classic lighting with hair light.


Items:
  • Woman
  • Your subject should have the main light lighting only part of the face and the shadows should be just a little to show the 1:3 ratio.
  • Monobloc with grid on boom
  • With dark hair start at same f/stop as main up to about 1 or 2 stops more.  With bald or light hair be careful using hair light. Sometimes better to not use one.
  • (D)SLR
  • Choose the lowest ISO.  Use a portrait lens 50mm if you don't have full frame camera can work.  No more than 100mm.
  • Octobox
  • This is your fill light and get just a reading of this 2nd.  Be sure it is 1/2 the power (1 f/stop less) than the main light. After this is done get a 3rd light reading of both lights which will be the setting for the camera. It can be level with the eyes, but you may have to move up with glasses to avoid glare.
  • Softbox
  • This light is your main light. Get a light reading with just this first. The light should be 45 degrees off the axis of the camera and 45 degrees above the subjects eyes.
  • White backdrop
  • Keep the subject a few feet from the background and do not use more lights to light it.
Background Light

You can add color to your background by just putting a colored gel over a light and pointing it to the background. You need to be sure your other lights are not lighting the background. For these photos here below we used the first lighting setup with one light with a grid and then added the background light.

Using a white background be sure your value on the background from the background light is -2 stops as compared to the main light. This will give you the same color as your gel.  If you want a darker color then even less light. If you prefer a lighting color add more light.


Here is a photo of some of the students having fun with their assignments in Kona, Hawaii.