Monday, October 15, 2012

Revisiting the Photo Story

The Photo Story

I wanted to revisit the Photo Story in case you missed my earlier post and also just to give some photos to go along with each of the points.  Here is a link to that earlier post.

Here are the basic things to look for in a Photo Story:

  1. Opener: Sets the scene for the story
  2. Decisive moment: The one moment that can by itself tell the story
  3. Details: Besides being like visual candy to the story, help often with transitions--especially in multimedia packages
  4. Sequences: give a little variety to a situation
  5. High overall shot: Gives a good perspective to how the elements all fit together
  6. Closer: Besides the classic shot of the cowboy riding off into the sunset there are other visual ways to help bring the story to a close
  7. Portraits: These photos are great for introducing the characters of the story
Not that long ago we had the youth leader for our church leave to go to seminary. I just took some photos to share with him as a thank you and for the church to use. While I was not shooting a major news story for a magazine even in a simple event like this the shots I was looking for was driven by the list above that I use on stories for magazines.

Opener


While this was not the first shot I took, it is a good opener. You can see the gift being given to Stephen Finkel where the youth group had signed their names and personalized this for him.  It really does the best job I think of all the photos to introduce what is going on at this event.

Decisive Moment

Just a nice moment where people are enjoying themselves at the event.

Stephen's mother and sister are sitting at the table listening to the lady gesturing and in the background is Stephen.
These are two photos that capture some nice moments. The bottom photo is the one I would use if I had to choose between the two.  I can see everyone lined up to say their goodbyes and his mother and sister hearing how much he meant to everyone.  This captures the emotions of the event really well.

Details


They had bought a nice book for everyone at the event could write a personal message to Stephen.  This is a good detail shot to help round out the story.

Sequences


These help communicate how everyone was close to Stephen and wanted to let him know that he meant a lot to them.

High Overall Shot


The high overall shot helps give a perspective and also shows how many folks showed up for the event.  

Closer


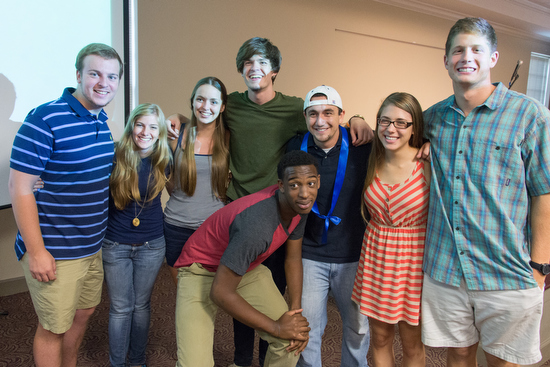
This may seem strange as a closer, but most of the folks in this photo are now apart of the church due to Stephen reaching out to his neighbors and inviting them. They all talk about his impact on his life.

Portraits

Lane Alderman the senior pastor of Roswell Presbyterian Church.

Lane Alderman the senior pastor of Roswell Presbyterian Church.

Emily Wright Associate Pastor


Closer shots of the key players lets you introduce these characters to the story.  

There you have a quick use of the photo story for an event. Use it whenever you cover something and you will have the variety you need to keep the viewers engaged.

Friday, October 12, 2012

LCD vs Viewfinder: Couple things to consider

Nikon P7000
LCD Benefits

First of all the LCD on most modern digital cameras and even cell phones is pretty big.  Compare that screen to the little eye piece on the Nikon P7000 above and at a first glance you might prefer using it over the viewfinder.

For the most part you can display more information on the LCD than in the viewfinders.  Here you can see I have the camera set for Aperture Priority due to the big "A" in the left-hand corner.  You can also see the ISO of 100, 1/1 and ƒ/4. In addition to these settings you can see the histogram, the flash is turned off, vibration reduction is on and also infrared remote is turned on.

Also you can see the JPEG setting is on FINE JPEG. Next to it the size of the image is set to the highest for this camera, which is 10 Meg.


As you can see in this photo of me using the LCD, I must keep the camera a good distance from my face.

LCD Disadvantages

Holding the camera still this far out is difficult.  I guess you now know why almost all point and shoot cameras now have vibration reduction. It is trying to compensate for the above average camera shake as compared to the viewfinder.


Now using the viewfinder the camera now is right next to my eye.


I can now use my two hands and my head as a tripod. I push the camera next to my head and this will help steady the camera and when you do that your pictures are sharper because you are not as prone to shaking the camera.


My Nikon D4 also has a LCD like the Nikon P7000, but you will rarely see photographers using it to shoot still images.

When you are outside it is very difficult to see the LCD in bright sunlight.  I would prefer the viewfinder.


Viewfinder Advantages


  • Can use your body as a tripod since you can now steady the camera on your head
  • Can see in any situation
  • On most DSLR cameras all the information on the LCD is in the viewfinder
Viewfinder Disadvantages

If you want to take a photo above at a birds-eye l you cannot see what you are doing and the LCD will help you still see what the camera is seeing.  This is also true for low worm's eye perspective.

Conclusion

Neither the viewfinder or LCD works for every situation.  I would always want both on any camera I buy for now on.

Thursday, October 11, 2012

Tips on photographing PowerPoint presentations


How do you get the photo above and not the next one?


PowerPoint or Keynote

PowerPoint and Keynote presentations often take place in a dark room.  So if you use a flash, even just off camera you might end up with something like the photo above, where the screen is washed out.


If you are not careful you will end up with a silhouette as I have in this photo above. Hey that might work occasionally, but don't you want to see the presenter at some point in your photos and their presentation?

Off Camera Flash using Zoom


In this photo here, with the man in the red vest, I put the Nikon SB-900 flash off to the side and zoomed the head to 200mm.  The Nikon SB-900 is on the PocketWizard Flex TT5 and on my camera is the transmitter which is the PocketWizard Mini TT1 with the AC3 to control the output of the flash.

While this is far superior to the first photo it can still be better.

Use a snoot on the hot shoe flash


In this photo you can see the speaker and the power point equally well. Now the people closest to the camera are in the back of the room where some of the fluorescent lights are on and giving that green cast.

I played with the exposure compensation on the camera and the flash.  For the photo where the best exposure works, I dialed the camera to -2 stops and the flash to +1 stop.  Since I am basically overriding the auto exposure of the camera and flash there really is no settings that will work exactly the same every time. It will for that room, but could fluctuate even then.  I just know to do a few test shots getting the settings the way I like them and then start shooting to capture moments.


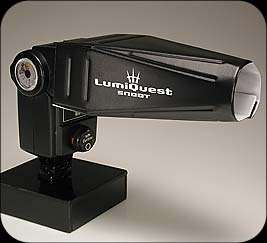
I put over the SB-900 the LumiQuest Snoot to help keep the flash off the screen and only on the speaker.  It is just $23.95.


Here you can see the setup.  Now notice there are a few light leaks around the snoot kicking light back on the wall.  Not a real big deal for me in this situation.  However, it could affect you in another situation.  Just take some gaffer tape and wrap around the snoot covering that up if needed.


Monday, October 08, 2012

Shooting sports using backlighting

Nikon D4, ISO 1000, ƒ/5.6, 1/2000, 28-300mm
This past Saturday I drove up to North Georgia College in Dahlonega to photograph The Citadel playing them in Rugby.  Honestly I just don't shoot a lot of Rugby.  I can probably count the number of times on both my hands.

There are a few things I knew from shooting football that I would do to insure good photos.

Nikon D4 Camera Settings:

  • Auto ISO with lowest ISO set to 100 and highest to 12,800
  • In Auto ISO I also set the minimum shutter speed to 1/2000
  • Capturing the images as RAW
  • Dynamic-area AF 21-point
  • Continuous-servo autofocus (AF-C)
  • Focus Tracking with Lock-On 4
  • AF Activation Off (Focus is done with the back button and shutter is only fired with shutter button)
  • 10 FPS and not 11 FPS.  At 11 only the first photo is focused.


Nikon D4, ISO 900, ƒ/5.6, 1/2000, 120-300mm ƒ/2.8 with 1.4 extender.
Lens Choice

  • Camera #1: Nikon D4 with Sigma 120-300mm ƒ/2.8 and 1.4 extender.  This gives me a 168 - 420mm ƒ/4
  • Camera #2: Nikon D4 with Nikkor 23-300mm ƒ/3.5 - ƒ/5.6


Nikon D4, ISO 900, ƒ/5.6, 1/2000, 120-300mm ƒ/2.8 with 1.4 extender.
Where to stand?

There are basically four sides to pick from.  I picked the sideline where the players are backlighted.  It is extremely important to use a lens hood or you will be getting lens flare.

The advantage I see in shooting with backlight is the contrast is dropped in the middle of the day. The players are rim lit, but you are not having the really strong bright area of the face with a strong shadow.

I am also watching my backgrounds.  The first photo, while a good moment, the background is distracting. Sometimes you cannot get a clean background. There are two things you can do. Use a shallow depth-of-field and pick an angle so the background is darker and cleaner. Maybe you pick an angle where the grass is predominate, or where the background is so much in the shade it goes dark.

Nikon D4, ISO 900, ƒ/5.6, 1/2000, 120-300mm ƒ/2.8 with 1.4 extender.
What I am looking for?

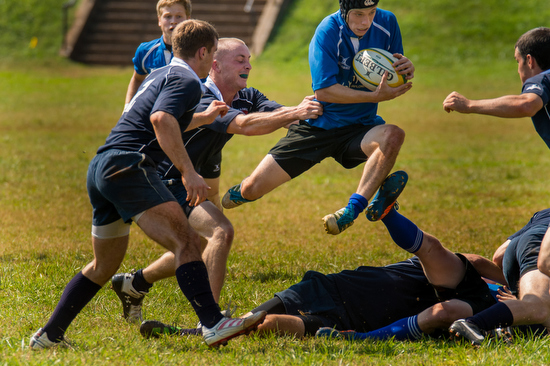
In Rugby you can only pass off to your team without advancing the ball. So you must pass in general backwards.  You can only advance the ball by running (most of the time) or by kicking.  Very similar to American football in tackling and running with the ball.  I wanted to show the competition rather than a guy all by himself running.

The major difference in Rugby and American football is just about the time they are getting tackled the players are often handing off to their team mates.

If they do go down they can hand the ball back to their teammates. I wanted to show how this is done in the photo below.

Nikon D4, ISO 1100, ƒ/5.6, 1/2000, 120-300mm ƒ/2.8 with 1.4 extender.
Even in sports expression counts

I think the one key element that can really make a photo is the expression on the athletes faces. In the photo below you can feel the intensity of the players just in their facial expressions. 

Occasionally even the flexing of the muscles can help communicate the effort of the athlete. The key to this success is being ready, because it is up to the athlete to make the effort and you then can catch it.

Nikon D4, ISO 1000, ƒ/5.6, 1/2000, 120-300mm ƒ/2.8 with 1.4 extender.
My suggestion is to shoot some shots when the teams are warming up.  See which side of the field gives you better light on the athletes.  See what combination of lighting and background works the best and then choose this side of the field for most of the game.  You can mix it up if you like, but the point is to get the best light to capture the action and the expressions of the athletes.

Friday, October 05, 2012

Photographers need to be guided by light


Finding your Direction

The thing that affects the photographer life and work is where they point their inner compass. What do they use to guide their path?

Houston we have a problem. The problem we have today is our role models. 

As we mature most of us grow up and realize we should stop worshiping athletes—unless they're on the field. The same is true with the celebrities. We should admire their talent, but when they do stupid things in their every day life we need to not emulate this behavior.

Adolescence 

During the age of adolescence we start to have the ability to do abstract thinking. Usually this starts between the ages of 12 to 15. This is when youth start to realize that just because a friend is attractive doesn't mean all they do is wonderful, just as if someone who is less attractive is going to be all bad. 

When I teach lighting I start first with just one light using a grid. After teaching about getting the proper exposure, I encourage my students to not move the light, but for them to move and walk around the subject and make photos. This is one of the examples I used when teaching this concept of them moving in relationship to the subject and how the light looks different. We need to do this with role models as well. Look at them from many directions to really learn from them.
While we are starting to learn how to do abstract thought our brain isn't finished developing. It is not until about age 25 that our brains are developed. 

A side note to this if you abuse drugs, it is the age that you started abusing them that the brain can be so adversely affected in that is the developmental age you will in many ways never grow out of--because you damaged so much of the brain cells.

Too many bad role models in photography

Today I think we have way too many bad role models in photography. I believe the digital age has hurt as much as it has helped society. 

One of the examples of this is how social media helped to connect us to the world and at the same time bullying has risen to levels beyond those of the past. People feel free to say things in the cyber community that they would never say to someone's face in the past.

Today a person can rise to prominence within seconds due to a photo they post on the web. Within a very short time they are held up as a leader in the industry for just one photo. 

I am seeing more and more photographers rise in prominence because they are taking wonderful photos of humanitarian work worldwide. The exotic locations are helping their work to be talked about in forums and even invited to speak to conferences.

We can learn from all these photographers. The key is gleaning the good stuff and sifting away the bad stuff.  This is what we learned to do in our adolescence. I learned that going after the super models was a good way to have a disastrous relationship.  I learned that I wanted someone attractive, but there were other criteria than just looks for a mate.


Stanley's criteria for a successful photographer role model:
  • Sustainable business model. I want to have as my role model those photographers who are able to pay all their bills and are not in debt. I also prefer that they are able to support more than just themselves.  They do not have to have children, but I want to see a business model that could support them.
  • People person. I want my role model to give honor, dignity and respect to all they come into contact with. I do not believe a jerk is something I need to emulate to be successful. 
  • Balanced life. Workaholics is not what I want to follow. I want to know how to work hard and play hard. I respect those with strong families and friends in their life.
  • Professional level work. I want to see work that is professional standards. I am also interested in seeing a consistency in their work. Having some outstanding work is good, but what is disappointing is someone who produces poor work too often.
  • Servant's heart. I really like following those photographers who give back. They serve as mentors or are involved in their professional organizations and even their community. I am not a fan of those who are greedy and it is all about them.
I do learn a great deal from other photographers, but that doesn't mean I want to emulate them. I even study them and their work, but not all these become my role model--but I do learn from them.

What I learn from photographers that I would not consider role models:
  • I learn a new technique
    • I have discovered from one of the photographers how to carry a set of clothing that you can ask people to wear to improve the photo.  One thing I thought was cool was the coveralls he carried to factories. He would put workers in red, yellow or blue coveralls and this helped tremendously give a pop to the photo.
    • Learned how to trigger off camera flash using a new technology.
    • How to use remote cameras.
  • Negotiating skills. I have learned from many photographers how to do a better bid for jobs.
  • Gear choices. I have learned about camera bags, lighting kits and more from photographers.
  • What not to do
    • I have watched many "famous" photographers kill a kid's enthusiasm by not giving them the time of day when they were trying to talk to them.
    • How many photographers will use foul language when talking to a group. My comedian friend Jeff Justice helped me to realize this from his comedy workshop. He will not allow foul language when they give their performance at The Punchline" because if you cannot be funny without it using it will not make you funny. Also, his most successful students thank him because this helped them get on TV.
Summary

Just because you think someones photography is great or the places they are going is something you want to do--be very careful before making them a role model and start copying them. Don't be an adolescent and get all caught up in their looks for instance. Look for the mate--the total package.

You need to separate the photographers who are being held up as leaders from those you make as a role model (LIGHT) and those who you can glean things from (DARK).

Tuesday, October 02, 2012

Outside photography: Best Time of Year

There are a few things that affect the outcome of a photograph outside.
  • Time of Day
  • Weather
  • Time of Year
Time of Day

There are 7 time periods during a day when there is light to make photographs outside

Dawn -- this is the 20 to 30 minutes before sunrise. The light at this time of day has a blue color cast to them. Also, there are really no shadows to contend with in the photos.


Sunrise -- There are two "Golden Hours" in the day. The Golden Hour the first and last hour of sunlight during the day. The sun's angle will produce long shadows at this time of day. Where the sunlight illuminates appears as gold in color. The contrast is less during the golden hour, shadows are less dark, and highlights are less likely to be overexposed. The dynamic range is less than midday and therefore you can record more of the scene than other parts of the day.


Morning -- The light can still be pretty good at this time of day. The sun is up and can still shine on a person's face so that you can still see their eyes and the color is more neutral.

Midday -- This is when the sun is directly overhead. The dyanamic range is great and therefore your photos are more contrasty. You either expose for the highlights and the shadows are black or you expose for the shadows and the highlights are blown out. It is very difficult to find a middle exposure to hold it all together. Since the light is directly overhead more often people's eyes are in the shadows and you often loose the detail of the eyes. You need fill flash to show people's faces at this time of day.


Afternoon -- Very similar light to the morning, but a little warmer due to the atmosphere being warmed up through the day.


Sunset -- You need to know the time of sunset to maximize the Golden Hour before the sun disappears below the horizon. The reason you see a lot of silhouettes of people and sunsets verses sunrises has more to do with people being awake.


Dusk -- I like to shoot architecture at this time of day, because you can put your camera on a tripod

Weather


Time of Year


There really isn't a "best" time of year to photograph. However, my favorite time of year is the fall.  I love the cool weather and all the color in the leaves. I also like the fall since there are more high pressure days, which translates into less stuff in the air making it where you can see further on clear days.


Fall


Spring


Summer


No matter the time, as long as you have light you can make photographs.  Sometimes shooting at the time of day many avoid will make your photos different. My suggestion is to always try and shoot the Golden Hour when you can outside and then look for other opportune moments to capture people and places in the best light for them.

Monday, October 01, 2012

Visuals verses text: The Eureka Effect

The Aha! effect refers to the common human experience of suddenly understanding a previously incomprehensible problem or concept. -- Wikipedia
Text is the core communications medium for most organizations. Due to this over reliance on text these organizations share a common mistake of writing a visual story without watching the visuals in front of them as they write.  Too often, a video or slide show story is not connected to the text. A good story is hooked to the visuals and audio.

A rule of cinema is to "show, don’t tell." Maybe this can be revised to "Show what you can, and tell what you can't."

Roswell Presbyterian Church's Middle School Youth with SonServants  and Widows Harvest to help do projects like: building wheelchair ramps and landings, scraping and painting houses, putting new roofs on homes, or landscaping and yard work.
Now there are a few things that are very difficult to write that a photo can help communicate. Emotional connections are moments where a gesture can connect people that trying to describe this would take a few pages of text.

The Suzuki teacher connects with the child in a tender instructional moment that text would struggle to communicate as effectively. Also, in this photo you can see the proud mother of the student in the background pleased with the instruction her son is getting. 
A few photos of a story can help set the tone and help the writer get deeper into the content. Your audience will appreciate a story with more meat to it than one that glosses over the content.

A child is working on an art project during a Suzuki workshop. They provided this creativity time for those moments when the young students were not playing and needed to stay on campus while waiting their turn. 
I thought capturing a student working on a fun craft project showed that creativity is in these students and looking for ways to come out. While music is one way the workshop was helping these students, they also provided a moment away from the music to be creative as well.

Show what you can

Detain shot of the lab project for DNA testing procedure.
Now I wanted you to first see the closeup photo here of the materials the students will be extracting the DNA from in a biology class. Notice how the photo begs the question of what is this?

Here the student is getting a measured amount of the substance that will be tested.
Notice in the second photo here of the lady in the lab there is less of a question and more of a statement that happens.  Maybe the closeup photo is a better hook and once you are into the story you use the photo showing the taking a sample by the student.

Now imagine the story on teaching DNA extraction tests without any of these photos. Which one would you even begin to read?

Physics Lab 

The professor asked the students to gather around her as she walked them through the lab experiment they were doing that day. 
What is very interesting here is how this professor walked the students through each step. She even would pause to talk about how if you don't do one thing then your results will be affected.

The professor adds a little humor in the demonstrations. Now I am shooting fairly tight, but just loose enough to show the students trying to see what she is doing and their emotional connection in the moment.
Now just hang around any class where students are doing something for the first time and you will see this next moment. They come to the teacher and ask a question. The teacher then realizes there is some missing information the student is not giving them.

Even after the professor had showed them this step, there is still more show and tell needed to be sure the concept is understood.
Now if you are a writer experienced a similar teaching moment like this physics class, then you understand how images will help clarify a moment.

If you look closely in the last photo the girl in the purple is having a small "eureka moment."

Don't fall into the trap of just taking photos and using them. Be sure your visuals are communicating. The best thing you can do is to show a photo to someone who doesn't know anything about the story or the people and things in the photo. Ask them to tell you what they see when they look at the photo. Not the obvious things, but like in photo of the teacher laughing they may say I see a good teacher.

You might ask why and they would say she looks fun and the students are reacting to her positively.

 Remember to "Show what you can, and tell what you can't."