Friday, June 21, 2013

Interactive Panoramic of State and Lake in Chicago


I just got back from Chicago where I covered the Grand Opening of Chick-fil-A's newest restaurant on the corner of State and Lake.  Be sure and click on the 360º above and drag your mouse to the top and bottom or you can just use the menu buttons to navigate. Be sure to also zoom in and out using the +/- buttons on the menu.

The far right button on the menu will make the 360º full screen.  Try that as well for really putting you there.

Maybe you have a place that you need to people to see as if they are standing onsite.  My recommendation is to use the 360º Panoramic to help put people in the place.


This is the corner of State and Lake Streets in downtown Chicago, which if you reload the page will start the 360º Panoramic and spin until you are standing on the street corner.

Maybe you have a campus that you would like people to visit and this is a way to help encourage them to see your space. On the other hand maybe you realize many people cannot travel to see your campus and you want them to have the experience of being there. Either way, the 360º Panoramic is a cool way to engage your audience.

Give me a call if you need a 360º Panoramic. 

Wednesday, June 19, 2013

Pricing Tip for Estimates

http://www.whattheduck.net/strip/1408
I am often getting phone calls from photographers about how to price a stock sale or assignment.

Options

No matter what you are quoting on I recommend giving the buyer a choice.

I like to think of this as a low, medium and high price.


When you order a drink like coffee usually they give you 3 choices: small, medium and large.  Using this as your model always try and give the customer up front three choices for your prices.

Why?

Well the way you price will help setup how you negotiate later.

In stock photography you are negotiating how much the photo is used and for how long. By giving them three options you have set some parameters from how you like to price.

In assignment work you are quoting on things like number of photos, when they get the photos, how you deliver them and more.

If you just give them one price you are communicating more of a take it or leave it even if you didn't mean that at all. When you give options people see you as flexible and may even ask for more flexibility.

If you offer three choices and the other bidder gives only one you can see how you just gave them 3 bids to the guys one and maybe you get the job just due to having an option they can go with without going back and forth.

Too Much

If you are not careful you can overwhelm people with too much information. Keep the options simple rather than complex. Sure if you tell them more they have even more options, but they show more than about 5 or 6 options actually works against you.


Monday, June 17, 2013

How to download video from YouTube and Vimeo on Mac


Downloading a video from YouTube can be tricky. Here is a simple App that will let you not just download, but choose the resolution that might be available for you.

FYI: You must not distribute or financially benefit from that content. It must also come with the express permission of the copyright owner.

This is a great way if you loose your copy to copy your own video from the web for example, or you can use this technique to let someone see your video and then give them permission to download it.


MacX YouTube is a free software that will let you download most YouTube videos.  This is great for those presentations when you may not have an internet connection or you don't want to rely on one in case that fails.


When you open MacX YouTube you get this screen.  Just click on the link and copy and paste your URL for the YouTube video. It automatically detects the YouTube video opened in browse. You don’t need to copy and paste the URL manually if you have it open.

It is capable of downloading all YouTube videos in whatever format or resolution, including MP4, WebM, FLV, even YouTube HD video.


As you can see in the screen grabe you are given many ways to download the video. It will convert it to the video format you prefer. I prefer downloading, if available, @ 1080 H.264 MP4 since this is the standard for the internet and works just about everywhere for everyone's computers.


Vimeo is better design for those who want to share videos across the web. You can upload the video package and then share a link and password protect the video. In addition you can make it downloadable.

So for those who choose to upload and distribute I would recommend Vimeo as a better choice.


With Vimeo they give you options for downloading the video if the person who uploaded it gave that permission. Here you just click on Download under the video and they give you a few choices.  As you can see the choices are much more limited than with the MacX YouTube downloader.


In case you need to convert a video I recommend Wondershare's Video Converter. It can convert video to 158 formats. You can download a trial version and then buy it for $59.95.  It works on Windows and Mac platforms.

It will also download from YouTube.


Just drag your files to the screen and then pick the output you choose.

Now you know an easy way to download video from YouTube and Vimeo.

Friday, June 14, 2013

PhotoMechanic is a must have for the editorial/sports photographer


If you were in the press room and were watching all the photographers ingest their images, write captions, crop and upload their images to the wire services or newspapers you would find the majority of them using PhotoMechanic. It sells for $150 and works on PC or Mac.

Why PhotoMechanic?

The number one reason most use it is speed.  It is a stand alone image browser that is so fast for the pressroom most who use it in their workflow ingest into this program and if they need to more than crop their images then they may use PhotoShop or Lightroom to adjust color, burn and dodge or some other image correction.

Many photographers shooting on deadline shoot JPEGs for speed. Some will shoot JPEGs plus RAW and use the RAW to help salvage an image if necessary.  You see most of these pros are nailing the exposure, focus and white balance. The most they are doing is cropping or rotating an image.
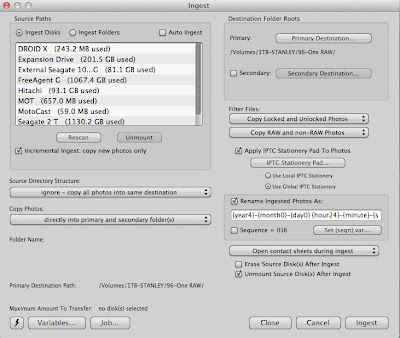
Figure 1
Step One—Ingest

PhotoMechanic allows you to ingest multiple cards at one time.  In Figure 1 you can see the screen that lets you customize how you ingest.  I select the cards and then select a destination, which for me is always an external drive.  I have it checked that when it is done to eject the cards and only to ingest new images.

Two more things I do before clicking the "Ingest" button is click the renaming of files. Now once this is done the next time I ingest this will be the same.  By the way I rename all my images using this code "{year4}-{month}-{day0} {hour24}-{minute}-{second}."

The most important step to me that makes this program stand out is the ability to embed text into every image as I ingest.
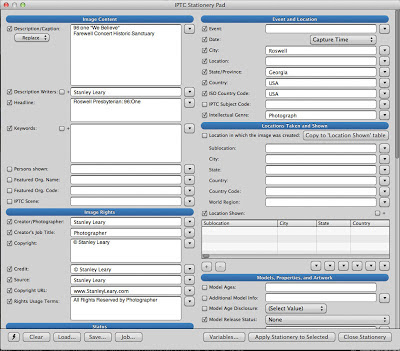
Figure 2
You can see the box that pops up when you click on the IPTC Stationary Pad here in Figure 2.  There are more fields as you scroll down than you see here.  PhotoMechanic will remember all that you typed as a default. You can also save these and then load them as needed.  For example if you shoot for Associated Press you have to use certain fields and they will be different than if you shoot for the New York Times. You may also have your own personal style that you want to use. So, I have many different forms saved to help speed up filling this form out.

Once I finish this I ingest. This will put the same IPTC on every image. This way when I want to modify the IPTC I only need to change a few things rather than put everything in the form from scratch.

Step Two—First Edit

I really don't want all the images I just ingested, so I am going to select the ones I want to keep first.
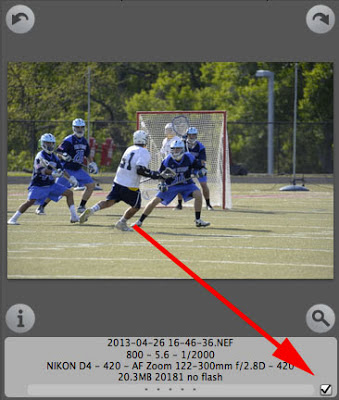
Figure 3
I look at each image and decide do I want it or not. If it is a keeper I just type "T" and the program puts a check in the box and it is now "tagged."

Figure 4
I then go and select all the "Untagged" images and select all the images. The together I push "⌘ Command" and "Delete" to move all of them to the trash.  Once this is done I show all images again.

Step Three—Rating

PhotoMechanic lets you rate images using color code system and/or stars. I primarily use the stars since this is how I was marking my contact sheets back in the days of film.
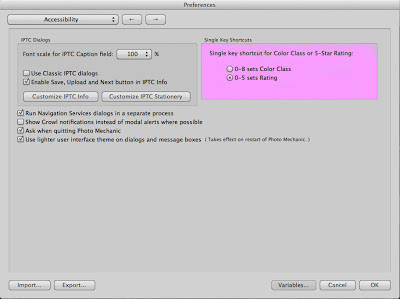
Figure 5
You need to go to preferences> Accessibility and this is where I check to use the Star Rating. Now when I like an image I can just key 1—5 and if needed 0 to remove them.  A 5 for me is portfolio quality and 1 is it is OK and usable for publication.  It is a sliding scale from there for me.

Step Four—Caption Modification

Now I go to the bottom right hand corner of PhotoMechanics contact sheet and click how many "Stars" I want to show to help me narrow down the images I will transmit to the publication or wire service.
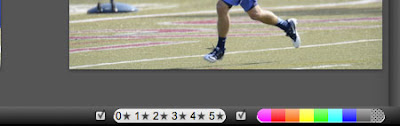
Figure 6
Usually the number of images Sports Photographers are moving from a normal game is about 5 to 6 images.

Now I can go into each photo and customize the caption. Now the really cool thing about PhotoMechanic is saving you key strokes and helping you be accurate with spelling.  This is called "Code Replacement" in PM.

Go to Edit>Settings>Set Code Replacements and here you will select a TXT file that has been previously created. This will have the roster of the players for both teams.
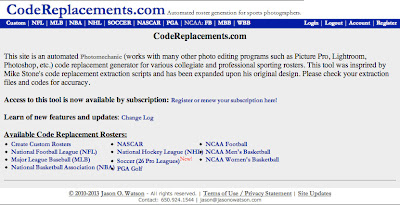
Figure 7
One guy has a website that you can go to and create that file for a small fee and help save you tons of time captioning players names, position they play and number.  Here is that link to help you understand how to use this in PhotoMechanic http://www.codereplacements.com/.

Step Five—Image Correction if Needed

Sometimes you might need to do some work on the image.  Here the photographer can press "⌘ Command" and "E" if they have selected an editing program like PhotoShop to make changes to an image or images.
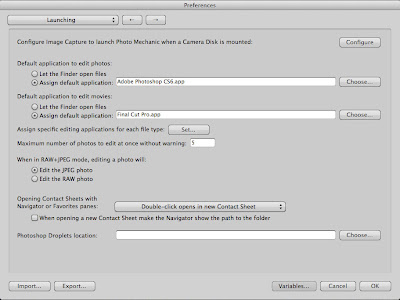
Figure 8
To designate a program like PhotoShop go to Preference>Launching and create the link to the program.

Step Six—Upload for Deadline 

Now you need to upload these images. Here is what I am doing for Associated Press. I have all the ftp information stored in PM and so I just select all the images, right click and click on "Upload."
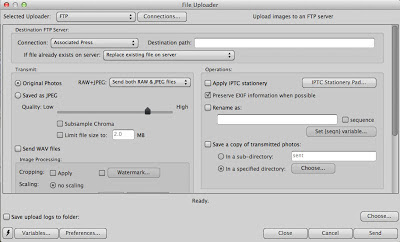
Figure 9
What pops up is Figure 9 for me. I then just click send and the images are off the the photo desk.

Step Six—Keywording When not on Deadline

For when I am shooting for something other than deadline I am often keywording images.
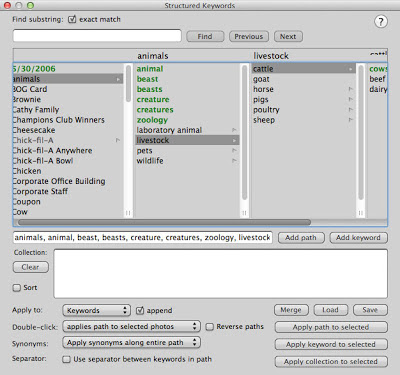
Figure 10
To help you with Keywords, PM already has a structured list of keywords for you to use that many Stock Agencies already use and then you can add your own keywords.

So you can select one or multiple images and then just type "⌘ Command" and "I", which brings up the IPTC pad [figure 2] and then click on the pull down menu for Keywords see Figure 11.

Figure 11
When you click on it you will then see Figure 10.  This way you can add things like "African American male" to all the photos you selected at one time. Now right next to the keyword field is a box with + sign next to it [Figure 11]. If you check it then it will keep any keywords already in the image and just add your keywords.  This way you can go through select all the photos with women and keyword them and then go and + add those photos where there are flowers in them.

Step Six—Upload to PhotoShelter or Stock Agency
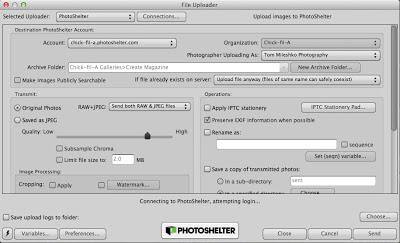

Figure 12
PM has many ftp logins already for you like PhotoShelter, Flickr and SmugMug for example. Here in Figure 12 you can see I have PhotoShelter. I just pick the folder or create a gallery to upload the images.

Stanley's Workflow

  1. Ingest to PhotoMechanic
  2. Select the keepers
  3. Delete all untagged images
  4. Import into Lightroom, because I am shooting RAW
  5. Make all corrections necessary to images
  6. Export all images to sRGB JPEGs
  7. Open PM 
  8. Upload if necessary
  9. Burn DVD as needed

Thursday, June 13, 2013

For you Mac users: The best way of teaching is by example

Screenium software is available through your App Store on Mac for $39.99.
Don't just describe a person what to do! It's slow, it's frustrating and chances are it's easily forgotten so you'll have to repeat that lesson at some point. Instead, record a screencast of your instructions and make it available online. What started as a one-on-one tutorial could help thousands of less experienced users all over the world.

I have done a few tutorials for folks and here is one I did on "Exposure Composition"


To make this I used the software Screenium.  It is available in the App Store on Macs.  It is very simple to use.


You can just record a: single window; a fixed area; fullscreen; or the mouse area.  If your Mac has microphone built in then just sit close to the monitor start the session and when you are done stop the recording.

You can then just post your video.

If you have a web camera hooked up you can also include this in the video if you like showing you talking to everyone.  Maybe you just want to use that to introduce yourself and then close the window or shrink it and then come back to it occasionally.

Here is one more video I did explaining depth-of-field. It has helped a lot of people see what DOF is all about and how to control it.


Now I think you can see from those two examples that seeing me walk you through it is much better than me just telling you something—wouldn’t you agree?

For Video Editing: Combine Final Cut Pro X and Event Manager X


First things first

I am using Final Cut Pro X version 10.0.8 when working with video, which you get through the App store on your mac.  I love the software because you can work in real time and not wait for rendering.  That works in the background.

No matter what video editing software you use I highly recommend maxing out the RAM on your computer. I have 16 gigs of RAM on my Macbook Pro 15".  If I had a desktop I would have even more RAM.

You need a fair amount of free space on your hard drive as well. This is why I recommend running the projects off an external drive. The program is on the main drive, but the clips and video are on my external drive.

I recommend 20% or more free space on your main drive. As you fill up the external, its performance will also slow and this is why my next recommendation will improve your experience with Final Cut Pro X.

Second

By default Final Cut Pro X will show you all  Events and Projects on all mounted storage devices. You are in essence loading all your projects on all your drives every time you open Final Cut Pro X.

Event Manager X gives you control over your Events and Projects so you can manage what you want to be visible in Final Cut Pro X’s Event Library and Project Library. So, you could have multiple external drives with various projects on them and Event Manager lets you decide what is visible.


Instead of launching Final Cut you launch Event Manager X. As you can see in the screen capture above those with a check are what will show up. Just uncheck and it doesn't show up in Final Cut Pro.


What the program is doing in the background is moving your "Events" and "Projects" from their normal folders into "Hidden" folders.  See the example above.

Now lets say you have a few projects in the works. You finish one and send it for approval to the client. While you wait on their feedback and changes you can then close Final Cut Pro open Event Manager and uncheck that project and event for now. Then just check the event and project you want to work on next. As long as you have that "Re-open Final Cut Pro X" at the bottom, when you click on the button to move the events and projects it will launch Final Cut after it moves everything and then you only see what you are working on in Final Cut Pro.

The reason for using Event Manager X is not to make things look neat in Final Cut Pro X, it is to improve the performance of Final Cut Pro X.

Wednesday, June 12, 2013

Photography Composition Tip: Anchor Your Subjects

Nikon D4, 28-300mm, ISO 180,  ƒ/10, 1/500
Anchors Away

I am still in cruise mode after last week. It takes longer to do everything since I got back. You see I think I need to stop every 45 minutes and find food.

Being on the ship and see those huge anchors made me think of a simple composition technique to improve your photos.

Anchor your subjects.

Nikon D4, 28-300mm, ISO 12,800,  ƒ/3.5, 1/160
When you crop off the feet of a subject or in this case the front of the car the subject isn't well anchored.

Just lower the camera a bit and give the subject a little room at the bottom.


See what a difference the composition is by just moving the camera a millimeter?

The reason so many of us forget to do this is we are looking too much at the subject. You need to scan the edges of the photo and correct for this problem.

Many photographers tend to have too much space above the subject and this is due to centering of the subject.

Tuesday, June 11, 2013

Tips for photographers who use Macs

Computers and cars have one thing in common—every so often you need to do some routine maintenance to get the best performance.

With cars about every 5,000 miles you need to take the car in for routine maintenance. I would say that once a month you need to also do some basic maintenance for your computer.

For the Mac owner I recommend just a couple of things that will improve your computer’s performance.

Disk Utility

Performing disk maintenance using Disk Utility that is included in the Mac OS X.

You can also use this even when your computer starts just fine but you want to check the disk for possible file system issues.
1. To launch Disk Utility go to your Applications Folder>Utilities>Disk Utility.
2. Click the First Aid tab.
3. Click the disclosure triangle to the left of the hard drive icon to display the names of your hard disk volumes and partitions.
4. Select your OS X volume.
5. Click Repair. Disk Utility checks and repairs the disk.

You should see improved performance when this is done.


NVRAM

Your Mac stores certain settings in a special memory area even if it is turned off.  On Intel-based Macs, this is stored in memory known as NVRAM.

Information stored in NVRAM includes:
1. Speaker volume
2. Screen resolution
3. Startup disk selection
4. Recent kernel panic information, if any


How to reset your NVRAM
1. Shut down your Mac.
2. Locate the following keys on the keyboard: Command (⌘), Option, P, and R. You will need to hold these keys down simultaneously in step 4.
3. Turn on the computer.
4. Press and hold the Command-Option-P-R keys before the gray screen appears.
5. Hold the keys down until the computer restarts and you hear the startup sound for the second time.
6. Release the keys.

After resetting NVRAM, you may need to reconfigure your settings for speaker volume, screen resolution, startup disk selection, and time zone information. If issues persist, your Mac's logic board battery (not a portable Mac's rechargeable battery) may need to be replaced. The logic board battery helps retain NVRAM settings when your computer is shut down. You can take your Mac to a Mac Genius or Apple Authorized Service Provider to replace the battery on the logic board.

If you have never done this you will notice major improvement in your computer.  The Disk Utility may take some time to run that first time. Running Disk Utility once a month takes less than five minutes unless something unusual has happened.

Parting Comment

I still recommend buying DiskWarrior and using this utility. It does more than just the Disk Utility.  However, just using the Repair Permissions in Disk Utility when it makes changes does improve your performance. 

Your camera choice does make a difference

Nikon P7000 ISO 3200, ƒ/4, 1/65
While on our cruise through the Caribbean we did some ice skating on the cruise ship. The first time we went I took my point and shoot and got some photos.

As you can see in the photo above I got a decent photo of my lovely wife Dorie.  I didn't want to use flash so you could see the ice rink.

I had a lot of blurry photos due to I could not get above 3200 without changing the resolution on the camera.

Nikon D4, 28-300mm, ISO 12,800, ƒ/5, 1/60
The next time some of the family went ice skating again I took my Nikon D4 and shot some photos as well.

There are a couple of things I think worth comparing. First of all the Nikon D4 @ ISO 12,800 looks better than the Nikon P7000 @ ISO 3200.

This is the reason I own a Nikon D4.  The sensor on the Nikon P7000 is CCD and the Nikon D4 is CMOS. The CCD has more of an electrical charge going that actually creates a noise as compared to the CMOS.


The size of the actual sensor also impacts the quality of the image. I am talking about the physical size and not the megapixels. The Nikon P7000 has a 14.9mm width CCD sensor size. The Nikon D4 has a 36mm width CMOS sensor.

If the megapixels were equal just having more space on a sensor helps spread out the sensors and cuts down on the noise created.  Just think of how your AM radio is impacted when you drive near power lines and you hear a buzz.  This is the major advantage for right now between the larger sensor and the smaller.  The larger the sensor the less noise.

CCD stands for Charged Coupling Devices.  They have been around a long time. CMOS stands for Complimentary Metal Oxide Semiconductor.  They are a newer technology.

The biggest difference is CMOS sensors are already superior to CCD sensors in terms of power consumption. You get a much longer battery life out of a CMOS camera, which means you can take more pictures.

How many megapixels do you need?

Now let me try and clear up this megapixel dilemma.

My first digital camera was a 6 megapixel CCD sensor camera. I made 16 x 20 prints that are still hanging in my home. These were shot with studio lights giving me the best quality and I like the quality of the prints.

The general rule of thumb is this, if you are not making prints bigger than 16 x 20 then any 8 megapixel camera or more will work just fine.

If you like to make bigger prints or you tend to need to crop your photos then getting more megapixels will benefit you.  However, for most people who are posting their photos primarily on social media websites, most any camera will do. This is why so many people are using their camera phones today instead of carrying another camera. Most of the latest phones have 8 megapixel cameras and that will work well for most of them.

For the Geek

Now for those of you who like to talk about how many millimeters your lens will resolve then you can go and get those specs on any camera you might want to buy here at http://www.dxomark.com/.

As you can see there is a big difference in the specs on these two cameras. I hope so, because the Nikon D4 sells for $6,000 and the Nikon P7000 sold for $500.


Nikon paid attention to these scores and improved them and the most recent version of the Nikon P7000 is the P7700.


Summary

If you just do general shooting then buying the high end camera is just overkill.  However, if you like shooting in low light inside then you just might need to consider something like the Nikon D4 to capture those images.

Your camera choice does make a difference in the quality of the image, but it is the photographer who makes a difference as to if the images are truly captivating to the audience.

Sunday, June 09, 2013

Vacation Planning Guide for Photography

Nikon D4, 28-300mm, ISO 100, ƒ/5.6, 1/800,  Off camera fill-flash using the Nikon SB-900 and SB800.  The Flash is on the Pocketwizard TT5 and being triggered by the Mini TT1 on the Camera with the AC3 to control the output of the flash. Flash is +2 EV and the camera is 0 EV.
I took the past week off for a family cruise of the Caribbean on the Royal Caribbean Freedom of the Seas with my parents, sisters and all of our families.  There were fourteen of us each evening at the evening meal.

I realized from watching so many folks traveling with cameras and from my own experiences I think you need a basic checklist of what you should bring for your vacation trip.

I am going to address two types of camera kits that you might want to use for your next vacation. The two kits are the Point and shoot camera and the DSLR.

Nikon P7000, ISO 1600, ƒ/3.2, 1/160

Point and Shoot Camera kit

First let me just list what should be included in your carryon bags for this kit.

• Camera
• 2 Batteries
• Battery Charger
• 2 Memory cards
• Lens cloth which can double for your gray card
• Bag or a plan for carrying what you need

The camera is obvious, but many people travel with just one battery. I recommend always having at least one spare battery always charged with you. At the end of each day, I recommend going ahead and charging the battery you used that day and if necessary your backup if you used it.  Too many people miss opportunities due to dead battery on the trip of their lifetime.

Today I would recommend carrying large capacity cards. Check with your camera manual and get the largest capacity possible.  Today many of these cameras will take a 64-gig card. Sometimes it may make more sense for the price to buy a few 16-gig cards than one 64-gig card.  If you take enough memory cards you can eliminate the need of carrying a computer or something like a portable hard drive designed to download memory cards.

Carrying a gray cloth that is designed to clean your lens can help you keep that lens clean and help for white balancing when you need to do so. Please remember to check your lens each day periodically.  Fingerprint on the lens will deteriorate the quality of the images.

Nikon P7000, ISO 100, ƒ/3.5, 1/1250

Which point and shoot should you buy if you don’t have one?

I recommend getting something with a decent zoom on it so you can get those images of things far away. I think most people will be able to find a camera in the $200 - $500 range that gives you a great deal of flexibility that can fit in you pocket.

Here are a few models that I would consider:

Canon PowerShot SX280 HS
• Canon PowerShot SX280 HS – It has a 20X zoom, which is equivalent to the DSLR 25 – 500mm. It is a 12.1 megapixel CMOS sensor. ISO 80-6400
• Nikon Coolpix L610 – It has a 14X zoom which is equivalent to the DSLR 25-350mm. It is a 16-megapixel CMOS sensor. ISO 125-3200
• LUMIX ZS25: Compact Long Zoom Camera – It has a 20X zoom, which is equivalent to the DSLR 24 – 480mm. It is a 16-megapixel CMOS sensor. ISO 100-6400


There is another Point and Shoot camera model in between the small pocket camera and the larger DSLR. I call these Bridge Cameras.  They are cameras with incredible zooms that make them a little larger and look like their big brother the DSLR, except you cannot change the lens.  However, with the zoom on these who would ever need another lens.

Here are just three Bridge Cameras you should seriously consider before sinking lots of cash into a DSLR.

Nikon Coolpix P520
• Nikon Coolpix P520 – It has a 42X zoom, which is equivalent to the DSLR 24-1000mm. It is an 18.1 megapixel CMOS sensor. ISO 80-3200 [H2 pushed to ISO 12,800]
• Canon PowerShot SX50 HS – It has a 50X zoom, which is equivalent to the DSLR 24-1200mm. It is a 12.1 megapixel CMOS sensor. ISO 80-6400
• LUMIX LZ30: Long Zoom DSLR Alternative Bridge Camera – It has a 35X zoom, which is equivalent to the DSLR 25 – 875mm. It is a 16.1 megapixel CMOS sensor. ISO 100-6400


Nikon D4, 28-300mm, ISO 250, ƒ/8, 1/500

DSLR Camera Kit

Plan to carry this on with you for security reasons.

• Camera
• Off camera flash
• Zoom or fixed lenses to cover 24 – 300mm recommended
• 2 Batteries
• Battery Charger
• 2 Memory cards
• Lens cloth which can double for your gray card
• Bag or a plan for carrying what you need

The basic difference for the hobbyist and the professional is the need for backup on everything for the pro.  My comments for each are the same as before with the Point and Shoot cameras.

Plan for the plane’s you will fly. If you have one of those really small jets or propeller plans you can only put a very small bag on board with you. If you are carrying a lot of gear I recommend suing the ThinkTank roller bags and check them at the door of the gate.  They will give them back to you as you get off the plane. It is a little safer than checking the bag where it can get lost.

If flying internationally you really do need to watch the weight. This is where a camera vest can pay off because you can put gear in it and it doesn’t count as baggage.  Cargo paints will work great for a lens or two.

My two sisters gave me a surprise kiss during our family photos. Nikon D4, 28-300mm, ISO 12,800 ƒ/8, 1/30 with Nikon SB900 on camera with 0 EV compensation and slow-sync.
Here is a family photo that I setup and asked a person to push the button for us.

Nikon D4, 28-300mm, ISO 12,800, ƒ/8, 1/125 with SB900 direct flash for fill on slow-sync.