Tuesday, February 17, 2015

Why Change?

Nikon D750, AF-S NIKKOR 28-300mm f/3.5-5.6G ED VR, ISO 100, ƒ/4.5, 1/200
Two of my favorite times the day are sunrises and sunsets. New beginnings and endings are what they represent to me.

This week I have been attending a corporate meeting where the one thing that struck me was that they acknowledged that probably one of the greatest threats to the success of their business was their own success.

When you become successful you can become very complacent. You take for granted your actions.

If your customers love your work that is great, but don't settle for what you are doing. Learn to continue to push yourself and grow.

Nikon D750, AF-S NIKKOR 28-300mm f/3.5-5.6G ED VR, ISO 8000, ƒ/4.5, 1/100
“The Only Thing That Is Constant Is Change,” said Heraclitus. Change is happening all around us all the time. You cannot stay the same and remain relevant today.

Trying to stay the same because the success you have today was because of the actions you took yesterday will not lead you to success tomorrow.

If you want to go somewhere in the future then you need to asses where you are and then think and plan accordingly to make changes. When you do you will most likely go backwards at first.

This is called the J Curve. The J Curve breaks down the behavior patterns we go through as we change tasks, habits or routines. There are five stages to manage internally as you cascade through the stages.

  1. Plateau
  2. Cliff
  3. Valley
  4. Ascent
  5. Mountain Top
It looks like this:


I only mention all this to make you aware that taking action to insure you move forward often will feel like you are making it worse.

Take the time and do some research. Plan your choices based on where you want to go.

See you at the top!

Friday, February 13, 2015

Nikon D750 & AF-S NIKKOR 28-300mm f/3.5-5.6G ED VR at Hawaiian Luau

Nikon D750, AF-S NIKKOR 28-300mm f/3.5-5.6G ED VR, ISO 7200, ƒ/5.6, 1/500
Last night I took in the wonderful Luau put on by Island Breeze at the Courtyard Marriott King Kamehameha's Kona Beach Hotel. If you come to the Big Island this is a must see!!!

I am also working on putting together a photography workshop here and will do my best to make this part of the package. I know many of the Island Breeze folks. They have been my Hawaiian fire dancers.

Nikon D750 Performance

I just wanted to enjoy the Lua and not work, but I still wanted a photo or two from the night. I just took the Nikon D750 and the AF-S NIKKOR 28-300mm f/3.5-5.6G ED VR with extra battery–that I never needed.

This is a wonderful combination. Extremely sharp images due to the D750 sensor and the Vibration Reduction of the lens.

Nikon D750, AF-S NIKKOR 28-300mm f/3.5-5.6G ED VR, ISO 800, ƒ/5.6, 1/100
After taking this photo of the dancers I went ahead and changed the Auto ISO shutter speed setting to 1/500. But I was surprised at the sharpness at 1/100.

Here are some more images from the night that you might enjoy:

Mixed lighting assignment comparing TTL Hotshoe to Studio Strobes

Nikon D4, Nikkor 85mm ƒ/1.8G, ISO 100, ƒ/1.8, 1/8000—Off camera fill-flash using the Nikon SB-900. The Flash is on the Pocketwizard TT5 and being triggered by the Mini TT1 on the Camera with the AC3 to control the output of the flash. 
Today I taught the students the difference between studio strobes using them outside for lighting and using a TTL Hotshoe flash.

I love the photo at the top with the ƒ/1.8 look.

Now all these are just the test shots to show the difference between the lights. Not so much about finding a great location–which now seeing these I should have spent more time scouting before the class to find a great background.

Click on diagram to see larger
Now before we added flash we took one photo as the light was on the subject.

Nikon D4, Nikkor 85mm ƒ/1.8G, ISO 100, ƒ/2.8, 1/1000
So this is where we started with no light, just the available light.

Nikon D4, Nikkor 85mm ƒ/1.8G, ISO 100, ƒ/11, 1/250–Off camera Alienbees B1600 powered by Vagabond.
Here for this photo we took the first photo and transferred the settings to using sync speed of 1/250. Then instead of same exposure we underexposed by -2EV.  I don't like the background as sharp as it is here.  I do like the shallow depth of field of the first photo.

Now you can see the advantages of TTL Hotshoe flashes and the advantage of the studio strobe is shooting faster [less recycle time]. 

Thursday, February 12, 2015

Nikon D4 and D750 shooting Hawaiian Fire Dancer

Nikon D750, NIKKOR 28-300mm f/3.5-5.6G ED VR, ISO 5000, ƒ/25, 1/40
I went out last night to shoot with strobes to show the students how to use a fill flash.

We set up a strobes to make some photos. This top one was without the strobe, which was a pleasant surprise to me.

Nikon D750, NIKKOR 28-300mm f/3.5-5.6G ED VR, ISO 100, ƒ/7.1, 1/60
Here you can see us setting up. Only one of those strobes is going off at a time. We had two strobes setup the same way giving more people the opportunity to shoot.

Click on diagram to see it larger
Here is one of the photos using this setup here.

Nikon D4, AF-S NIKKOR 14-24mm f/2.8G ED, ISO 100, ƒ/7.1, 1/60
Now had I been just shooting this for me then I would have had even more options and maybe even better photo. I just shot a few and gave the students time to also shoot the same setup on their cameras.

We used Pocketwizards to trigger the strobe.

Wednesday, February 11, 2015

Student's 1:3 Lighting Ratio results

© 2015 Stephanie Leilani
These are the results from the students assignment where they were to create a 1:3 lighting ratio on the subjects. They could add background color or just white. They could also have fun, but they had to demonstrate the 1:3 lighting setup.


Assignment Description:
1:3 lighting ratio.  This photo is classic lighting.

Items:

Softbox
This light is your main light. Get a light reading with just this first. The light should be 45 degrees off the axis of the camera and 45 degrees above the subjects eyes.

Subject
Your subject should have the main light lighting only part of the face and the shadows should be just a little to show the 1:3 ratio.

White backdrop
Keep the subject a few feet from the background and do not use more lights to light it.

(D)SLR
Choose the lowest ISO.  Use a portrait lens 50mm if you don't have full frame camera can work.  No more than 100mm.

Octobox
This is your fill light and get just a reading of this 2nd.  Be sure it is 1/2 the power (1 f/stop less) than the main light. After this is done get a 3rd light reading of both lights which will be the setting for the camera. It can be level with the eyes, but you may have to move up with glasses to avoid glare.


© 2015 Benjamin Marsden
To see all the photos just look at this slide show.


Tuesday, February 10, 2015

Before you use the studio strobes–See the light first

Nikon D4, 85mm ƒ/1.8G, ISO 5000, ƒ/1.8, 1/250
Today was the first class of lighting I was teaching to the School of Photography at the University of Nations located in Kailua-Kona, Hawaii. I asked one of the students to be my model.

Bethany is helping me as the model for the first assignment on Rembrandt lighting using just one light with a 10º grid on the Alienbees studio strobe.

The top photo here is the first photo I took showing what the fluorescent room light looked like before we used lights.

Nikon D4, 85mm ƒ/1.8G, ISO 12800, ƒ/1.8, 1/250
The first thing I did was turn all the lights off in the room except for the modeling light that is on the Alienbees with a 10º grid on it. Rather than jumping into shooting with the strobes I showed the class you can see what you are going to get with the strobes using the modeling light.

Here you can see the triangle on the cheek which is the classic Rembrandt lighting with a little twist of me not shooting her looking straight on but slightly behind her.

To see the rest of the assignment you can go to an older post that walks you through the Rembrandt light exercise. here is that link

You need to see what you are trying to create first before using flash.

Friday, February 06, 2015

One light is often better than too many

Nikon D3s, 14-24mm, ISO 400, ƒ/5.6, 1/500—Off camera fill-flash using the Nikon SB-900.  The Flash is on the Pocketwizard TT5 and being triggered by the Mini TT1 on the Camera with the AC3 to control the output of the flash. 
I have been going through my files getting ready for next week when I teach lighting to photography students in Hawaii.

One of the tips we will be discussing is learning to not light everything. Here in this photo I just used the existing light and the camera is set -2 EV  and then added strobes which are zoomed in to just light the subjects. The strobes are set around +2 EV.

Nikon D3s, 14-24mm, ISO 400, ƒ/3.2, 1/400
Here is the same photo without the strobes. See how the strobes make the subjects "POP" and help saturate the colors.

Click on diagram to see it larger

This is the lighting diagram for the top image.

Nikon D3s, 14-24mm, ISO 100, ƒ/5.6, 1/250—Off camera fill-flash using the Nikon SB-900.  The Flash is on the Pocketwizard TT5 and being triggered by the Mini TT1 on the Camera with the AC3 to control the output of the flash. 
By underexposing the background I am saturating the colors of the sky. Then the flash is helping light  the subjects to be properly exposed and drawing your eye to them.

Nikon D3s, 14-24mm, ISO 100, ƒ/5.6, 1/250
Click to image to see larger

With no strobes these photos just don't "POP" like I want them to do.

Nikon D3s, 14-24mm, ISO 100, ƒ/4, 1/200—Off camera fill-flash using the Nikon SB-900 & Nikon SB-800.  The Flash is on the Pocketwizard TT5 and being triggered by the Mini TT1 on the Camera with the AC3 to control the output of the flash. 
Now here is an example where by using two lights on either side of the subjects starts to create what I call an "unnatural" light setup. Now they look like this is a painted background and they are on some cruise ship where you get your photo made.

Nikon D3s, 14-24mm, ISO 100, ƒ/4, 1/200
If you want your photos with light to truly "POP" remember to not light everything. Use light sparingly for more dramatic photos.

Wednesday, February 04, 2015

Disaster strikes due to a mistake

I was really tired working at my computer when I was helping a friend who asked me to help fix their jump drive. It needed to be formatted.

Well it just wasn’t working at first. After a few tries I finally formatted it and since I was use to just clicking the drive and clicking go in a moment I accidently formatted my external hard drive instead.

Panic struck as realized what I had done and what I potentially had lost. The only good news was I had just put this new 2TB hard drive into service a few weeks ago.

The worst case scenario was I lost images that I had not posted to my cloud servers, which was all the camera RAW files. I just post JPEGs once I finish running them through Lightroom and keep the RAW files in a couple places.

Everything was gone and I hadn’t had a chance to create a backup on some of the files.

Frantically I tried to use my PhotoRescue software, but due to the newer Mac 10.10.1 operating system it wouldn’t work.


I then found Data Rescue 4. I had to run a deep scan and it took a good 24+ hours to scan the 2 TB hard drive. 95%+ of the hard drive was recovered. The only thing is the folder and organization wasn’t as I hoped, but all the RAW files and JPEGs were there.


Couple of points that you need to know to recover the most. First, if you make a similar mistake I made stop and immediately do not use the hard drive until you have recovered your files. Formating is bad, but even worse is shooting more images and writing those to the hard drive. 


On the Mac open system preferences and then click on Energy Saver.


Change the Computer Sleep to never when running the program. Put it back when you are done. I made the mistake of not doing this so when I set it to run over night after about 15 minutes the computer stopped running and had gone to sleep.

While I would love to say the moral of the story is to never do this, there are times you too may be so tired and not thinking straight and make a mistake as bad as I just did. There are solutions and this is one that worked for me.

Tuesday, February 03, 2015

Word choices are as confusing as foreign language and often worse

Nikon D4, 28-300mm, ISO 12800, ƒ/5, 1/80
Circle of Confusion at best or Linguistic Chaos

Using Jargon and acronyms from your industry with someone not familiar with that jargon will alienate rather than ameliorate, creating a barrier bigger and harder to fix.

Word Choice

I grew up in a Southern Baptist Bubble. There were words used in our bubble that when we said them they were well understood. Here are some of those words:

  • Sin
  • Sanctification
  • Existentialism
  • Inerrancy
  • Predestination
In the circles I grew up in I knew people that could quote scripture every other sentence and they did!

I always wondered did everyone around me really understand what they were saying or just dropping words to sound impressive. I think today most of them were trying to impress more than truly understanding.

Today I actually find when someone starts down this road of a club language to be very divisive and offensive to me.

Nikon D4, 28-300mm, ISO 2000, ƒ/8, 1/500
I think this is the reason for so many nondenominational churches are growing. They tend to use more common language of the marketplace versus a club language.

I was working with an NGO which happens to be run by Christians, but they really want to get non-Christians involved in their social justice projects like digging wells around the world.

They asked for my feedback on a 3 minute video. Twenty seconds into the video the subject talked about why they were involved in with the organization. They dropped the first club language word of "Kingdom of God." 

Immediately I could feel my body actually wanting to get up and leave. They were not even aware how the words alone were creating a barrier and doing just the opposite of what they hoped to accomplish.

Tips

First, learning to evaluate your language to see if what you are saying with words is connecting with your audience is quite difficult and requires practice. You need the help of some really trustworthy friends that will be frank with you. You need them to hear or read your verbiage and give you some feedback. 

Now if your friend grew up in the same bubble as you the odds of them helping is less likely. The best feedback is from someone in the audience you want to reach that culturally would not be aware of all your language jargon.

Second, this might sound like it goes first, but in reality as you are confronted with what are you trying to say with this word and being forced to use other words will you come to realize you might not really know what your true intentions are in your thoughts. Often we say things that just make people feel comfortable. However, if you are trying to elicit a response and not just put people at ease then you may actually have to think about what your message really is all about.

Third, you need to realize also that even if you use all the correct words things like psychological and emotional barriers might exist with the audience. They may prematurely judge your words and interpret something you are not saying before you finish your thoughts. The audience may not really be paying attention and be distracted by something else in their life. They may distrust you and anything you say isn't heard.

There are just a lot more reasons than your words that communication breaks down. You should however make it your goal to word your conversations so that the audience understands them and opens up them to hear all of your message. So practice your messaging with a trusted friend so that your language helps you to communicate more effectively. 

Monday, February 02, 2015

"Match Total Exposures" saves time in Lightroom


Use "Match Total Exposures" to save some time in Lightroom.

If you have a similar scene you can select many images as I have shown here:


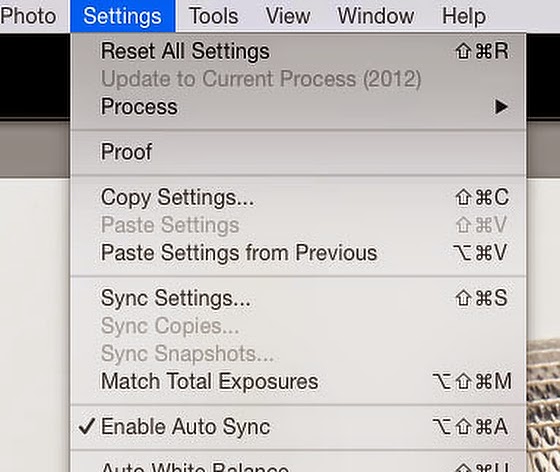
Then make all the corrections to the first photo like you would do in all your "Auto Sync" situations and then go to the Settings in Develop module and choose "Match Total Exposures."

This lets you quickly adjust the exposure of multiple photos to match a target photo. Now you can go back and just select images also and select them and choose your "target" photo and then apply the "Match Total Exposures" and you will save a lot of time that you used to adjust exposures.