Showing posts with label large group photos. Show all posts

Wednesday, August 13, 2014

Use strobes even with the sun outside

Nikon D3, 14-24mm, ISO 200, ƒ/14, 1/250 [Lighting Diagram below]
Using flash outside can really give your photos that pop you need to make your photos better.

Now I often get asked to make group photos and even with some sunlight facing the subject I find that the shadows under the eyes and sometimes from people's heads casting a shadow on another person I prefer to add strobes to take the quality up a notch.


There were clouds also in the sky, but the software for the diagram didn't have that as a choice.

Since there were clouds the people were not squinting and the flash pops in so quickly I get some pretty decent expressions.

To me the biggest change is in those black robes. Anytime I use flash the shadow to highlight difference is minimized. While it looks like a greater dynamic range it really is just the opposite. The strobes help fill in the shadows and therefore brings the exposure all over closer to a four or five stop range, rather than the ten stops often in daylight scenes outside.

Friday, June 01, 2012

One Light: Group Shot


Students helping me demonstrate the issues of problem with one light close the the group. Person closest is brighter than the others.
Here all I have done is repositioned everyone, but still the lady on the far left is darker than the other two in the photo.
This is the lighting setup for the two photos above
After seeing the photos above one of the first things people think they need to do is add another light. No question this would help solve our lighting problem.

Now let's be realistic here. Most photographers starting out will have just one light and cannot justify another light until some income starts coming in. How do you solve the problem with just one light?

Inverse-Square Law

We need to first start with understanding the Inverse-Square Law of Light.

In physics, an inverse-square law is any physical law stating that a specified physical quantity or strength is inversely proportional to the square of the distance from the source of that physical quantity. (Wikipedia)

In photography it means an object that is twice the distance from a point source of light will receive a quarter of the illumination.

How this is used most often in photography is to figure your exposure.  If you want to keep the same f/stop when you move a light twice the distance from the subject then you must increase the power 4 times. Inversely if you move the light twice as close then you will need to power down the light to 1/4 the power to keep the same f/stop.

Using the Inverse-Square Law of light for Group Photo

The further you move the light from a group the difference between the light falling on the subjects faces will become less and less different. The reason is that the distance of each subject to the light source as compared to others in the group will be so small of a difference that they will appear to be more evenly lighted.
The only thing that changes from the first diagram to this one is the light source is moved further from the group and moved the light to the left side.
As you can see in the lighting diagram I have moved the light source further from the group. My suggestion is to move the light as far as you can from the group to get the most even amount of light.

You can now see that the light is more even on everyone in the photo. One person said it is light creating depth-of-field for the flash using this technique.
While this would have solved the lighting problem by keeping the lights the same in the first photo it will limit your creativity for posing with one light.  This is why moving the light back gives you more posing options and more even light in a group photo.
Technical Changes
  • ISO: You may need to use a higher ISO to have your flash still be affective. You may change from ISO 100 to as high as ISO 3200.  Remember that since you are using a flash the noise is not the same and actually can appear to disappear. (link to earlier blog on this)
  • Aperture: With group photos you will want to use f/8 or higher to be sure everyone is in focus. If you use f/2 for example your group photo above would look more like a solo act and their backup singers and not like a musical group.
  • Studio Strobe vs Hot Shoe Flash: This is when it makes more sense to own a studio flash than a hot shoe flash. You can get more power and recycle time is much quicker. (Earlier Blog Post comparing hot shoe flash and studio light)
(8+ Nikon SB900s) = (1 Alienbees 1600)
(8 x $510 = $4,080) vs ($360)
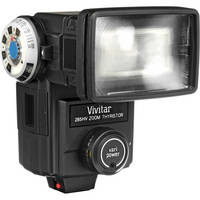
You can buy hot shoe flashes for under $90. These hot shoe flashes are not TTL, but you can use them in manual mode just as you would a studio strobe.  They are just less powerful and take a while to recycle.

This is the Vivitar 285 which you get get at B&H Photo for $87
Go and practice making a group photo and getting everyone evenly lighted using just one flash. Understanding and mastering this skill will help you when you have limited amount of equipment and still need a professional photo of a group.

Thursday, June 16, 2011

Spacing is important for group photos

2
When you have groups space the people so that if you have a second row they are staggered in between the front row.
When taking group photos, arrive early. You need to scout the location, maybe setup risers, set your lights and then wait.  When the group arrives you can ask everyone to lineup by height and start in the middle back with the tallest person. As you add people alternate them on either side of the middle.

While you might not have a set of risers there are many places you can get a similar effect.  Look for stairs a sloped area outside or if you don't find one get up higher and shoot down on the group.

The key is to have the photo already sketched out in your mind or even on paper.  You also have to take charge right away.  I have even jokingly taken a few shots before they get into place fully.  Since the flashes go off the folks think I have already really started.  Well I have--I have taken charge and gotten their attention.

I do make a little joke and then they all laugh.  I might even snap another one for fun.  The problem with large groups is people have conversations with each other. You need their attention and also need those talking to stop.  They make it difficult for others to hear your instructions. 
3
Use steps or risers for larger groups so that the people on the back rows are not blocked by the height of those in front of them.
One thing these photos show is how more uniform everyone is in their dress the more of a "group" they become.  Even the introduction of color with the hoods creates a little more of individuality in the photo.

4
For the group photos I used this setup.  The lights were about 30 feet from the group.  The further the light is from the group the light value from the front row to the back is more even.  The closer the light is to the group the greater the risk is of the front row being much brighter than the back row.


1
Before and after group photos I like to shoot candid photos.  Most clients love to have this moments for their files.