Showing posts with label Group photos. Show all posts

Friday, October 25, 2013

Want better posed group photos, pick better locations

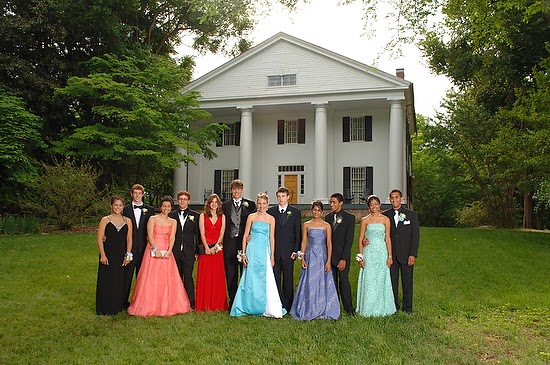
Bulloch Hall Plantation located in Historic Roswell, GA
Location, Location, Location

Just like real estate, your photos will look better when you choose your location. This is the time of year for holiday parties, school dances and even weddings. While going into your yard and finding a clean background is a great idea, picking a location in your town that stands out may be a better idea.


Here you can see all the parents watching as I am taking the group photos and couple photos. If you look closely you will see my one Alienbees B1600 with the original vagabond battery by Paul Buff. It is to the far right in back [yellow head].


Another tip is to use a tripod. There are a couple of good reasons to do this. First your photos are sharper when the camera is rock steady still. Second if one person in a group photo blinks and then another person in another photo, you can always cut and paste one person into the other photo using PhotoShop.  This way everyone will look good in one photo.


Fill Flash

The subjects are all back lighted by the sun in all these photos. Unless you use a flash you will have a hard time holding the background and their faces to get a good exposure.  I metered the scene which was ISO 100, ƒ/8 and 1/50.  I then set the flash to ƒ/5.6 or one stop under whatever I would have metered for the over all scene.


Here I composed a wider shot to show Bulloch Hall where the grandparents of President Theodore Roosevelt, the 26th President of the United States, and great grandmother of Eleanor Roosevelt, First Lady from 1934-1945 lived.


I like the closer composition over the wider shot.  But I did both in case couples preferred one over the other.


Any time my family is with me and I have gone to this much trouble for photos, I always get a photo of them.

Monday, October 21, 2013

Homecoming Dance Photos

Nikon D4, 28-300mm ƒ/3.5-5.6, ISO 320, ƒ/5.6, 1/40

With a little preplanning your photos of your child's homecoming and prom pictures we all take before with friends and family can improve your photos.

Now we tried to get all of our daughter's friends to stop by the house before going out that night, but that just didn't happen. This photo here out in front of the restaurant is what we did get with the group.


I hope you notice the major difference in backgrounds. Also, the on camera flash below compared to off camera flash above is also not as good.


This is how I setup in my backyard for the photos with the green background. The camera is on a tripod so that I could drag the shutter and use a low ISO.


It was easy to move parents in and out of the photos.


I just put the camera on a tripod and let our friends press the shutter so I could be apart of my daughter's first homecoming dance.

When you plan those photos around your house where the family get's dressed up, take the time to scout for a good background that will not distract from the people in the photo. Earlier that day we had rain and the ground was a little wet and for that reason I used a corner of the patio so people didn't sink into the ground.

Be sure the background doesn't have hot spots from sunshine. This will distract from the people.

Use tripod so you can shoot at lower ISO. Use off camera flash to help fill in the raccoon eyes and also help clean up the color in the skin tones.

Tuesday, November 06, 2012

Rock Band Promo Shot

Nikon D4, 28-300mm (44mm), ISO 100, 1/160, ƒ/5
"Hey can you take some photos of our band for a promo shot?" Was the request from Late Night Reading's drummer Drew Cottrell.

Earlier I took some pictures of the band when they were in town a couple of months ago.  Here is the blog post I did then.  What I wrote about back then was that even the D4 was struggling to take photos in a dark hole like the Swayze's Venue in Marietta, GA.

I had in my van my monobloc lighting kit this time in addition to the Nikon Speedlights.

I went into the parking lot a little later after they had played and set up my lights.  I also asked them if they had something they were looking for.  They didn't have any ideas, so I took the lead and told them about this concept you see above.

Here is the setup for the photo.


Now lets play

Once I have the lights set and get a few of the shots that I was initially looking for, I asked the band to have some fun.

I then took the same setup and moved it to where you could see the Tatoo Shop and the Pawn Store lights in the background.  Here are some of those shots.

For these I used a tripod and dragged the shutter to 1/13th of second.  Everything else stayed the same since there was almost no light on the band.


I would prefer to shoot the promo photos all the time over the concert photos.  Just compare these above to the same band performing below.

Live Performance 

Nikon D4, 14-24mm ƒ/2.8, ISO 6400, 1/60, ƒ/4
The strobes are on the PocketWizard Transceiver TT5 and They are on Manfrotto 5001B Nano Black Light Stands and the Manfrotto 175F Justin Spring Clamp with Flash Shoe to hold the flashes. I am triggering the TT5 using the PocketWizard Mini TT1 and PocketWizard AC3.

I turned the ISO up to about ISO 6,400 because I didn't want the background to go totally dark.
Nikon D4, 14-24mm ƒ/2.8, ISO 6400, 1/60, ƒ/4

Nikon D4, 28-300mm ƒ/3.5-5.6, ISO 10,000, 1/60, ƒ/5.6
While these are pretty good for shooting in a dark hole, I still prefer having the control I had with the studio strobes and moving the band members around.

My friend Zach Arias launched his successful freelancing business just shooting bands like Late Night Reading's promo shots. He started by just using a Vivitar 285 on a light stand. He was so successful he started a workshop teaching photographers his "One Light" technique.

You can see my whole take here from the evening.

Friday, June 08, 2012

Versatile lighting setup for groups and head shots

This is a lighting setup I used for an awards dinner last night. A little over 100 awards given on stage in just a few minutes. After they got their award they walked off the stage and I took their photo.  I was averaging about 3 groups a minute with 2 shots each.  We were moving.

So this is where speed was very important.

Items I used for the shoot:

When I set this up I used light stands that go to about 8 feet tall. I would suggest 10 foot light stands if I were to do this again. I set the lights 45º to either side of the camera and as I high as the light stands would go.

The reasoning is that I had no time to have people sit down and pose them. They would all be standing.  I wanted the shadows to go down behind the and not up on the screen. I kept everyone about 2' to 3' away from the background to help the shadows to fall down or wide.

I wanted to shoot at f/8 to be sure if I ended up with two rows everyone was in focus. I didn't need much more depth a field.

I shot at ISO 200 and 1/8th power on the monobloc lights.

Results for the Awards Photos


The reason I didn't use umbrellas or soft boxes was the space issues.

While you are here photos

Now the primary reason I am hired is to get these photos which are then sent to those in the photos for them to use in their own newsletters to promote their winning of the awards. However, once you are there they often want some other photos. The most common is head shots of their staff.

Since we didn't have the luxury of time and space to use another lighting setup I shot the staff head shots using this lighting setup. 

Results for quick head shots


The client is satisfied because the photos work well for their uses.

More than photos

If all I were doing was just taking these photos it would be one kind of a job, but they need names of everyone. So I was able to shoot and identify all the people in the photos. Think about pulling this off.

How would you shoot and identify all the people in the photos?

I then print out contact sheets with the photos and the names under each photo. The text is also in the metadata of each photo, so if they can search for photos by names or open the file in software that reads metadata (PhotoShop) and read the caption.

Since the photos all have identification embedded, then the client can easily just drag and drop these photos into a database and easily pull photos in the future.

Keep in mind when you do a job that there might be a better way to do any individual part of the package. However, you must take into consideration all the aspects and how they impact one another to reach the goal for the client. 

Friday, June 01, 2012

One Light: Group Shot


Students helping me demonstrate the issues of problem with one light close the the group. Person closest is brighter than the others.
Here all I have done is repositioned everyone, but still the lady on the far left is darker than the other two in the photo.
This is the lighting setup for the two photos above
After seeing the photos above one of the first things people think they need to do is add another light. No question this would help solve our lighting problem.

Now let's be realistic here. Most photographers starting out will have just one light and cannot justify another light until some income starts coming in. How do you solve the problem with just one light?

Inverse-Square Law

We need to first start with understanding the Inverse-Square Law of Light.

In physics, an inverse-square law is any physical law stating that a specified physical quantity or strength is inversely proportional to the square of the distance from the source of that physical quantity. (Wikipedia)

In photography it means an object that is twice the distance from a point source of light will receive a quarter of the illumination.

How this is used most often in photography is to figure your exposure.  If you want to keep the same f/stop when you move a light twice the distance from the subject then you must increase the power 4 times. Inversely if you move the light twice as close then you will need to power down the light to 1/4 the power to keep the same f/stop.

Using the Inverse-Square Law of light for Group Photo

The further you move the light from a group the difference between the light falling on the subjects faces will become less and less different. The reason is that the distance of each subject to the light source as compared to others in the group will be so small of a difference that they will appear to be more evenly lighted.
The only thing that changes from the first diagram to this one is the light source is moved further from the group and moved the light to the left side.
As you can see in the lighting diagram I have moved the light source further from the group. My suggestion is to move the light as far as you can from the group to get the most even amount of light.

You can now see that the light is more even on everyone in the photo. One person said it is light creating depth-of-field for the flash using this technique.
While this would have solved the lighting problem by keeping the lights the same in the first photo it will limit your creativity for posing with one light.  This is why moving the light back gives you more posing options and more even light in a group photo.
Technical Changes
  • ISO: You may need to use a higher ISO to have your flash still be affective. You may change from ISO 100 to as high as ISO 3200.  Remember that since you are using a flash the noise is not the same and actually can appear to disappear. (link to earlier blog on this)
  • Aperture: With group photos you will want to use f/8 or higher to be sure everyone is in focus. If you use f/2 for example your group photo above would look more like a solo act and their backup singers and not like a musical group.
  • Studio Strobe vs Hot Shoe Flash: This is when it makes more sense to own a studio flash than a hot shoe flash. You can get more power and recycle time is much quicker. (Earlier Blog Post comparing hot shoe flash and studio light)
(8+ Nikon SB900s) = (1 Alienbees 1600)
(8 x $510 = $4,080) vs ($360)
You can buy hot shoe flashes for under $90. These hot shoe flashes are not TTL, but you can use them in manual mode just as you would a studio strobe.  They are just less powerful and take a while to recycle.

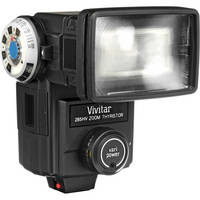
This is the Vivitar 285 which you get get at B&H Photo for $87
Go and practice making a group photo and getting everyone evenly lighted using just one flash. Understanding and mastering this skill will help you when you have limited amount of equipment and still need a professional photo of a group.

Monday, November 28, 2011

Why I photographed them this way (Part 2)

Nikon D3S, 24 - 120mm, ISO 200, f/9, 1/60
Lighting Setup
This first photo by itself may not make a lot of sense to light and shoot the photo this way. However, when I was asked to help my son with all his friends on prom night I had to be able to shoot a lot of couple shots and group shots in a very limited time.

If you see the lighting diagram you will notice I put lights up behind the people and up the stairs behind them.  This is so I could shoot without having the drag the shutter too long to get the background to show up.  It also helped me by having very little shadow that didn't have some light hitting it.  This meant that the dynamic range was in some ways compressed.


I hope you are seeing that I didn't move. What I did do is use the Nikon 24-120mm lens so I could stay put and just zoom in and out the accommodate the size of each grouping.

If I were to step forward I could end up casting a shadow into the photo.  By standing back you avoid the problem of the photographer casting a shadow.


Nikon D3S, 14-24mm, ISO 200 f/9 1/60

This last photo helps you to understand one more reason I set the lights one way and left them alone.  I put the lights on light stands and then put them as high as I could make them go and then put sand bags on the bottom of the stands.

This helped be sure the light would drop off down behind people and make any shadows not hit people in the rows in back.  Also by having steps to use I was able to stack folks to get everyone in the photo and see their faces.

Summary

Many times what will determine how you photograph groups will be the time you have with the group and how many different groups you have in that time frame.  I have learned to setup for the biggest group and then place the smaller groups in the same space and just get closer with the camera.

Thursday, June 16, 2011

Spacing is important for group photos

2
When you have groups space the people so that if you have a second row they are staggered in between the front row.
When taking group photos, arrive early. You need to scout the location, maybe setup risers, set your lights and then wait.  When the group arrives you can ask everyone to lineup by height and start in the middle back with the tallest person. As you add people alternate them on either side of the middle.

While you might not have a set of risers there are many places you can get a similar effect.  Look for stairs a sloped area outside or if you don't find one get up higher and shoot down on the group.

The key is to have the photo already sketched out in your mind or even on paper.  You also have to take charge right away.  I have even jokingly taken a few shots before they get into place fully.  Since the flashes go off the folks think I have already really started.  Well I have--I have taken charge and gotten their attention.

I do make a little joke and then they all laugh.  I might even snap another one for fun.  The problem with large groups is people have conversations with each other. You need their attention and also need those talking to stop.  They make it difficult for others to hear your instructions. 
3
Use steps or risers for larger groups so that the people on the back rows are not blocked by the height of those in front of them.
One thing these photos show is how more uniform everyone is in their dress the more of a "group" they become.  Even the introduction of color with the hoods creates a little more of individuality in the photo.

4
For the group photos I used this setup.  The lights were about 30 feet from the group.  The further the light is from the group the light value from the front row to the back is more even.  The closer the light is to the group the greater the risk is of the front row being much brighter than the back row.


1
Before and after group photos I like to shoot candid photos.  Most clients love to have this moments for their files.

Friday, May 13, 2011

Hire a professional photographer for technical and for the artistic

When you hire a professional photographer, they show up with the right equipment to deliver high quality images.  One thing is a seasoned pro shows up with is flashes to use outside with group photos on sunny or cloudy days.

1
I used a flash on this overcast day to help with being sure you see everyone's eyes.  If you don't use a flash you will often have raccoon eyes, where those with deep socket eyes have shadows covering the eyes.  The flash also gives a catch light.  One more thing is often on overcast days the color shift can rob a photo of the color that the flash can put back.

2
This is the time of year for diploma presentations to graduates as in this photo.  A seasoned pro will be sure the background is appropriate and the lighting looks natural and you can see everyone's faces.

3
While posed photos are often the ones chosen, today people always like to have a "fun" shot.  While you would never have a person who is part of a group photo up above everyone else for the "fun" photo it can work.  Again the photographer needs to be ready for the moment when it happens.  This is not a 1, 2 and 3 count off photo and then fire the camera--you have to anticipate.  If you wait until you see it--it is too late.


4
Using flashes effectively comes from years of not using a flash like in this photo.  You have to see the light before you can make it look natural.  It is also another reason to hire the seasoned pro, they will deliver "moments" rather than just lining people up and getting good expressions in a group photo cannot replicate.  This requires a photographer to feel the moments and capture the mood. 

Graduations are ceremonies for change.  We need them to help us say goodbye to the way things were and help us to prepare for the future.  Weddings are as much a funeral celebration to the single life as they are to the future as husband and wife.  Graduations are a time when people are saying goodbye to the friends they shared for the past year or years on a journey.

Photography plays a really big part in helping us with these transitions in life.  They give us something tangible to help us remember.  We will remember the friends and maybe want to reconnect after looking back at the photos.

If you hired the pro rather than having your friends with cameras take the photos you are more likely to have memories that tell the story to future generations. The professional photos capture your personality and tell something about you to your grandchildren that words alone would not capture.

Thursday, April 28, 2011

Some of my best friends

This is one of the best group of guys I enjoy hanging with anytime I get a chance.  We were missing just a few of the guys, but we enjoyed meal and sharing memories as well as making some new ones.

We have known each other between 20 - 30 years. If you ever want to know where I get some of my inspiration--these are the guys.

1
This is some of my good photography friends: Dr. Bob Carey (past NPPA president and chair of Gardner-Webb's Communications department) Mark Sandlin (director of photography at Southern Living) Bill Bangham (Dir., Editorial & Photography of International Mission Board) Kent Harville (Corporate Visuals Coordinator, Lifeway Christian Resources), Jim Veneman (Director of Visual Communication, Union University) Gibbs Frazuer (Freelance Photographer)


2
Bob Carey
3
Mark Sandlin and Bill Bangham

4
Bill Bangham works on material for his blog http://wahokia.wordpress.com/

6
Bill Bangham enjoys dinner at Sugo in Roswell, GA.  The crane was made by Chelle Leary.

7
Photo of the crew with me by Gibbs Frazeur