Showing posts with label mixed lighting. Show all posts

Friday, October 25, 2013

Want better posed group photos, pick better locations

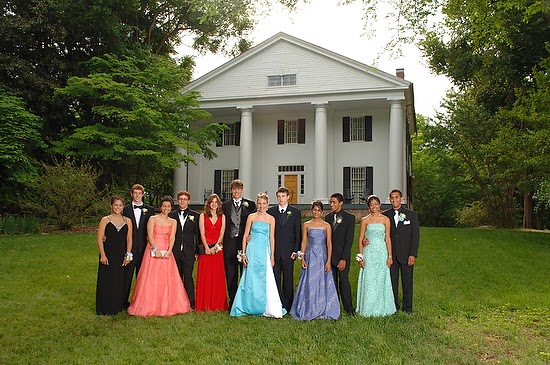
Bulloch Hall Plantation located in Historic Roswell, GA
Location, Location, Location

Just like real estate, your photos will look better when you choose your location. This is the time of year for holiday parties, school dances and even weddings. While going into your yard and finding a clean background is a great idea, picking a location in your town that stands out may be a better idea.


Here you can see all the parents watching as I am taking the group photos and couple photos. If you look closely you will see my one Alienbees B1600 with the original vagabond battery by Paul Buff. It is to the far right in back [yellow head].


Another tip is to use a tripod. There are a couple of good reasons to do this. First your photos are sharper when the camera is rock steady still. Second if one person in a group photo blinks and then another person in another photo, you can always cut and paste one person into the other photo using PhotoShop.  This way everyone will look good in one photo.


Fill Flash

The subjects are all back lighted by the sun in all these photos. Unless you use a flash you will have a hard time holding the background and their faces to get a good exposure.  I metered the scene which was ISO 100, ƒ/8 and 1/50.  I then set the flash to ƒ/5.6 or one stop under whatever I would have metered for the over all scene.


Here I composed a wider shot to show Bulloch Hall where the grandparents of President Theodore Roosevelt, the 26th President of the United States, and great grandmother of Eleanor Roosevelt, First Lady from 1934-1945 lived.


I like the closer composition over the wider shot.  But I did both in case couples preferred one over the other.


Any time my family is with me and I have gone to this much trouble for photos, I always get a photo of them.

Wednesday, October 24, 2012

Sports Photography: High Speed Flash vs No Flash

Nikon D4, 28-300mm, ISO 12,800,  ƒ/5.6, 1/400 -- Flashes used (4) Alienbees B1600 with  11" long throw reflectors with PocketWizard Plus II receivers and being triggered by the PocketWizard Mini TT1.
High Speed Flash vs No Flash

In the photo above I used a flash with an output just about the same output as the existing light.


This is the histogram for the above photo.

Nikon D4, 120-300mm, ISO 11,400,  ƒ/2.8, 1/1000
Here is another photo where strobes were not used. I had to change to a faster lens and used a faster shutter speed.


This is the histogram for the second photo.  There are two things I notice that are different.  First of all the shadows in the available light photo have less information as compared to the photo using flash. Second the entire dynamic range appears greater with the flash, which results in less noise in the photo.

ISO 25,600

I wanted to just see what the Nikon D4 looked like at 25,600 without strobes.  Here is that result.  I am showing the same player so there is little variation as possible except for ISO.

Nikon D4, 120-300mm, ISO 25,600,  ƒ/4, 1/1250
Here is the histogram for ISO 25,600


Color Temperature


The ability of a camera to reproduce color accurately depends a great deal upon the color space with which the object is photographed.  The dynamic range of color is the greatest with Daylight or 5500º Kelvin. As you move away from this color temperature to the sodium vapor lights in this gym that are 3700º Kelvin and then must add 27+ magenta to color correct this to get a neutral grey the color space actually shrinks.  The dynamic range is less.

For the most accurate color if we had used only the strobes and no ambient light at all the color would have been the most accurate. Also, I could not have bounced the flashes off the ceiling, but would have to point them straight at the volleyball players. You see the flash that is bounced will have a color shift of whatever it bounces off. If the ceiling was red then there would be a red tent to the light.

Setup


Here is a photo of one of the four Alienbees B1600 with the 11" long throw reflectors. You can also see the PocketWizard Plus II used to trigger the flash. I dialed down the flash output to 1/8 power. Again with todays full framed high ISO camera chips the results are quite acceptable and the flash is less disturbing to those in the room.


This is a wider shot of the room where you can see the results of all four strobes going off.


This is the histogram for the overall shot above.


Here is that same angle with no flashes.


This is the histogram for the available light photo.

One last comparison

Nikon D4, 28-300mm, ISO 12,800,  ƒ/5.6, 1/400 -- Flashes used 
Nikon D4, 28-300mm, ISO 12,800,  ƒ/5.6, 1/400 -- No Flash
High Speed Flash Sync

You may have noticed that the flash shots were done with studio strobes and syncing faster than the 1/250 sync speed for the Nikon D4.  How did I do that?


Here is an explanation from the PocketWizard website.
PocketWizard’s HyperSync™ feature throws x-sync out the window, allowing never before possible shutter speeds with full power flash – any full power flash.  With some camera and flash combinations even 1/8000th second is possible.   (Alienbees with the Nikon would only sync up to 1/400)
HyperSync is simply the ControlTL® system’s unique ability to adjust the timing of the flash burst so that you can use as much of the light output as possible as the shutter opening passes over your sensor.  With the systems “through-the-shoe” communication, a ControlTL transmitter with HyperSync can automatically detect the camera type connected to it as well as the shutter speed. Read more ...

Tuesday, April 17, 2012

How to get rid of orange and green backgrounds with flash

Nikon D4, ISO 3200, f/6.3, 1/80, 28-300mm, White Balance: Flash
Have you been getting photos like this with your off camera flash? The reason for it is you have a mixed lighting situation. The background is tungsten or 3200º Kelvin and the subject has flash or 5500º Kelvin.

Nikon D4, ISO 3200, f/6.3, 1/80, 28-300mm, White Balance: Tungsten
Now by doing everything pretty much the same except for two things are changed: the flash has an orange gel on it to match the tungsten and then the white balance for the scene is set to tungsten.

I prefer to put on the orange gel over the flash and then use my ExpoDisc to get a custom white balance by pointing the lens to the flash with the ExpoDisc in front to help me get an accurate skin tone for the subject.

Nikon SB-900 with the gel kit that comes with the flash and the two covers.  One at the bottom holds the gels and the other cover is a diffusion filter.  You can use the gels with the diffusion filter as well. There are two green and two orange filters. You can test these and depending on the lights in the room one may work better than the other.
The gel slides into the plastic cover and the hole lines up with a raised piece in the cover. When you do the the little white squares will automatically adjust your camera to the correct white balance when on the camera hotshoe.
Here you can see the cover snapped back on the SB-900 with the other gels off to the side in the carrying case.
I prefer not seeing the orange and green backgrounds in my photos when using flash. If you do use the gels as I am showing you here, then you will fly through the post production. Many people try and remove the color shift in the background with post production, but the time it takes to convert the flash to the correct gel combination if far faster than just color correcting one image.

Now imagine shooting a wedding or an event where you may have hundreds if not thousands of images to color correct if you do not use the gels.

Nikon D4, ISO 3200, f/6.3, 1/80, 28-300mm, White Balance: Flash 
This is with regular flash under fluorescent light. There are more color differences from my experience under fluorescent lights than under tungsten.  Just because you see a fluorescent light doesn't mean it is going to be green. Some of the lights are already daylight balanced and will give you proper color with a flash. 
Nikon D4, ISO 3200, f/6.3, 1/50, 28-300mm, White Balance: Fluorescent
Here you can see the shift to a better skin tone and background not as green, because I used a green gel over the flash.

While this may take between 2 - 5 minutes to set up properly over time you may cut your time to 2 - 3 minutes to do. It is very important you see this in your over all workflow. 2 - 5 minutes once or 2 - 5 minutes for every photo you shoot to color correct it. It is your choice. Depending on the situation you might not have time. If you had the time and didn't do it you will be wishing you had during post.

Monday, March 05, 2012

YWAM School of Photography: Mixed Lighting

Here is another lighting assignment for the students.  They were to go outside and use the sun as a back light and then use a strobe as main light.  Here is the assignment and diagram that I sent to them.

Description: Mixed lighting

Items:

Monobloc
You may choose to use your hotshoe flash if you choose, but it must a be off the camera.  Short cord will not work for this.  You need a really long cord to fire the flash or you need to use the radio remotes.  Use extension cords for power or use the battery powered strobes.

Camera
You may use any lens you choose for this assignment.  Fish-eye, wide angle, portrait, telephoto, lens baby or shift.  Make this a strong environmental portrait as you can.

Sun
This is done outside with the sun still lighting the sky.  Can be dusk, dawn or mid day sun.  Be sure the subject is back lighted by the sun and not on their face.

Subject
We need good expressions in this photo.  Maybe have the subject posing with something.  Sitting on a motorcycle or holding a surf board are some examples of what students have done in the past.

Here are the students results:
 
by Elsa Mesot

by Lisa Mironuck

by Annett Rek

by Sharon A. Reitsma

by Deborah Mataia

by Lauren R. Tercero

by Francisco Leon V.

by Janie Wakefield

by Joshua Soon Yong Choi

by Xiaodong Yu

by Hastings Franks

by Katie Suderman

by Sarah L. Quinones

by Malcolm Adair

Sunday, January 22, 2012

One Week of Studio Lighting in Kona, Hawaii

YWAM School of Photography 1
Students work from 2006
In one week students go from not knowing how to turn on the strobes to doing some incredible work. My job is the take the fear out of trying new things and teaching them some basics from which they can build upon.

Take a look at each of these shows showing you some of the student's work through the years. I think you will be impressed as I was with their first time shooting with studio strobes.


This is the students work from 2006


In the studio
Mixing the strobes with available light


This is the students work from 2007
We shoot and let everyone see each others work on monitors, this way we are learning not just by doing but observing as well.
The school has a variety of lights for the students to practice with in the class.  Here we have the JTL battery pack system letting you shoot outside with studio lights and radio remotes.
Students learn they can shoot at dusk and night with the strobes. Here the students mixed strobes with available light and added a flashlight to write the word "Viking" beside the subject.  This was his nickname.


These are examples of my students in 2009 and what they did in one week.


Here is the students work from 2010