Showing posts with label posing. Show all posts

Monday, February 13, 2017

Shooting 3:1 Lighting Ratio by the students I taught in Kona Hawaii

© Fred Tesone 2017
These are the photos by the students in School of Photography 1 at the Kona, Hawaii Campus.

The students shot the 3:1 Lighting ratio and then after doing the assignment I saw they needed to push for more variety. So the next assignment was to turn in 10 different poses of a person all doing 3:1 Lighting Ratio.


Tuesday, March 15, 2011

Lens Choice: Just the subject or a story

Filling the frame with a subject can look quite different depending on the focal length of the lens.

These three examples the f/stop stayed the same. I moved the camera forward or backwards to keep the stuffed ducks the same size in the frame.


c
The 28mm wide-angle lens lets you see the environment around the subject more as you see in this photo of the What the Ducks.


b
The 105mm short telephoto focal length lens makes the background less distracting.


a
The 300mm telephoto focal length lens makes the background even less distracting.
Which one do your prefer and why? 
What you need to do is understand how a lens choice can really help your subject.

You just need to say here is the subject then look at using the telephoto lens.  This will help you make the subject pop out away from the background. All the focus will be on the subject.

If you need the subject to be part of a sentence where you use adjectives and adverbs to help give a context for the subject, then move in close with a wide-angle lens. Now you see what is around the subject as well as the subject.

There are varying degrees to this change. Just as the writer uses simple sentences and sometimes longer sentences to tell the story, the lens helps you make it a simple sentence or complex.

Sunday, February 27, 2011

Three Stages of Composition

Stage One: "Literal" Snapshot – making photographs to simply describe what you see. 

Typical Snapshot
Typical Snapshot

A snapshot is popularly defined as a photograph that is "shot" spontaneously and quickly, most often without artistic or journalistic intent. Snapshots are commonly considered to be technically "imperfect" or amateurish--out of focus or poorly framed or composed.
Snap shot - this time with an off camera flash at 45 degrees
We all start with the literal snapshot and often revisit this stage of photography. These literal snapshots are primarily taken for the photographer. These photos are "memory joggers." They help you remember the moment.

Inside snap shot without flash

Inside snap shot with flash at 45 degrees
Believe it or not there are many "professional" photographers who never move beyond this point. Since the bride and groom were there with the photographer, the literal snapshots are like "memory joggers" for them as well.

Another place I see this is my church. After a team comes back from their mission trip they show their photos the team laughs because they get the "inside joke." While not always a joke it is another memory jogger and not a photo that communicates to the audience.
When a photographer realizes that other photographers are getting better looking photos than they do, they often move to stage two.

Stage Two: "Artistic" Snapshot - making aesthetically pleasing pictures that enhance what you saw
Inside photo with flash at 45 degrees and the photographer simplified the background giving more attention to the subject.
In this stage the photographer is aware of visual composition, exposure and how to do things like control their depth-of-field and/or freezing a subject or blurring the background.

This is where a photographer thinks about being sure the subject is well composed.

Not everyone is able to see the difference in their own photos to get to stage two, but believe me most everyone can see the difference between a "literal snapshot" and an "artistic snapshot."

I have written in previous newsletters about composition, lighting and framing and therefore encourage you to review those articles.

Stage Three: "Expressive" Images - images made for public, rather than private meanings. Expressive photography, like all art, offers universal, and often metaphorical, statements.
Ansel Adams said it best, "There are always two people in every picture: the photographer and the viewer." Once you realize this and want the audience to feel about the subject as you do then you want to move beyond just the "rules of composition."
Subject in her room. Main light off to the side out of the camera view to highlight the subject and draw you to her.
 Expressive photography interprets, rather than describes, what we see to others.


There are three aspects to Expressive Photography, see the diagram. All three need to be present for the photo to be more than a "artistic snapshot."
snap7
Subject close to camera and her room around her. Light off to the right lighting her to draw more emphasis on her.
Abstraction removes literal, descriptive clutter and hones an image down to its essence and encourages unlimited thinking. In music this might be the difference of listening to music that has no words in the tune.

Your mind is free to explore your thoughts. However, if the music has words in the music then it is less abstract even if the words are not sung. Hearing Amazing Grace played even without the words will put a more literal thought and therefore is not unlimited as the abstract music.

If the photo moves too far into just abstraction then the other parts of the triangle become weakened and the photo becomes just an "artistic snapshot."
Tension presents elements that seem to be at odds with their context and creates contrasts and juxtapositions that stimulate both the emotions and the imagination. This is where the photographer helps create a mood within the photo. They may use composition, lighting and exposure or in combination to help move the photo beyond just documenting the moment to an interpretation of the moment. Under expose a little and you create darkness or gloom. Over expose and you may create lightness and lighten the mood.

After photographing my daughter in different locations I started to write this newsletter. My wife called out to me "Stanley you've got to see Chelle." Of course I had to add another photo after seeing her in a tree playing her guitar. Some of the best photos are when you catch the subject doing what they like best.
Human values convey the emotions, beliefs, traditions and knowledge that we understand and share as humans. Genuine smiles communicate across all language barriers, just as frowns and anger will. We often say this is one of the most critical factors of the portrait. What are the three most important things of a portrait?—1) Expression 2) Expression and 3) Expression.

To make expressive photos you must first, ask yourself what it is you want to express through your image(s). How do you feel about your subject?

I like to boil this down to "Why?" Why should anyone in your audience care about what you want them to see?

Journalists are trained to ask: Who, What, Where, When, How and Why. In my opinion the hook of the story often is resting on the Why.

If you failed to ask yourself why you are making this photograph—rest assured that your audience will not know either.

I would love for you to have a chance to comment on which photos you think above are your favorite photos and why? Do any of them work as "Expressive" images?

Thursday, March 06, 2008

Seeing Eye to Eye Isn't Always Best

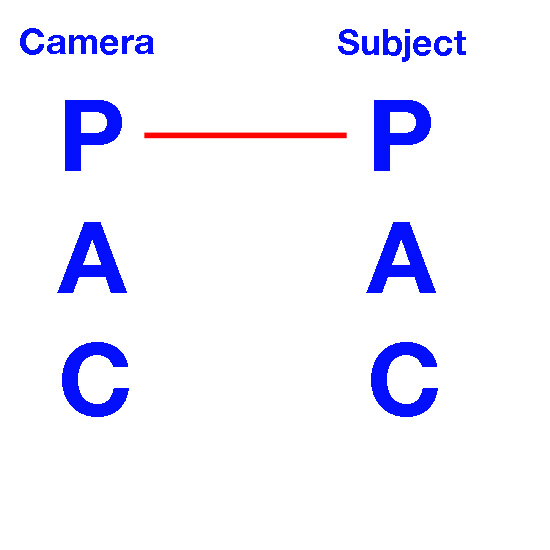
In Psychology 101 we learn the value of relating to others at eye level. Many books on photography discuss unusual angles such as a worm's eye or a bird's eye view. Such perspectives can create interesting photos, but there is much more to the choice of the angle of view than just making a nice picture. Indeed, the angle from which you photograph a person sends a message to the viewer about that person. Do you know what message you're sending?

The three letters in the illustrations below stand for Parent, Adult and Child. If you photograph another adult at their eye level the camera (audience) is, of course, on the same level with your subject. This adds dignity to the subject.

On the other hand, if you shoot down at the subject you place the audience above or over the subject much the same way a parent is above or over a child. This makes the audience feel responsible for the subject. We often see photos of starving children in Africa photographed this way.


Lower the camera angle and you reverse the camera (audience) to the subject relationship. This "shot from below" adds prominence to the subject. It increases the stature of the subject and makes them more authoritative. (Don't use flash from below a face unless you want to create the look of a monster.)


To carry the audience back to their childhood, place the camera on the floor and crawl around photographing a child at the child's eye level.


When photographing an expert, like a research scientist, keep the camera at eye level, not below. The eyeball-to-eyeball angle helps to humanize or "warm up" the expert.


Photographing people using this simple PAC principle allows you to make statements about who they are, not just what they look like.

Like everything else in photography, knowing more than ƒ-stops and shutter speeds will make you a better photographer. And remember, seeing eye-to-eye isn't always best.

Wednesday, January 30, 2008

Guidelines for Portraits, Headshots and Mug shots

Good example
With LinkedIn, Facebook and other social media websites, the importance of a good headshot could not be more important.

There are a few do’s and don’ts, which if you know them can help you look your best the next time you have your photo taken.

When you are having a head and shoulders photo made the photo is suppose to be about the person and not the clothes. I doubt seriously a clothing manufacturer wants a headshot of the model to sell their shirts—they want to see the clothing predominately.

The reverse of this is what will help you look your best—the photo is about you and not your clothes and/or jewelry. So here are a few guidelines about how to keep the attention on you and not the clothes.


Example of pattern

Solid Colors—Avoid Patterns
Keeps the viewer from looking first at the clothing due to the design over the face

Darker clothing is preferable
Your eye will go to the lighter area of the photo, which will be the eyes. White shirts are difficult for printers to hold together and makes your head look like it is floating on the page without a shirt sometimes.


Example of Solid Color
Avoid herringbone jackets
On the web and television you will get a moiré effect.

Classic over trendy clothing
The classic look tend to stay fresh looking without going out of date as quickly as some of the fashion trends of the day and makes the photo look more current longer.

Simple or no Jewelry
One strand of pearls and matching earrings verses pendants and large earrings help keep the attention on you.


White Clothing & Jewelry
Do you wear casual or a suit for the photo? If you are using the photos for business—it is always best to have the suit in addition to a casual dress if you choose to use as your primary photo a casual dress. The reason for the backup suit photo is we often need a more serious tone at times. If your company is going through a merger—the suit photo would probably be a better choice to send out with the PR packet.

As you plan for portraits in the future it is always best to follow these guidelines and always bring two or more outfits to change into. If you are part of the executive team of the company you want to look your best so the company will benefit. Having a few different portraits with different outfits to pick from gives you the ability to choose the best option—and this is what most executives do each day—make choices.


Moiré Effect from Herringbone Jacket
If you need additional help in planning your next portrait session—give me a call and I will be glad to answer any additional questions you might have.

Wednesday, May 10, 2006

Group Photos

Every once in a while you just have enough good things come together to turn a standard photo like a head shot or group photo in this case into something pretty good.

I was pleased with the result. The two key leaders of the design firm are out front leading their team at this Victorian home in Marietta, Georgia.

I really enjoy spreading out group photos where you can see everyone. You may have to use a larger photo to see everyone, but it is a much more interesting photo.

The strength in the photo to me is each person is an individual portrait all put together for the group photo. For me this makes me want to look at the photo longer and see each person.