Sunday, May 31, 2015

Turning into a Bird Watcher

Fuji X-E2, FUJINON XF 55-200mm, ISO 4000, ƒ/4.8, 1/500
Do you feel like a little kid all excited about a subject you get to photograph? I know I do and lately since we have a nice bird feeder and have been blessed by a variety of birds at the feeder.

Here we have the male purple finch and the Red Headed Woodpecker on our feeder. This is something that connects me to the past. My grandparents loved their feeders and I remember them talking about the birds as they visited.

Fuji X-E2, FUJINON XF 55-200mm, ISO 5000, ƒ/4.8, 1/500
I was surprised the woodpecker stayed for so long on the feeder just chillin. It was lightly raining and I guess just like we enjoy a shower to relax us maybe the bird was relaxing to all the rain.

Nikon D4, Sigma 120-300mm ƒ/2.8 DG OS HSM | S,  Sigma 2x EX DG APO Autofocus Teleconverter, ISO 25600, ƒ/5.6, 1/2000
Another thing I really get excited about is sports photography. As I was going through my college negatives the other day I noticed how much more I shot at a typical game than a typical assignment. Well it is much more difficult to get a good action shot than an environmental portrait.

Nikon D4, Sigma 120-300mm ƒ/2.8 DG OS HSM | S,  Sigma 2x EX DG APO Autofocus Teleconverter, ISO 25600, ƒ/5.6, 1/1600
When you find yourself totally absorbed and lost in something take note of it. This is most likely where your strengths lie. This is something you need to nurture.

Nikon D4, Sigma 120-300mm ƒ/2.8 DG OS HSM | S,  Sigma 2x EX DG APO Autofocus Teleconverter, ISO 14368, ƒ/5.6, 1/2000
Sometimes as I have found you don't have to go any further than your own backyard.

Friday, May 29, 2015

Scanning some photos from college in 1982


It is a lot of fun going through my work while I was in College. This is from my Junior year at East Carolina University.

Now one thing I am noticing already that I love about today's digital cameras over the film years–XML code that tells you the camera, lens, aperture and more data about the camera used to shoot the photo.

Another thing is today I embed IPTC or just think of it as all the text I want to help with the image. Caption information, Copyright, city and state information I can store today. I can even store the GPS coordinates.


This photo is from the October 9, 1982 at Ficklen Memorial Stadium in Greenville, NC with an attendance of 19,521. ECU defeated Richmond 35-14. I was able to look that up on the web.

I can also tell you there is a lot of grain in Tri-X film and there were a lot of spots where there wasn't a chemical base giving small spots.


Today I can get incredible detail that just wasn't all that possible with the Tri-X in a 35mm camera. I now understand even more why medium format gave you better resolution. You had more information than you needed.


This is a photo of Joe Jackson at Great Adventure Theme Park in Howell, NJ. While going through all the negatives I noticed more soft photos due to shutter speed issues. Today I would catch that issue much faster due to the histogram and the LCD to help check images for sharpness.


It is just fun to reminisce about the past and scanning these old photos. Hopefully I can scan some of those worth keeping and getting all the caption information embedded in the photos so they can be searched and posted online. This way historians and just anyone can search and find photos that I happened to take that they may enjoy one day. 

Thursday, May 28, 2015

How to deliver photos to clients


I talked on an earlier blog about me switching from CD/DVD as a deliverable to USB. It also talks about where I ordered my custom USB jump drives. Here is that post.

The question came up about how to deliver photos to a client on a board the other day. With new computers not coming with a CD/DVD player and the size of images today making it quite difficult to fit all your images on one CD/DVD the question is what can you do? Here are my thoughts that go beyond the one size fits all.

The key when working with potential clients and clients is that you are thinking about them and not you. Telling them to bring a USB is thinking about yourself rather than you–that is if that is the only option you give to them.

General pricing tips:

First remember that you need options. This way you are communicating your desire to accommodate their needs and tastes.

Example:

Deliverable: You may choose any of these different options for having the photos delivered to you. If you have another way you would like them delivered please let me know and I can get you a price for that service.

1. Photos delivered on a USB Jump Drive


2. Photos delivered by the Cloud. This is where we send you an email with a link that you can click on and using a password then download all the images on your personal computer. You will need the space on your computer for the images. A typical portrait session can take 500 megs of space on your computer and a wedding can be 3 gigs to 4 gigs of space.


3. Photos put into an online Gallery. This choice gives you the ability to order prints, t-shirts, coffee mugs and more as well as downloading the images. This is often chosen when someone wants to share their photos with friends and family. This allows them to order their prints and you do not have to get their money and handle shipping their prints to them–we handle all that for you.
4. Photos delivered as prints. This option is where you choose a print size and we give you all the photos as a print. You can pick 4x6, 5x7, 8x10 or whatever size you choose and then we deliver all the photos as a print. You can also request multiple copies at the same time.
5. Combination of any of the above. You can mix and match the delivery of the above options.

I recommend pricing each of these and maybe even giving the price of combination packages of those options. I would discount them if someone ordered prints, USB and wanted online gallery.

Remember the thing that will make you more money that just taking the photo is the deliverable. This is the final experience the customer has with you and how they will share their experience with their friends.

Wednesday, May 27, 2015

Nikon D4 Video Settings


This is based on my experience and others may have other suggestions that might contradict my comments.

When shooting video on your Nikon D4 there are a few settings I recommend. When this becomes very critical is when you decide to start shooting more than one camera and you need everything to match when you get into post production.

In my opinion editing RAW images in Adobe Lightroom and getting images to match from different cameras is much easier and more accurate than in the video editing software of Adobe Premier or Final Cut Pro X.

Before you go to the Movie settings on the camera I recommend first creating a menu bank for Video as I have done here. This way once you have created all the settings they are saved.


In the movie Settings choose your Frame Size/Frame Rate. The standard Frame Rate for movie theaters and TV is 24 fps.

When you pan left to right or right to left this is when you will see Frame Rate really affect the look and feel of the image. The public is so used to 24 fps that this is the best default. Some use 30 fps.


Many times people will shoot higher Frame Rate to then do slow motion by slowing it down to 24 fps.

Your shutter speed on the camera should be set to twice the Frame Rate for the movie settings. If you are shooting 24 frames then you will be at 1/60 since this is the closest. If you shoot 60 fps then 1/125 should be your setting.


I shoot most of the time on 1080/30fps and set also for High Quality.


Microphone setting for most all the time needs to be set manually and use the Sound Levels to adjust the volume of the recording. I highly recommend using headphones and looking at the audio meter on the viewfinder. Be careful because the recording level and the headphone volumes are set separately.


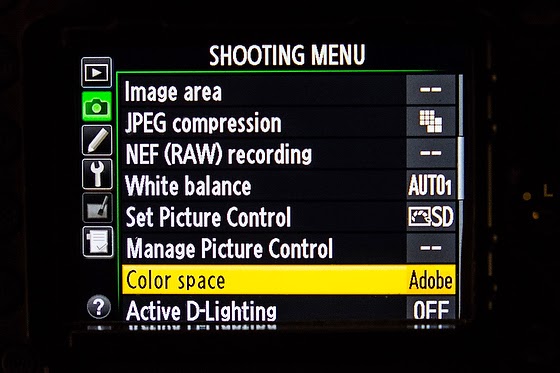
I have my color space set on Adobe RGB. You also want to then set the Picture Control.


Some of this is personal preference, but the key is if using more than one camera that all the settings be set the same or you will have trouble matching the video and color can look off switching between the cameras.

When you go to Live View in the movie mode you will be able to then adjust your microphone levels and exposure. To prevent light entering via the viewfinder from interfering with exposure, close the viewfinder eyepiece shutter.

You should go to manual mode to have the most control over the settings. Just a little movement by a subject can make the exposure to change even when the light stayed the same. Use manual mode.

As you can see from this chart you have the ability to control more in manual mode.

As far as focus I tend to use autofocus when I first have a subject framed and then go to manual focus.

The motor for lens tends to make a noise I don't want to pick up.

Microphone

I recommend using a lavalier microphone for interviews and for natural sound and quick moving situations I recommend a shotgun microphone.

Here is an earlier blog post I did to help you with audio recording.

Monday, May 25, 2015

Memorial Day remembering the people who died while serving in the country's armed forces

ON THE BEACH: The first wave of Marines takes cover behind the sand dunes on Saipan beach, during the World War II invasion of Marianas Islands. The soldier kneeling in the sand at far right is Carl Matthews of Texas; second from right is Wendal Nightingale of Skowhegan, Maine; standing is Lt. James Stanley Leary of North Carolina. Neither Nightingale nor Leary made it home from Saipan; both are still listed as missing in action. Time Life photo by U.S. Marine Sgt. James Burns
The oldest of my father's siblings was James Stanley Leary who was named after his father and my grandfather. He died July 14, 1944 during battle with the Japanese on Saipan. 120 Marines died there.

I too was named after my grandfather, so we shared the same name.

Good chance that the famous Life photographer W. Eugene Smith was there with him. This is where he took the famous photograph of the little baby being pulled out by the soldier. Here is link to that photo.

Today is about remembering those who gave the ultimate sacrifice for our freedom.

Nikon D4, AF-S NIKKOR 28-300mm f/3.5-5.6G ED VR, ISO 100, ƒ/8, 1/250
I drove up to Canton, Georgia to the National Cemetery there to just remember. While there I saw family members in tears missing their loved ones.

Nikon D4, AF-S NIKKOR 28-300mm f/3.5-5.6G ED VR, ISO 100, ƒ/8, 1/250
I saw what looked like parents at their child's grave.

Nikon D4, AF-S NIKKOR 28-300mm f/3.5-5.6G ED VR, ISO 100, ƒ/8, 1/200
I saw service members remembering their friends. This marine left this for his friend.

Nikon D750, AF-S NIKKOR 14-24mm f/2.8G ED, ISO 100, ƒ/2.8, 1/3200
I had waited till he had paid his respects to get the close-up of the Symbol of the Corps The Eagle, Globe and Anchor emblem has been part of the uniform since 1868 and became the official emblem of the Marine Corps in 1955.

The eagle with spread wings represents our proud nation. The globe points to worldwide presence. The anchor stands for naval tradition. Together, they represent a dedication to service in the air, on land and at sea.

Nikon D750, AF-S NIKKOR 14-24mm f/2.8G ED, ISO 100, ƒ/2.8, 1/3200
Today this tomb stones are visual reminders to us the living of the dead who sacrificed. Remember your photos will help generations to come to be able to remember. Take pictures with the attitude of service.

Nikon D4, Nikon 85mm ƒ/1.8G, ISO 100, ƒ/2.2, 1/3200
John 15:13 Contemporary English Version (CEV)

13 The greatest way to show love for friends is to die for them.


Wednesday, May 20, 2015

Getting the Iconic travel photo

3 photos stitched together, Nikon D750, AF-S NIKKOR 28-300mm f/3.5-5.6G ED VR, ISO 100, ƒ/9, 15 sec

Nikon D750, AF-S NIKKOR 28-300mm f/3.5-5.6G ED VR, ISO 100, ƒ/7.1, 20 sec
When I am traveling in a new town I like to try and get the Iconic image of the town, which is often a skyline shot.

Nikon D750, AF-S NIKKOR 28-300mm f/3.5-5.6G ED VR, ISO 100, ƒ/5.6, 1/250
Big tip is to find the right time of day to get the photo if at all possible.

Nikon D750, AF-S NIKKOR 28-300mm f/3.5-5.6G ED VR, ISO 100, ƒ/10, 1/640
One of the iconic places in San Diego is the photo of the statue which is copy of the famous Alfred Eisenstadt's V-J Day Kiss. Since I am here working on a Military Appreciation coverage I thought this would be a good b-roll image and stock image to use.

Nikon D750, AF-S NIKKOR 28-300mm f/3.5-5.6G ED VR, ISO 3600, ƒ/7.1, 1/100
I even got a photo of The Hotel del Coronado which is another landmark in the San Diego area.

When I went to Seattle I did the same thing.

Nikon D4, Sigma 70-200mm f/2.8 EX DG APO OS HSM, ISO 100, ƒ/8, 1/6
I shot this photo and then waited for the sun to go down.

Nikon D4, Sigma 70-200mm f/2.8 EX DG APO OS HSM, ISO 100, ƒ/8, 1 sec
For the skyline shots I used a tripod which kept the camera still and steady for the long exposures.

Monday, May 18, 2015

Scanning old negatives

Pentax K1000 & Pentax 135mm lens, Kodak Tri-X  [April 7, 1982]
My daughter is really loving theater and this made me want to pull out some photos I shot during college at East Carolina University's theater doing Show Boat.

To scan my negatives I used the Nikon Coolscan V-ED [Adorama has one for $739] On Amazon it sells for $2,000.
A high-performance dedicated film scanner from Nikon, the CoolScan V ED offers high-quality scanning of 35mm slides, 35mm film strips, APS film (with optional IX240 film adapter), and prepared slides (with optional medical slide holder). The Scanner-Nikkor ED glass lens offers a 4,000 dpi optical resolution, while the 3,964-pixel linear CCD image sensor and 14-bit A/D input (8-/16-bit output) provide true-to-life, brilliant results.
Nikon's own LED illumination technology ensures accurate color with no warm-up time or risk of heat damage. Scan times are as fast as 38 seconds including image transfer to display, and as fast as 14 seconds in preview mode. Automatic color/contrast compensation helps you achieve accurate results, while the ICE4 advanced digital image correction suite of technologies helps to restore old slides to their original glory. Additionally, the included Nikon Scan 4 software provides a comprehensive and easy-to-use interface for managing your scans.
The CoolScan V ED has a convenient plug-and-play USB interface, while one-touch scan and preview buttons will have you scanning film in no time. PC and Mac compatible, the CoolScan V ED also comes backed with a one year limited warranty.
Pentax K1000 and 50mm lens, Kodak Tri-X
Now if you have scratches and spots like in this photo here you will need to use PhotoShop to clean up the image.

SilverFast 8
Now Nikon has stopped supporting it so to make it work on my Macbook Pro I bought the software SilverFast 8.0 This software is even more advanced than the original Nikon Software that I used years ago.

Now the learning curve is a little steep to get used to scanning with the software.  Here you can see the version and what I set up for when I downloaded the software. You pick your scanner.


There are a lot of videos already made that you can watch to help you step by step. Just Google SilverFast 8 and look for just the videos, there are many to choose from.

Pentax K1000 and 50mm, Kodak Tri-X
There is one this great about the scanner. As compared to the time spent in a darkroom working on print forever burning and dodging, with the scanner and PhotoShop you can get far superior results.


Hope this inspires you.


Friday, May 15, 2015

The Principles of photography versus the Techniques of Photography

Nikon D4, Nikon 85mm ƒ/1.8G, ISO 100, ƒ/1.8, 1/400
Have you ever noticed that when you use a technique that some famous photographer perfected and maybe even taught you that you don't get the same results?

Maybe you have started to realize that you are implementing all these techniques correctly in your photos and you continue to not win any of the competitions you are entering.

There is a great moment in the movie Remember the Titans about how “… attitude reflects leadership.” Here listen to the clip:


Where is your heart?

It wasn’t so much what I did that made a difference–it was how I thought. I started to ask myself why certain techniques worked and others didn’t. I soon noticed that when a strategy was wildly successful, it had more to do with the fact that I honored a principle than the strategy itself. When a strategy was less successful, that too could be directly related to a principle I violated.

Principle is much deeper understanding of something than a strategy. By understanding the why and not so much the what or how you understand how to implement it better because you are able to be much more flexible. Your ability to be flexible is because you are more relaxed. You “GET IT” and because you do you are able to listen more and look more for ways to implement. This is when real creativity can take place.

The principle of the technique frees you up, whereas the technique alone will freeze you up.

Nikon D4, AF NIKKOR 85mm f/1.4D, ISO 800, ƒ/1.4, 1/160
I remember this photo shoot I was doing to help a young actress with her headshots. I could see right in front of me what I wanted to capture, but it just wasn't working. I was shooting with soft boxes using strobes and the depth of field was too big.

I wanted to shoot at ƒ/1.4. The technique of always using my strobes in the studio setting was a technique. I was letting that technique get in the way of the principle of soft lighting.

These lights are just too much and then I relaxed and realized the modeling lights might be just enough to make it work. So I turned off the radio remote and opened the 85mm lens to ƒ/1.4 and then cranked the ISO up to 800 and then started shooting.

That is only a small part of why I love this photo. You see there is another part of the creative process. I had been noticing her looks and mood they were creating. I talked to her about how certain looks of hers were reminding me of some famous actresses in Hollywood.

Nikon D4, AF NIKKOR 85mm f/1.4D, ISO 200, ƒ/8, 1/200
I thought here that she looked like Evil Queen/Regina Mills (Played by Lana Parrilla) on Once Upon a Time. She loved that actress and was pleased I saw her in that way.

Nikon D4, AF NIKKOR 85mm f/1.4D, ISO 200, ƒ/1.4, 1/80
I told her how she reminded me of Anna May Bates (played by Joanne Froggatt) of Downton Abbey in this photo.  Well her mom was there and said I was mentioning all her favorites. We were connecting.

You see the principle of lighting and WHY was driving the creative process and not just put the light here and look here.

Nikon D4, Nikon 85mm ƒ/1.8G, ISO 50, ƒ/2.8, 1/60
For the photos of the beautiful blonde I was just trying to capture her personality. She is such a ham and just loves to have fun. Not too serious at all. After a while I was connecting with her like the humble kid next door.

Then as we changed locations I started to see how certain locations would bring out different parts of her personality. They would compliment her and create a mood. The last photo here is what I think of when I think of the famous Dove Girl ads.

You see we have been talking about the principles of portraits and not so much technique.

If you just love photography because of playing with all the gear, then just be ready to accept mediocrity. However if what motivates you is inspiring imagery then learn to get in touch with your heart and what moves you and then you too will create great images.

Wednesday, May 13, 2015

Multimedia Storytelling–NEED to know vs. WANT to know

Last year's storytelling workshop in Lisbon, Portugal [Fuji X-E2, Fuji XF 18-55mm, ISO 6400, ƒ/13, 1/450]
When teaching workshops on storytelling we always like to get a feel for what the students are wanting to learn from the experience.

There are some very consistent things people want to learn from a storytelling multimedia workshop. One of the top things listed usually involves software. They want to learn how to use Final Cut Pro X or Adobe Premier Pro for example.

Now if we created a workshop based on what people talk about most would leave the workshop not much better than when they came. Even the things they don't mention are sometimes at the top of the list.

The location of the workshop is a HUGE factor in people choosing to attend. If the workshop were somewhere down the street from them versus some exotic location like Cuba, Paris or Bucharest, Romania they might not sign up.

What students list at the very bottom of their desires to learn is audio.

Click on photo to see larger

Now this is the timeline inside Final Cut Pro X on one of my most recent projects. The interview is actually the foundation for the project and the sound for this is what is driving the entire project. What the subject is talking about influences what images should accompany the words.

While we teach how to interview and get the sequencing of the interview in an order that helps engage the audience and tell the story, if the person doing the interview doesn't technically get a good quality sound then it makes no difference how good or bad the interview is the audience will never know what they said.

Shure FP1 with the WL183 (Omnidirectional) microphone

Quality Sound

The foundation for every multimedia/video project is the soundtrack. Here are two microphones I use all the time, but regardless of what microphone you choose you must know how to use it and set the levels of the microphone to get the sound just right.

Shotgun Røde Video Pro Microphone
People will not watch your project if the sound is poor quality. They are more likely to watch if they sound is high quality and the visuals are mediocre than if that were reversed.

Which Microphone?

My recommendation for anyone going down this road of storytelling is to invest in a lavalier microphone. One with a long cord of 20' will work great for interviews and is pretty reasonably priced.  You can get one for about $23 from most stores.

I like this microphone because it picks up sound close to it and drops off pretty quickly, so you can put this on someone's collar and get their voice and ambient sound around the room will be diminished.

The shotgun microphone is nice when you don't want to see the microphone and depending on how you place it in relationship to the subject can give you incredibly nice sound. Takes more practice to use this over the lavalier.

NEED to know vs. WANT to know

Now back to the headline. While learning sound is not all that sexy, based on everyone pretty much ranks this at the bottom of what they want to learn, it is the foundation of the project. Good sound is equivalent to good exposure with your photography/video, but the difference is that it is more important.

Here is a simple package I did on how I do packages years ago. It is actually quite easy to edit once you have the voice over recorded. See if you can see how the sound drives the project.


Here you can see the package I produced. Now this was in 2008 when I was just using an audio recorder and photos. But this is the backbone of the video to understand that the soundtrack becomes the timeline for the project.


Advice to those wanting to learn multimedia/video

Most important tip I can give to you is to be totally open to the professional teaching you. Try your best to hear what they say you NEED to know versus what you WANT to know. Don't filter out what you think is not important or not that interesting.

Pour yourself into every step of the process of learning a skill. The reason you do this is not that you can pass a test, but rather that you will master the subject.

Do you want a surgeon who passed their tests or knows all there is about your procedure? Just as a surgeon who didn't pay attention except to the exciting parts of medical school will lose a life, so to will the storyteller who only learns what they want to learn. They too will lose the life of the story.


Here is another example. Listen to the soundtrack and see how it moves the story along.