Thursday, January 31, 2013

3.5 reasons to buy faster glass

[Nikon D2X, 24mm ƒ/2.8, 1/4, ISO 800] Ismael Tarnagda and Jay Shafto wind up a long day in Sabtenga, Burkina Faso.
1.    You need a faster lens to capture a scene
2.    You need a faster lens to increase the shutter-speed
3.    Bokeh: You want a silky smooth out of focus background and/or foreground
3.5.    Status symbol
If you are still shooting film and don’t have a digital camera shooting fast glass is a necessity in low light. Kodachrome only went to ISO 200 and sure you could push the ISO and pay extra to process, but the quality just falls a part.

If you shoot color negative film you can find ISO 1600, but again there is a lot of grain to contend with in your photos.
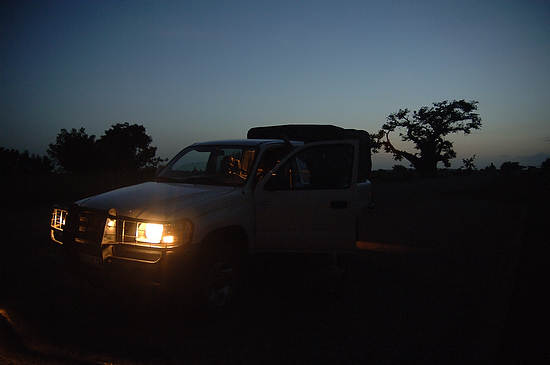
[Nikon D2X, 28mm ƒ/2.8, 1/10, ISO 800] Ismael Tarnagda and Jay Shafto wind up a long day in Sabtenga, Burkina Faso.

On my Nikon D4 the ISO is expanded to 204,800. This looks better than my film did at ISO 1600.

This is all to say that if you cannot increase your ISO for any reason you need a faster lens to capture a photo. One of the first lenses many photographers first buy to get the faster glass is the 50mm ƒ/1.4.  This lens is affordable as compared to almost every other ƒ/1.4 lens.  The Nikon 50mm ƒ/1.4 sells for about $289 on the street.

Many of Nikon’s cameras come in a kit with the 18-105mm f/3.5-5.6G ED AF-S DX (VR) Lens. By adding the 50mm ƒ/1.4 the photographer gains 2 ƒ-stops.

If you are shooting architecture getting faster glass isn’t that important for the most part. Most of these photographers are stopping down the glass to get everything in focus. Also, they can put the camera on a tripod and since their subject doesn’t move they can shoot a long exposure time.

If you shoot people, then shooting much slower than 1/30 shutter speed will capture motion blur due to the subject moving.

[Nikon D2X, 30mm ƒ/2.8, 1/60, ISO 400] Clinic attendant Ester Betnam assists George Faile, general practitioner as he sees patients at Baptist Medical Center in Nalerigu, Ghana.  Outside his door are patients waiting to see just him for today. 

Stanley’s Shutter Speed Guidelines
  • 1/30 for people when they are stationary. You could do family portraits with your camera on a tripod (to avoid photographer movement) to get good results.
  • 1/500 for sports. This is for most sports you can get sharp photos of the athletes. Things like football, basketball, and baseball will fall into these sports that will work at 1/500.
  • 1/2000 for high-speed sports. If you want to freeze the hockey puck or the motorcyclist in a race you need to crank up that shutter speed even more.
These are just guidelines. Shooting a photo with a shutter speed of 1/30 maybe too slow if you have an active child in a family photo. Maybe you want to pan with the racecar and shoot a slower shutter speed to blur the photo and therefore you wouldn’t want to shoot at 1/2000 shutter speed.

These are just ways to evaluate your need for faster glass in a situation.

With today’s zoom lenses being incredibly sharp as compared to earlier models they rival the sharpness of some of their prime lenses counterparts. Due to this increased quality I recommend finding a zoom that fits your style of shooting.

[Nikon D3, 16mm ƒ/2.8, ISO 6400, 1/50] Sunrise in North Georgia for a balloon ride over Lake Lanier.

Here are some of my recommendations from Nikon’s lens lineup.

Zooms

Photojournalism/Documentary/Street Shooters
  • Wide Angle Zoom (one of these) 
    • AF-S NIKKOR 14-24mm f/2.8G ED 
    • AF-S NIKKOR 16-35mm f/4G ED VR 
    • AF-S Zoom-Nikkor 17-35mm f/2.8D IF-ED 
  • General Zoom (one of these) 
    • AF-S NIKKOR 24-120mm f/4G ED VR 
    • AF-S NIKKOR 28-300mm f/3.5-5.6G ED VR
[Nikon D4, 105mm of 70-200mm ƒ/2.8 1/640 ISO 12,800]
Sports Shooter Zoom (in addition to the above)
  • AF-S NIKKOR 200-400mm f/4G ED VR II

[Nikon D4, 85mm ƒ/1.4, 1/100, ISO 800]
Prime Lens Suggestions

Photojournalism/Documentary/Street Shooters
  •     AF-S NIKKOR 24mm f/1.4G ED
  •     AF-S NIKKOR 28mm f/1.8G
  •     AF-S NIKKOR 35mm f/1.4G
  •     AF-S NIKKOR 50mm f/1.4G
  •     85mm (either one)
    •     AF-S NIKKOR 85mm f/1.4G
    •     AF-S NIKKOR 85mm f/1.8G
Sports Shooter
  • AF-S NIKKOR 400mm f/2.8G ED VR
  • AF-S NIKKOR 600mm f/4G ED VR 

[Nikon D4, 85mm ƒ/1.4, 1/250, ISO 100]
Bokeh

If you desire the silky smooth Bokeh there is another thing that affects the background—sensor size. This is especially true when you go to the smaller chips. The lens gets closer to the sensor and when this happens the depth-of-field increases. This is why your smartphone photos look in focus with a ƒ/2 lens. It is like shooting at ƒ/8 or ƒ/16 with a full-framed DSLR.

Buy a full-framed sensor camera to get the silkiest of all backgrounds.

[Nikon D4, 85mm ƒ/8, 1/6, ISO 100 for light I used Alienbees B1600 at 1/16 power being triggered by Pocketwizard Mini TT1 on the camera and Plus II transciever on the strobe. The strobe is powered by the Vagabond Mini Lithium]

Monday, January 28, 2013

Nikkor 28-300mm ƒ/3.5 - 5.6 can replace the Nikkor 85mm ƒ/1.4

Nikon D4, 28-300mm (300), ISO 100, ƒ/5.6, 1/25 - Off camera fill-flash using the Nikon SB-900.  The Flash is on the Pocketwizard TT5 and being triggered by the Mini TT1 on the Camera with the AC3 to control the output of the flash. Flash is -2 EV and the camera is -1 EV.
Bokeh 

Bokeh originated in the Japanese word [boke], which means blur. Today many photographers are going out and buying the ƒ/1.4 lenses to get that silky smooth background for when you shoot the lens wide open.

If the reason I am reaching for a lens based on getting a silky smooth out of focus background I might be wasting my time. You see so much of what I shoot is with the AF-S NIKKOR 28-300mm f/3.5-5.6G ED VR and to take the lens off to put on my AF NIKKOR 85mm f/1.4D IF I could be just creating an unnecessary step.  

If you compare the lenses at the same aperture and focal length then it would make more sense to grab the 85mm ƒ/1.4. As you can see in the photo below shot on the 85mm @ ƒ/5.6 the background isn't all that silky Bokeh.

Nikon D4, 85mm ƒ/1.4, ISO 100, ƒ/5.6, 1/50 - Off camera fill-flash using the Nikon SB-900.  The Flash is on the Pocketwizard TT5 and being triggered by the Mini TT1 on the Camera with the AC3 to control the output of the flash. Flash is -2 EV and the camera is -1 EV.

Nikon D4, 85mm ƒ/1.4, ISO 100, ƒ/2, 1/50 - Off camera fill-flash using the Nikon SB-900.  The Flash is on the Pocketwizard TT5 and being triggered by the Mini TT1 on the Camera with the AC3 to control the output of the flash. Flash is -2 EV and the camera is -1 EV.
Shooting however at ƒ/2 you are seeing a major difference on the 85mm as compared to itself. But now compare it to the first photo on this blog shot with the 28-300mm when the lens is zoomed in to 300mm and shot wide open at ƒ/5.6.  I am having a really hard time seeing any difference in the Bokeh.

Nikon D4, 85mm ƒ/1.4, ISO 100, ƒ/1.4, 1/50 - Off camera fill-flash using the Nikon SB-900.  The Flash is on the Pocketwizard TT5 and being triggered by the Mini TT1 on the Camera with the AC3 to control the output of the flash. Flash is -2 EV and the camera is -1 EV.
When shooting at ƒ/1.4 with the 85mm the depth-of-field is tad bit more shallow than the 300mm @ ƒ/5.6.

This is where you might just be scratching your head as I was after doing this little test.

The trick to getting that really silky smooth background has as much to do with how close you are to the subject as the ƒ-stop.

I would argue that if you are wanting that shallow depth of field with a creamy Bokeh you can do it with the 28-300mm ƒ/5.6 and not have to buy another lens to carry around.

There are other reasons you might want an 85mm ƒ/1.4 in your bag--stay tuned in for that post later.

Sunday, January 27, 2013

Nikon D4: Sports Camera Setting


In an earlier blog post I gave you my normal settings for the Nikon D4 for how I shoot. Here is a link to that post.

These are the settings that I use on my Nikon D4 for shooting most all sport action. Nikon has made it really nice to allow photographers to save these settings so they do not have to remember each and every little setting they like to use for a style of shooting.

If you go to Menu and under the camera icon pick the first item "Shooting menu bank." I have chosen C, which is my sports menu.


If you toggle into the "Shooting menu bank" you can rename those settings. Once you choose one of these settings everything you do to change the menu will be saved in that menu bank. I recommend to go ahead and try all my settings and then tweak them to your preferences.


When shooting sports it is very common for the lighting conditions to change instantly. While the football player runs toward you they may go from shade into direct sunlight. For this reason I let the camera do some of the thinking for me.

Go to the camera icon again and look for "ISO sensitivity settings." Select this and you will then see this menu:

I turn on the "Auto ISO sensitivity control." Then I set the minimum shutter speed to 1/2000. The ISO setting is what you see in the smaller window below the menu. I set this to ISO 100 and then set the "Maximum sensitivity" to ISO 12800.

While I am in Aperture Mode shooting the camera will always pick 1/2000 shutter-speed. If in sunlight I am at ƒ/4 the shutter-speed may go as high at 1/8000 at ISO 100, but as the scene changes and the athlete is now in the shade the camera will automatically drop to 1/2000 @ ƒ/4 and then change also the ISO up until I can still shoot at 1/2000.

The only time the shutter speed will dip below the 1/2000 is if the ISO peaks out at 12800.  If my aperture is wide open then the camera is doing everything that I would have done manually, but faster than I could ever adjust the camera. That is how you get more shots than the guy next to you.


Under the custom settings bank (Pencil Icon) I go into the auto focus setting.


I change the "Focus tracking with lock-on" from Normal to 4. What happens when I do this is the delay for the lens to refocus if something comes in between the camera and subject (like a referee). While I am following someone the camera will not refocus right away. This is something you need to try and pick what you like. You may want the lens to be more responsive and therefore go to setting 1 which will let the lens refocus instantly.

Focus Settings


I set the camera to AF mode. I also run this in continuous focus mode rather than single.


I go into the menu and select under custom settings the AF activation and choose "AF-ON only." This means when I press the shutter it will not focus the lens.  It will only fire the camera. To focus I am using the AF-ON button on the back of the Nikon D4.


By changing these settings you will notice the camera will stay in focus and shoot faster frame rate. Great for following a baseball player sliding into a plate and another player trying to tag them or maybe a football player running towards you to score. You will find more photos tack sharp in a series.

I generally put my focus point dead center and lock it so I don't bump it. I am trying to get photos of moving subjects and off center is too difficult for me. I may crop later for a better composition, but I want the subject in focus first.

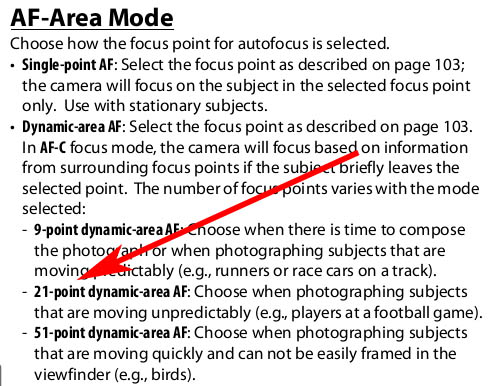
Now of the 51 different focus points you can choose groups of these to help with focusing. I went with Nikon's suggested 21-point dynamic-area AF.


Here are suggestions by Nikon in the manual:


The only other setting is on the lens that I turn on VR. 

Thursday, January 24, 2013

Nikon helps to continue solving photography's number one problem

Nikon D3, 24-120mm, ISO 6400, 1/50, ƒ/5.6 (shot at 112 focal length)
Photos are not sharp

While the photo above is not terrible it isn't sharp. Look at the enlarged section here below.


The reason the photo isn't sharp is not due to the camera or lens. You see the number one problem facing most photographers today is soft images due to camera movement.

No matter the camera you are shooting, the best thing to combat camera movement is a tripod. Your images will be the sharpest possible, that is if your subject is perfectly still during the exposure.

The second thing you can do is to increase the shutter speed. The rule-of-thumb is turn your focal length into a fraction. Put 1 over your focal length and then find the closest shutter speed on your camera faster than it and you are generally good to go. 

In the photo above I was shooting at focal length of 112. I would convert this to a fraction of 1/112 and then shoot to the closest shutter speed, which for my camera would have been 1/125.  Notice however I was at ISO 6400, ƒ/5.6 and 1/50.  I needed to go up by more than 1 stop to do that for this photo.

For various reasons I couldn't raise the shutter speed. To raise it would have been to push the ISO to 12,800 and the D3 really didn't look all that good at 12,800. I was already wide open and so I couldn't open up the aperture any more. I couldn't shoot with a tripod in the hair salon because I would be in the way of customers.

Nikon to the rescue

Nikon added two lenses to some of their lenses to help with camera shake. These lenses help with vibration and reduce the camera shake by counteracting it. They call these lenses VR which is acronym for Vibration Reduction. Nikon VR lenses use two angular velocity sensors, one that detects vertical movement (pitch), the other, horizontal movement (yaw), with diagonal motion handled by both sensors working together. The sensors send angular velocity data to a microcomputer in the lens, which determines how much compensation is needed to offset the camera's shake and sends that information to a duo of voice coil motors that move selected lens elements to compensate for the detected motion.

If you ever go on a cruise the ships have similar devices called gyroscopes that help stabilize a ship in rough water. If you have ever been on a ship and you still felt the roll of the sea this is because there is a limit to how much they can compensate.

The compensation of the Nikon VR II lenses is about equal to four stops. What this means is if you were shooting hand held with a camera lens at 1/60 then you should get the same sharpness as if you were shooting at 1/1000.  So you should be able to handhold a 1000mm lens at 1/60 based on this technology.  But if you have ever handheld a 600mm lens you know that few can actually hold one up.

The VR system can also detect the use of a tripod, recognize panning―an instance in which you wouldn't want the lens to compensate for movement―and address the specific shake caused by the ongoing vibration patterns produced when shooting from a moving vehicle. From my personal experience you want to turn off the VR function when shooting from tripod.

Nikon D4, AF-S NIKKOR 28-300mm f/3.5-5.6G ED VR, ISO 12,800, 1/80, ƒ/5.6 300mm
Just a few years later I now am shooting with a Nikon D4 instead of the D3 above. I can now shoot ISO 12,800 and I also have the newer AF-S NIKKOR 28-300mm f/3.5-5.6G ED VR that is a VR II technology.

I am hand holding this lens and just loving the results.

This is cropped area of the photo above. Notice how sharp the eyelashes are in the photo.
When I started shooting professionally 30 years ago I was using the Nikon FM2 film cameras. Let me list a few things that have changed making the above photo possible that I could have never done before.
  • Auto focus lenses
  • Highest ISO I shot in 1982 was ISO 400 for color and today I regularly shoot ISO 12,800
  • Vibration Reduction (letting me hand hold images four stops slower)
  • In Camera White Balance today (Only Daylight, Tungsten and BW film in 1982)
In 1982 Nikon had a 50-300mm that weighed 6lb 2.8oz

The lenses were manual focus early in my career and weighed a lot more than today. They are not as sharp as today's lenses due to the ability of computers to help in the design today.
Today this 28-30mm lens only weighs 28.2 oz and can focus faster than I could ever do with manual lens.
Nikon has helped me take photos I could never have taken before in available light, which is helping me provide services to my clients that have never been done before.

My go to lens

The AF-S NIKKOR 28-300mm f/3.5-5.6G ED VR lens might as well be bolted onto my camera. I do use other Nikon lenses, but this is always my first choice in majority of the situations I shoot. This lens with the Nikon D4 is one of the best combinations in camera gear today.

Tuesday, January 22, 2013

Nikon D4: Normal Camera Setting


These are my settings for normal shooting. Normal shooting for me is more photojournalistic using a lot of available light and lenses from 14 - 300mm range.

The first thing I do is select my shooting menu bank in the menu. I have saved two primary shooting setups.


I have normal for most average situations and shooting using studio flash. You can rename these to whatever you like to use.  I have occasionally setup a sports menu bank as well. Once you select this setting everything you then set in your menu will be saved here.


My primary slot is the XQD and the secondary slot is overflow. I am normally shooting in RAW in this setting. This means I can change white balance later if I want with more control than I would have in JPEGs.


Also I have set the bit depth to the highest setting of 14-bit to give me the largest possible data capture from the sensor.


I set the picture control to standard which only really affects the previews in a RAW.  If you are saving as JPEG and RAW then the JPEGs will be a little more punch than the Neutral which for me is too flat.


I shoot in the ADOBE RGB color space and after editing in Lightroom I output to sRGB.  In the Adobe RGB I have the largest color space and therefore when editing will have more information giving better color in the final image.


I prefer to shoot in AUTO ISO.  The ISO sensitivity is set at ISO 100 and set to max out at ISO 12,800.  I will go into this setting and often tweak the minimum shutter speed, especially when shooting under fluorescent lights to 1/100.  I wrote about Auto ISO in an earlier blog post here. While it is written about the Nikon D3S the concept hasn't changed.  Earlier I also wrote about the reason to shoot at 1/100 with fluorescent lights here.


In the custom settings I only change a few from the default settings.


I use the auto focus points of 51 with auto setting on single. It will look for faces automatically.  I may override this if the auto setting isn't locking in where I typically want. Often it is faster than me and sometimes I just need to override who I want as the focus point when there are many people in a photo.


I also like to embed my name in all the photos. So both in Image Comment and Copyright Information I put my name.


I will write more in future posts on settings for studio strobes and sports.

Monday, January 21, 2013

Imaging USA EXPO

David Bergman speaks at the Nikon booth during Imaging USA EXPO.
This blog post may seem a little disconnected, but it is more like a journal of my experience today at the Imaging USA Expo. I had a lot of fun and learned a few things.

Kevin Ames is photographing a model at the Sigma booth. Kevin is is sponsored by Sigma.
The reason I drove to the convention was to see my friends. All the gear I have seen before and no company was rolling out new gear at the show that I knew about.

One person that always is good to have in town is Bill Fortney. Bill is retiring July 1st from Nikon as one of their representatives. I knew I wanted to have some time with him as well as get a chance to talk with his boss Bill Pekala, the head of Nikon Professional Services.

Bill Fortney is handling all the questions from the convention attendees.
In a few weeks I will be doing a similar role to Bill when I am answering student questions about their next purchases. While Bill thought I was just hanging out to say hello, I was actually listening to how Bill handled all their questions.

Bill was helping people understand the Nikon lineup of cameras. For the most part Bill was talking to people about the differences between the Nikon D800 and the Nikon D600.  For most folks the Nikon D600 fits the bill just fine is what he was telling them. Fortney thinks of his Nikon D800 like a 4x5 camera. When he shoots with it this is serious. He knows he wants all the detail possible and pulls this camera out of the bag.

For the most part Bill explained how much he enjoyed shooting for the most part with the Nikon D600 as his everyday shooting camera.  You can read a blog Bill wrote on this here.

Dr. Charles Stanley asks Bill for some advice on his upcoming trip to Africa. He didn't want to take all his gear and asked Bill for what he recommended. Bill recommended the Nikon D7000 and the Nikon 18-200mm lens for the trip.
You need good relationships with the camera representatives because they know the gear the best and great people to help one navigate their lineup of cameras and lenses.

I went by the Nikon Professional Services room and even met for the first time face to face Melissa DiBartolo. For years she has helped me with getting my cameras repaired and answering questions. I walked in and she knew me right away and this was so reassuring to know they are taking the time to help us out.

Jeff Raymond enjoys meeting Dr. Charles Stanley in the hall of the convention.
While I was having a chance to renew friendships I also was starting new ones. Jeff Raymond was able to meet Dr. Charles Stanley and talk about his work in missions.

Coming up the escalator was my friend Tara Patty who has a photo studio in Colorado Springs, CO. I was enjoying hear how her business is growing and changing. Years ago she was shooting 90% commercial and only about 10% portraits for the public. Today she is shooting 10% commercial and 90% portraits and her business is growing.

I then met my friend Mark Turner who said the last three years have been great for business. He only wonders how much better if the economy was stronger.

As I talked to friend after friend I was finding they were all doing much better and had made changes in their business as well.

If you have time I recommend taking it in yourself if you are in Atlanta on January 22nd.

You can go here to register and enjoy the event www.imagingusa.org/registration.