Showing posts with label available light. Show all posts

Sunday, July 26, 2015

Shooting portraits in the middle of a department store for a workshop


Nikon D750, Nikon 85mm ƒ/1.8G, ISO 10000, ƒ/1.8, 1/500

BEST BUY® DIGITAL PHOTOGRAPHY WORKSHOP

Today I taught a workshop at the Best Buy 850 Cobb Place Boulevard Nw, Kennesaw, GA 30144. After a brief overview we divided into two groups. We would rotate from Portraits and Low Light to Sports and Macro.

Andrew was my first model that each of the students shot.


We were in the TV section which can get pretty dark the farther back you go, which we eventually would do.


This was typical first shot for most of the students. Guess what the first lesson was about? Use your feet and get closer. I shot the top photo as the example and asked them to compose their shot this way first. Even after they shot their second photo, most still were too far back.

Nikon D750, Nikon 85mm ƒ/1.8G, ISO 10000, ƒ/1.8, 1/500
I then shot this photo and showed them the person doesn't have to move but you can and clean up your background. I am shooting these at ƒ/1.8.  They were to shoot wide open and then take a photo at ƒ8 or even ƒ/11 to compare their backgrounds.

Nikon D750, Nikon 85mm ƒ/1.8G, ISO 7200, ƒ/1.8, 1/500
I even went behind the subject slightly to show even more angles.

I also taught them how to set the white balance other than using AWB [Auto White Balance] by choosing a preset like Tungsten, Daylight or Fluorescent. Then I showed them the best way was to do a custom white balance. Here are earlier blog posts that cover this for you.

For even more blog posts just put your topic like "White Balance" in search field at the top right of this page to search my blog for even more posts.

Nikon D750, Nikon 85mm ƒ/1.8G, ISO 6400, ƒ/1.8, 1/500
We then changed groups and models and I repeated the same information. Here I moved the model to a different location so I could get a plane wall behind her and used the existed track lights in the ceiling for the lighting. Looks like I did this in a studio.

We talked about keeping the eye closest to the camera in focus as a tip.

Nikon D750, Nikon 85mm ƒ/1.8G, ISO 6400, ƒ/1.8, 1/500
I also talked to the group about having one shoulder closer to the camera rather than perfectly squared up for a more flattering photo. As always these are guidelines and not hard fast rules.

Fujifilm X-E2, FUJINON XF 18-55mm, ISO 6400, ƒ/3.2, 1/160
I also showed them how to make a more environmental photo by pretending this model was the leader of this department. This was to help them know when they may want the more cluttered background. To help make the lady stand out we had her closer to the camera and not just close to the background.

Nikon D750, Nikon 85mm ƒ/1.8G, ISO 4500, ƒ/1.8, 1/500
After they made the "environmental portrait" I asked them to leave her where she was and to move around and make a portrait. Here I walked to her side and cleaned up the background and used a shallow depth-of-field.

Nikon D750, Nikon 85mm ƒ/1.8G, ISO 5600, ƒ/1.8, 1/500
Then I walked to the other side. I was finding that the students only started to grasp the idea of using their feet to recompose after I showed them. Slowly they started to explore and look for better images.

No strobes and shot all this in the busy Best Buy store showing how it is thinking about what you want to capture and not just a magical camera setting that will make them better photographers.

Wednesday, July 31, 2013

Concert photography: Better known as the Black Hole

Huey Lewis and the News 1982 in Greenville, NC
At least I found ONE photo for the paper

I remember being in a darkroom looking through my photo shoot of a concert and struggling to find one image that I could give to the editors.

When I was photographing bands in the 1980s I was just starting in this career. Every time I pushed that button it was costing me about 50¢ to 75¢ a photo. The cost depended on if I was shooting black and white, color negative or color transparency film.  It was quite common for me to come away from a concert with only a handful of images that were keepers.

The learning curve for me was quite steep as compared to today. You had to wait to see your results.

Joe Jackson, 1983 at Great Adventure in Howell, NJ.
With film the time from me taking the photo to seeing if it was usable was a few hours at best and usually with color transparency a couple of weeks.

I should have been writing down all my camera settings and then when looking at the photos know what I did, but I didn't. I just knew the shutter speed was too slow and my images were not sharp.

Brice Street at the Attic in Greenville, NC 1983
The camera's metering systems were not as sophisticated as today. Getting a good reading on the face of the singer using spot meter in your camera that we have today, was not on those Nikon FM or FM2 cameras I had back then.

I was shooting tungsten color transparency film since most stages were being lighted by tungsten temperature lights. I was shooting ISO 160 being pushed to ISO 320. I had a Nikon 80-200mm ƒ/4 lens and therefore getting very little usable images back then.

I was making a lot of mistakes in those first five years. Sometimes I was hunting through contact sheets for just one image that could run in the school paper. I remember a time or two handing in photos that were just slightly out of focus or had more motion blur than I should have had.

Charlie Daniels Band at East Carolina University 1984
The Attic in Greenville, NC had a good number of rock bands come through and since it was such a small venue the lights were closer and the light was decent. However, when the school had concerts like the Charlie Daniels Band, the light wasn't much better.

I was getting very few usable images in those days. You see shooting in the bright sun was much easier than going into some of the night clubs where light was scarce.

Late Night Reading at Swayze's in Marietta August 2012 [Using off camera strobes]
Even with today's cameras you are not going to walk into the venue and walk out with all your photos in focus, sharp and well lighted because of the new cameras. I am drawing upon all those years of mistakes today. I am showing up with lights in my car that I can go and get to setup as needed.

When I went to Swayze's in Marietta, GA to photograph a boy band I walked into worse lighting than I had back in the 1980s. I went to the car after trying to shoot with the available light to get some strobes. I knew that was the only way to really get some usable images like the one above of the bass player from the band Late Night Reading.

Five lights in the ceiling on the band. Four in front and one behind the drummer. Also, their were footlights in cases that the guitar and bass player jumped on that was lighting them more than those lights in the ceiling. [Nikon D4, 28-300mm @ 125mm, ISO 5000, ƒ/5.6, 1/60]
Here is the overall shot of the stage showing their lighting. I was few if any photos in focus, because they were a punk band. They didn't stay still like some bands. Their heads were banging as fast as the music.  My experience told me to shoot the available light and get all I could without lights before setting up lights. Too many photographers jump too quickly to strobes and trying to shoot at low ISO all the time.

[Nikon D4, 14-24mm @ 14mm, ISO 5000, ƒ/5.6, 1/60, with off camera strobes firing] You can see the footlights here.
What I learned through the years

Had I not been shooting bands on stages for years, I would not know what stage lighting should look like. I realized some concerts the bands paid attention to the lighting. Huey Lewis and the News the lighting was excellent. For a Rita Coolidge concert the lighting was great. For the Charlie Daniels band not so great. With Charlie Daniels wearing hat and the light from above, he never had good light on his face. 

Rita Coolidge 1983
Later when I didn't use a flash to photograph Marc Brousard, I was equally screwed until he looked up into the light as here below.

Knowing what good light looks like makes it so much easier to then know how to create that light later with strobes or even hot lights. One thing I knew from shooting stage lighting is I wanted good light on the performers face and often this meant a light that wasn't being blocked by hats.


  1. I have learned to always shoot the available light first before adding lights.
  2. Learned that the light changes as the artist moves around the stage. So sometimes the light is great and sometimes it sucks--depends on your timing and luck.
  3. I try to shoot faster shutter speeds for sharp photos. I may experiment with slower shutter speeds to show motion, but when I do I know that is what I am looking for in the photo.
  4. I shoot more variety of shots today--wide, medium and tight shots.
  5. I shoot the reaction to the stage as well as the stage.
  6. I shoot each type of shot until I have some variety with each and not just a photo here and one there.

While shooting what is on stage from different angles can give your clients some variety, it is what happens off the stage that is just as compelling when put into a package.


You don't get credit for lighting professional productions as a photographer. However, not getting good skin tones and technically in focus, sharp and well exposed photos will keep you from making a living in this profession.

Now by shooting the crowd you really are capturing with a visual how they sound. If they are good then the crowd is into it as we see here above with their hands in the air. getting people up and dancing is another way to show how the music moved people. The point is the action isn't always on the stage.  

I can tell you from my earlier years I didn't know to shoot the reaction of the crowd to the music.  That is really one of the best signs of the seasoned pro--a broad coverage.


When the light is great like here when I photographed the comedian Tim Hawkins I am thrilled. My job is so much easier. I don't have to light the stage. If you have great shots at venues like this, you don't get credit for the lighting. 

Comedian Tim Hawkins. [Nikon D4, 70-200mm @ 135mm, ISO 5600, ƒ/5.6, 1/500]
When you start out you will be terrified when you show up at events where there is little or no light. You will make mistakes and lots of them. Most likely the people hiring you don't know how difficult the job is they hired you to shoot.

You will be sick as you edit your work hoping you have enough images to even show the client and pray they are enough they are satisfied.

As you get more experience your anxiety will diminish. You will come to jobs with more gear for those difficult moments you anticipate.  You now know how bad it could get.

Just know all professions have lifecycle that you grow into become a veteran.

Lifecycle for the professional photographer
  1. First five years--Lots of mistakes and primarily the way we learn
  2. Second five years--Still making mistakes, but now learning to round out our coverage
  3. Third five years--Have a style that is established that is professional.
  4. Forth five years--Nailing most assignments and not just delivering what is expected, but now experimenting to stretch beyond
  5. Fifth five years--Going after new markets and often trying new things to add to our portfolio of skills. 
What you will notice is about every five years you will have mastered a new skill you started and added this to your portfolio of skills. In order to remain competitive you add a new skill about every five years and take about five years to really perfect it.

Some skills that you might add over time
  • Lighting with hot shoe flash
  • Using studio strobes in a studio setting
  • Portrait lighting
  • Product lighting
  • Location lighting
  • Video

Tuesday, June 25, 2013

Flash or not to flash

Nikon D4, 70-200mm,  ISO 10000, ƒ/2.8, 1/800 with Nikon SB900 on camera flash fired at slow sync
While at first glance this photo is quite acceptable the main light is now my flash and not the stage lighting.

Nikon D4, 70-200mm, ISO 2500, ƒ/2.8, 1/100
The second shot is available light and shot only 1 minute prior to the flash shot. This is around 9 pm and on one of the longest days of the year, so there is still some sunlight as the sun sets.

There is not as much "Stage Light" as there will be after the sun sets.

Nikon D4, 70-200mm, ISO 2200, ƒ/2.8, 1/320 with fill flash from SB900.
Here I went to the other side of the stage and shot a similar comparison of the flash and no flash.

Nikon D4, 70-200mm ISO 12,800, ƒ/2.8, 1/400
The one reason I was using the flash to begin with is the singer Marc Broussard's hat is casting a nasty shadow and most of the time his eyes are hard to see.  You can see the shadow in the second available light shot.

While the flash fixed this issue as long as it was on my camera it just ruined the mood of the stage lighting.

Nikon D4, 70-200mm, ISO 12800, ƒ/2.8,  1/100
While I now decided to shoot the rest of the performance with available light I now had another problem the light on the lead singer's face only looked good occasionally   Most all the time the light looked like this when he sang.  You see a bright spot on his chin and his eyes are in a shadow.

Nikon D4, 70-200mm, ISO 12800, ƒ/2.8,  1/80
Now to get the best photos of the lead singer Marc Broussard I had to pick the best moments where the light and the emotion came together. I think I have this here when Marc looked up into the light and also the emotion in his face worked really well.

Now you know why so often a spot light is used to follow the main character on a stage with stage lighting. You also can see why many theaters have foot lights. These are lights on the floor of the stage at the front aimed up at the actors to get rid of the shadows under hats and those with deep set eyes.

When there is still not enough light at ISO 12800

I have been in the darkest places like Swayze's Venue in Marietta.  Here the punk band moved around so much that I needed flash.

Nikon D4, 14-24mm, ISO 4000, ƒ/5.6, 1/60
Here is an earlier post in case you want to see when I do use flash and how I used it off camera: http://blog.stanleyleary.com/2012/08/nikon-d4-iso-12800-still-not-enough.html.

Thursday, April 04, 2013

Vacation Photo Tip: Long Lens can compress the scene


Nikon D4, 28-300mm [56mm], ISO 100, ƒ/10, 1/80
We were on our quest to get a good photo of the Hollywood sign by going up the road to the Griffith Observatory in Los Angeles. After parking we immediately took our first attempt here.

Nikon D4, 28-300mm [68mm], ISO 280, ƒ/29, 1/60
Now we move up the road to the observatory. Here the photo is a little better. Had there not been cars and road right behind me I might have backed up a little and used a longer lens. While I like the photo, I still feel that the Hollywood sign is just too far away.

Nikon D4, 28-300mm [190mm], ISO 280, ƒ/29, 1/60
To get the last photo we went further up the mountain. I used a longer focal length and to be sure the Hollywood sign was readable I stopped down to ƒ/29. I like this photo so much I did another one of my wife alone.

Nikon D4, 28-300mm [280mm], ISO 280, ƒ/29, 1/60
One last thing about that latest photo, notice how I zoomed in even more to 280mm focal length. The sign is even closer in feel and based on this if I had shot this with a 600mm it would appear even closer.

Just a couple of posts ago here I recommended composing the background first. This is still the case, but sometime You need to consider bringing the background closer.

Remember this is just the opposite of what they are doing when they shoot TV sitcoms. They are trying to make the most of the small space they often work in and therefore are using moderate to wide angles to expand the set.

Tuesday, April 02, 2013

Vacation Photos: Compose Background then add family and friends

Nikon D4, ISO 12,800, ƒ/5, 1/100, 28 - 300mm [No Flash]
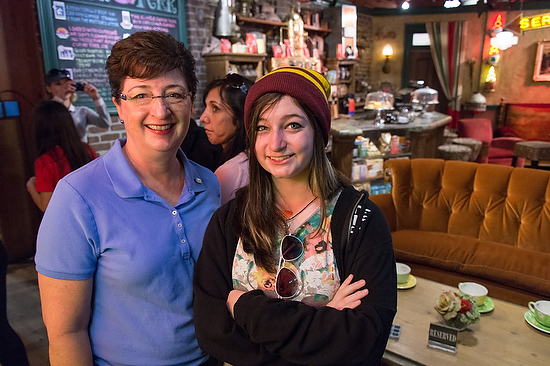
Today I was touring the Warner Brothers Studio in Burbank, California. We made a stop to see the set of the Friends TV show set.

While I enjoyed seeing the set and took many photos.  I took this shot and then put my wife and daughter into the photo.

Nikon D4, ISO 12,800, ƒ/5, 1/100, 28 - 300mm [No Flash]

I had my wife and daughter get as close to the camera as possible without totally blocking the background.


The diagram shows how their was neon sign lighting my wife and daughter just over my shoulder.

Had we had more time and no one else in the room with us I might have tried a few other angles.

Nikon D4, ISO 12,800, ƒ/5, 1/100, 28 - 300mm [No Flash]

My tip is simple, first compose the background and then get the people as close to the camera as possible. This means they are most likely between three to five feet from the camera at the most.

Nikon P7000, ISO 128, ƒ/2.8, 1/250, -1 EV flash

Earlier we went to Disneyland. Here I just carried my Nikon P7000. I have a already programs my U1 [User Setting 1] where the flash is -1 EV. So in this last photo I used similar technique and got everyone close to the camera. I popped up the on camera flash and because we are so close to each other the subjects faces don't have those nasty raccoon eyes due to the sun directly overhead.

So the only last tip is to use a flash outside to fill in those shadows. 

Tuesday, March 05, 2013

Child Prodigy Photographer: Still Waiting


By definition a Child Prodigy is:
A child prodigy is someone who, at an early age, develops one or more skills at a level far beyond the norm for their age.[1] A prodigy has to be a child, or at least younger than 18 years, who is performing at the level of a highly trained adult in a very demanding field of endeavour.
Here is a formal list of child prodigies and as you can see there are no photographers. This past week I had some time to hang out with Dave Black. It was Dave that made this observation about there are no child prodigies in photography.

Why no prodigies?

Photography has been around now for two hundred years and you would think that if it were possible that we would have a prodigy by now.

While I do not know exactly why there are none I do have my hypothesis. Why even care if there are any prodigies? I believe the answer is that this is a learned field and that even if you have an artistic eye you still need to have some training to succeed.

No Degree Required

Photography does not require a degree or certification to practice. If you own a camera you can hang your shingle out as a professional photographer.

Many professionals have tried to create certificate programs to help them in their business. It doesn't work, because of one simple problem. People will look at your work and not your degree to hire you.

We look no further back in history than to 2012 to see what it takes to be a successful photographer. Why only last year? Well in many articles written about photography, many are saying that due to the camera phone that more photos are made than at any other time in history and that 2012 was the biggest of all time.

While many photos were made last year only some are rememberable. The great photos were not just made because the camera was set on "P" mode [professional mode].  Hopefully, you know I am joking. They are great because the photographer had a vision and knew how to manipulate the controls and/or light to capture what they were wanting.

Abstract Thought Required
"The formal operational stage begins at approximately age twelve [adolescence] and lasts into adulthood. During this time, people develop the ability to think about abstract concepts. Skills such as logical thought, deductive reasoning, and systematic planning also emerge during this stage.
While children tend to think very concretely and specifically in earlier stages, the ability to think about abstract concepts emerges during the formal operational stage. Instead of relying solely on previous experiences, children begin to consider possible outcomes and consequences of actions. This type of thinking is important in long-term planning.
In earlier stages, children used trial-and-error to solve problems. During the formal operational stage, the ability to systematically solve a problem in a logical and methodical way emerges. Children at the formal operational stage of cognitive development are often able to quickly plan an organized approach to solving a problem."
Formal Operational Stage of Cognitive Development
By Kendra Cherry, About.com Guide

While today's cameras allow you to point and shoot and come away with an image even for someone blessed with a visual eye needs to know how to manipulate the controls to give them an image that is superior.

Painters can include and exclude from the canvas much easier than a photographer can be selective with a camera. But both the painter and photographer must have a vision of what they are creating for the image to have impact.


Depth-of-field is a tool the photographer learns to use over time. How much will be in focus in front and behind the subject. There are varying degrees to which the photographer decides what is in focus and helps to create more impact by using this creative tool


Motion is either frozen or blurred in photography. While varying the shutter speed controls this the photographer can even choose to add motion to the camera during the exposure to keep a subject sharp and while at the same time blur the rest of the photograph.


Light is the greatest influence in photography. The absence of light alone means there is no photograph to be created. How the photographer chooses to use light helps improve the photograph. Sometimes they may choose to use the available light, light everything or only light part of the photo. They can also choose to vary the light values through out the photograph as well.  

Learning these technical tools and how to use them in conjunction with one another to create an artistic image requires abstract thought. 

Many photographers are masterful technicians who learn to use the aperture, shutter speed and light to give them different affects. 


Photographers who specialize photographing people must also master body language. Body language is everything from the very obvious smile down to the subtle pinky finger being raised while drinking tea.  To tell stories with people in the photos, the photographer must master the art of body language and all the technical skills of the camera to help make photos that impact the audience.

Photography is an acquired skill

The good news from all this is that even if someone feels like they do not have an artistic eye they can over time develop the skills to become an outstanding photographer. Those who do have an artistic eye must also study and learn how to master the camera and light to make photos or they will never be able to make photos—the camera will do it instead.

Great Visual Storytellers master these skills:
  1. Depth-of-field—You need to understand how the focal length of a lens and the lens opening in combination affect a photograph. After you understand how this works you need to then be able to look at a scene you want to photograph and consciously make a decision as to what you want in focus. 
  2. Shutter Speed—Not only does shutter speed help you freeze objects and blur parts of a photograph it can determine if you have color shifts in a photograph. You need to master how this impacts the photograph so you can choose how this tool with affect the photograph.
  3. Light—Seeing light and being able to capture the natural settings is a must. Once you have mastered capturing light as it is naturally, then you can manipulate it to help situations look more natural. You can add light to a scene to improve it. You can add light to overpower the natural light and make it what you want it to be. 
  4. Composition—Studying the masters in art will help you to know how to use compositional techniques to lead the viewer where you want in a photograph.
  5. Body Language—For the people photographer you need to understand what your subjects are communicating so you can control the message. You are able to anticipate the moment and capture the ones which help the message you want to communicate become clear and concise.
  6. Combining the techniques—After truly mastering each of these skills will you then be able to see how they are used in combination to create what you want, just like the painter who decides what will go onto the canvas.
While there are no prodigies, there are great photographers. Great photographers are self made through persistence. You can be a great photographer. You need only to master the skills and most importantly have a vision for what you want to appear on your canvas.

Thursday, September 06, 2012

Dissecting Party Event Photo Coverage

Let me start with the client's email to me the morning after the event. Yes I deliver quickly.
The pictures are great.  I really love the clarity; especially those that are up close.  Please send me an invoice so I can submit payment.

thanks again!!

When I cover a party I have a shot list in my head. As I work through the list I notice that I become more and more relaxed as I tick things off the list.

I have learned over time to cover an event in phases that allows me to be sure I have the "safe" shots and then slowly I can add the photos that add to the package.

Nikon D4, 28-300mm, ISO 2800, ƒ/4, 1/100
Phase One

Arrive early and start taking photos of the location. Most likely the hosts have spent a little money on the food and the caterer has done their best within the budget to show their best.

Nikon D4, 28-300mm, ISO 5600, ƒ/4.8, 1/100

Nikon D4, 28-300mm, ISO 5600, ƒ/5, 1/100

Nikon D4, 28-300mm, ISO 4500, ƒ/5.3, 1/100

Nikon D4, 28-300mm, ISO 6400, ƒ/5, 1/100
By arriving early you can have more space to work as well. No one is really there and this gives you the ability to backup, move close, and change your angle to get what you like for representing the food.

All the food shots I did with available light. I am not trying to do the cover of Southern Living Cookbook so I am not shooting the photos at the lowest ISO and lighting the food to make it look it's very best. My purpose is to show the food as it looked for the event.

I try to use available light as much as feasible. All the food shots were done with available light.

Phase Two

I work the room trying to get photos of the people interacting. During this time I might use some flash to fill in the shadows. I want to be sure the photos are solid and not me pushing the limits of the situation, which might not work.

Nikon D4, 28-300mm, ISO 3200, ƒ/5.6, 1/80 and Nikon SB-900 bouncing on the ceiling with no diffusion dome.

Nikon D4, 28-300mm, ISO 3200, ƒ/5.6, 1/80 and Nikon SB-900 bouncing on the ceiling with no diffusion dome.
As you can see this is where I might have the guest pose for a photo. I am encouraging them to get closer to one another. Now if they do not want to get too close I just capture them with a little space or when they want to show a true friendship you might see them holding on to each other.

I try and shoot these just a little loose for two reasons. First if you shoot too tight and they want an 8x10 print then they may not have enough excess to crop the photo from long side. The same can be true for a 5x7 except this is where they don't have enough from the short side to crop. Keeping it loose allows for different dimension prints.

Second, I like to show the environment. I think this is one of the largest mistakes made by amateurs. They come in so close the pictures no longer have any context. Whose party are they attending anyway?

Why Flash?

Nikon D4, 28-300mm, ISO 900, ƒ/5.6, 1/100 and no flash

Nikon D4, 28-300mm, ISO 500, ƒ/5.6, 1/80 and Nikon SB-900 bouncing on the ceiling with no diffusion dome. They are outside on a porch with an overhang that has a white ceiling.
During the second phase I am occasionally shooting available and then quickly adding a flash. The reason is the flash will help fill in the shadows. With darker skins their is a tendency to loose the face details if you are not careful. Notice the difference in the skin tones of the face of this lady and you will see how the lower photograph is technically nicer. I prefer the expression of the first photo and wish I had the flash on for that photo and then it would be perfect for my taste.

As one who is always advocating getting the flash off the camera, unless the budget would have allowed for a photo assistant to walk around with my flash the guests would most likely bump into a light stand and maybe get hurt and/or damage my gear. So I stayed with on camera flash for this event. However, I did bounce it and never shot with it directly pointed at the subjects.

Nikon D4, 28-300mm, ISO 12800, ƒ/5.6, 1/60 and no flash

Nikon D4, 28-300mm, ISO 4000, ƒ/3.5, 1/500 and Nikon SB-900 bouncing on the ceiling with no diffusion dome.

Nikon D4, 28-300mm, ISO 400, ƒ/4.8, 1/80 and Nikon SB-900 bouncing on the ceiling with no diffusion dome.

Nikon D4, 28-300mm, ISO 2500, ƒ/4, 1/250 and Nikon SB-900 bouncing on the ceiling with no diffusion dome.

Nikon D4, 28-300mm, ISO 800, ƒ/5.6, 1/125 and Nikon SB-900 bouncing on the ceiling with no diffusion dome.

Nikon D4, 28-300mm, ISO 1000, ƒ/5.6, 1/100 and no flash.

Nikon D4, 28-300mm, ISO 2500, ƒ/5.6, 1/100 and no flash.

Nikon D4, 28-300mm, ISO 3600, ƒ/5.6, 1/100 and no flash.

Nikon D4, 28-300mm, ISO 2000, ƒ/5.6, 1/200 and no flash

Nikon D4, 28-300mm, ISO 2000, ƒ/5.6, 1/125 and no flash

Nikon D4, 28-300mm, ISO 3200, ƒ/5.6, 1/100 and no flash
 Notice in these two photos I have switched to an ultra wide-angle lens the Nikon 14-24mm ƒ/2.8.  I love shooting with these lens to help give context and put the viewer as if they are standing right their on the porch and part of the conversation.

Nikon D4, 14-24mm, ISO 1000, ƒ/5.6, 1/200 and no flash
Notice in this photo below I went just a little wider than the photo above.  The one above is shot at 24mm and the one below at 19mm.  I love seeing the three women in the back in three different conversations. You can just tell everyone is enjoying themselves and having moments of their own.

Nikon D4, 14-24mm, ISO 2000, ƒ/5.6, 1/200 and no flash
Using the 28-300mm lens I can zoom in as I have done below with the photo of the guy listening to another person. This was zoomed to 300mm and let me look across the room just like you would if you are there to catch glimpses of others enjoy conversations.

Nikon D4, 28-300mm, ISO 2000, ƒ/5.6, 1/250 and no flash
You need some overall shots to capture how many people came to an event. This is everyone gathering for a few comments at the cocktail party. I shot it with the Nikon 14-24mm @ 14mm to capture as much of the room as possible.  I am holding the camera as high as I can above my head and angling it down to show the room almost like a security camera would do in the corner of a room.

Nikon D4, 14-24mm, ISO 2200, ƒ/5.6, 1/100 and Nikon SB-900 bounced with no diffuser.

Nikon D4, 14-24mm, ISO 2500, ƒ/5.6, 1/200 and Nikon SB-900 bounced without the diffuser

Nikon D4, 28-300mm, ISO 2000, ƒ/5.6, 1/125 and no flash
Phase Three

Usually there is a point that I have photographed most everyone in the room a few times. I have the event covered if I were to stop working. This is where I am now freed up to start looking around for more interesting photos.

Now in Phase Two I did some of these photos, but this is where now I just look for moments and may push the limits of the situation.  A good example is shooting with the Nikon 28-300mm zoomed to 300mm shooting available light. Even at ISO 12800 inside you might be hand holding at really slow shutter speeds.

I did this and had to toss a lot of the photos because of camera movement or the subject moved. It would be common for the subject to start laughing and toss their head back in the process and I get a blur and nothing is sharp.  This is why I often wait to do these shots in Phase Three, but I might mix a few in Phase Two.

Nikon D4, 14-24mm, ISO 11400, ƒ/5.6, 1/100 and no flash

Nikon D4, 14-24mm, ISO 10000, ƒ/5.6, 1/100 and no flash
Nikon D4, 28-300mm, ISO 2000, ƒ/5.6, 1/160 and Nikon SB-900 bounced with no diffusion
Since I have pretty much everything the client needs, when the chef asked for a photo for himself it was easier to meet this request towards the end. I could have done this in Phase One, but he was very busy then.

Nikon D4, 28-300mm, ISO 5000, ƒ/5.6, 1/100 and no flash

Nikon D4, 14-24mm, ISO 4500, ƒ/5.6, 1/100 and no flash
With the photo of the man in the center and the people around the table I moved a little back and forth until I used him to block the light behind him. This is the president of Georgia Tech talking to the new tenured professors.

Nikon D4, 14-24mm, ISO 11400, ƒ/5.6, 1/100 and no flash
In this photo below you can see the dining room from above. Hopefully this gives you the reason why you arrive early to take photos of the food. Where do you stand to get those photos now?

Nikon D4,14-24mm, ISO 10000, ƒ/5.6, 1/100 and no flash
In the following two photos notice the slow shutter speeds and high ISO settings.  The top photo was shot at 250mm and the lower one at 210mm.  Either of these would normally be shot at a minimum of 1/250 shutter speeds to be sure there is no camera movement. In the lower photo I am shooting at 1/40 shutter speed. While I can do everything as perfect to capture this moment all it takes is for the lady to move slightly and it is a blur. This is why I shoot this type of photo without a flash and ISO 12800 in Phase Three. I am taking larger risks. If I did this in Phase Two the number of photos I would be giving the customer would shrink drastically.

Nikon D4, 28-300mm, ISO 8000, ƒ/5.6, 1/100 and no flash

Nikon D4, 28-300mm, ISO 12800, ƒ/5.6, 1/40 and no flash
The Seasoned Pro

It takes years to really know how to shoot in this way. Besides dividing up types of photos I am also pushing the limits of the flash and available light.
Notice I am shooting inside at really high ISOs and using flash. Why would I do that?  Read this early blog post of mine to answer that question here.

Shooting the way I did for this event is very complex, but the results I think speak for themselves. I think I captured real moments with very little intrusion. This is why clients hire me, not because they just need a photographer. They need a photographer who will come in and not come to them complaining about not enough light and basically creating problems.

Before my client even saw these photos they were excited to invite me back. They liked how I work was their comment to me as I left. If it is that evident they see a difference in how I work as compared to other photographers and they haven't even seen the results, then I know it is my years of experience showing in how I carry myself.