Tuesday, March 19, 2013

The importance of the pause

The most important tool I use when I read is the pause. We even talk about books as being a quick read or not. The writers that say a lot with few words cause us to pause to take in what we just read.

Poets are the masters of the pause. They use this tool more than just about any other technique. It is quite common for a poem to take a long time to write, sometimes years for a poem to be finished. The reason is the poet is looking for the right word or phrase to communicate something worthy of the pause.

World Read Aloud Day

There is even a day each year where we celebrate the reading aloud of the written word. There are the masters of this art that make us all want to just listen to the reading aloud of writings.

Who hasn’t heard a reader take off as if it is a race to the end of the passage only to leave listeners all confused due to the lack of pauses?

That pause is a tool that when used properly allows the silence to give deeper meaning to the word or phrase just preceding the pause.

Paul Harvey the master of the pause

The New York Times said that Paul Harvey’s “trademarks: a hypnotic timbre, extended pauses for effect, heart-warming tales of average Americans and folksy observations that evoked the heartland, family values and the old-fashioned plain talk one heard around the dinner table on Sunday.”

Paul Harvey understood the power of the pause.

The visual pause

The still image has come to be known as the visual pause. For the audience can savor a moment rather than being bombarded by a constant moving image of life as we experience it in real time.

Even in video and film the still image is used to help the audience absorb the content. Ken Burnes is an American director and producer of documentary films, known for his style of using archival footage and photographs. He has mastered the use of the still image. The audience is not bored by the still image, but rather mesmerized and able to digest the content.

The photograph has helped influence our world and change it.


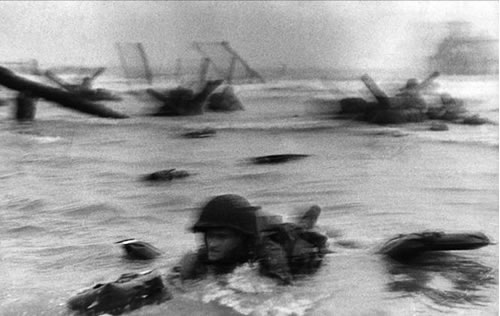
Robert Capa’s photograph of Omaha Beach, Normandy, France in 1944 put the viewer on the front line of the war.

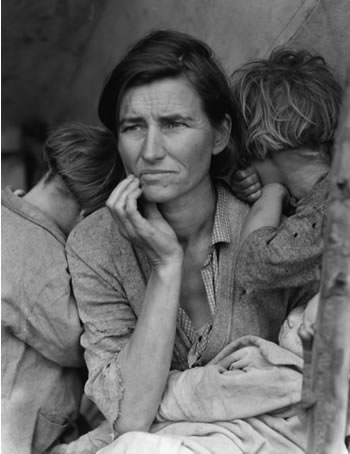
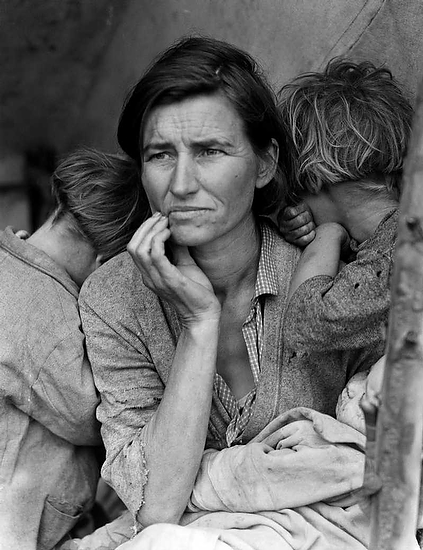
Dorothea Lange’s 1936 picture of the Migrant Mother put a face on the Great Depression.


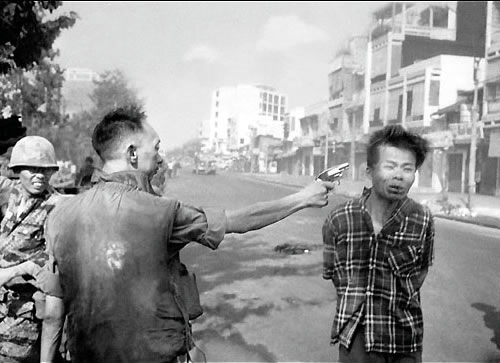
Eddie Adams 1968 photograph of the murder of a Vietcong by Saigon Police Chief helped to end the Vietnam War.

The photos are like poems. They allow the audience to pause and take in the deeper meanings of the images.

Now just compare the video below of the famous moment of the murder of a Vietcong by Saigon Police Chief.  I think this helps us understand how important the [PAUSE] is for something so emotionally impactful.

This is an interview with Eddie Adams years later talking about this experience. It happened so quick for Eddie that he didn't even think about it having any impact at all even after he shot it.  It is only when he was able to [PAUSE] did he understand what he shot.

Video and cinema use the still

Even in the movies directors use the still image to help the audience pause to absorb the moment. Sometimes they will slow down the movement to give a similar affect.

While video is about movement if it duplicates reality of life too much then the pause is lost.

Great producers understand the storyline and use the images as well as the sound to help tell the story. The more emotional the storyline becomes the more the movie will slow down.

Combining poetry and the photograph

If you could combine the reading of poetry at it’s best with the strongest still images of the subject you could have an incredible impact.

In the fourth quarter of this year’s Super Bowl Dodge RAM ran a 2 minute package combining the best of the spoken pause of Paul Harvey with some of the great photojournalist for a package that was voted the #1 Super Bowl ad this year by AdWeek.


Which medium?


Each medium we use for messaging has it's strengths. My largest concern today is that too many people are defaulting to video for everything.

I have some recommendations for those who want the most impact with their message.

If your message is vital to your organization then you need to pull out all the stops. This is where you put a team of communicators working together on the project.

You need strong text, strong still images and compelling video that is presented in a way that compels the audience to become engaged with the topic.

This is where you do what Jimmy Bonner, of the Richards Group, the brainchild of the "God Made the Farmer" ad did. The instructions were very simple and freedom was given to those photographers. He gave each photographer Paul Harvey's speech and asked them to spend time with the farmers and ranchers. Just shoot what you feel is appropriate.

Andy Anderson, one of the photographers blogged on the project. He said:
10 photographers capturing on there own terms the life of a farmer and rancher. All of us searching for meaningful images. Not any one photo rising above any others, but collectively voicing a message for folks and a vocation we have all really taken for granted. The last truly archetypical American worker. And who better else to match the images with than Paul Harvey…America’s grandfather.
Do you want impact like this ad had on the world? Maybe then you need to consider the power of the pause--the visual pause of the photograph.

Monday, March 18, 2013

Famous Photographers: Nature or Nurture?

Nikon D4, 14-24mm, ISO 10,000, ƒ/2.8, 1/60 @ 7:07 am at the Chattahoochee Nature Center located in Roswell, Georgia.
Too many times when I meet people they assume that the reason I take good photographs is one of two reasons.

First they assume my camera gear is why I get great photos. The second reason is they assume I was born with this talent.

The one thing they rarely if ever talk about is how much work and study is necessary to make great photographs.

Nikon D100, 16mm, ISO 400, ƒ/6.7, 1/160
In my mind's eye, I visualize how a particular... sight and feeling will appear on a print. If it excites me, there is a good chance it will make a good photograph. It is an intuitive sense, an ability that comes from a lot of practice.
Ansel Adams
Previsualization

Visualization is a central topic in Ansel Adams' writings about photography, where he defines it as "the ability to anticipate a finished image before making the exposure".  You may see some people holding up an empty frame or even putting their hands together to create a frame to look at a scene before ever picking up a camera.

In the movies storyboarding was done to help visualize what would happen so that all those involved would be able to make it happen, from lighting, camera and blocking of the talent for example.

For me to make the photograph of the basketball players I had to visualize this long before it actually would happen.

When I was on staff at Georgia Tech I installed the Ultra White Lightning system. The Alienbees are what I put up once I started doing freelance full-time.

I arrived early and put four strobes onto the catwalk to light the court. I needed the light to get the depth-of-field necessary to be sure the players were in focus.  You cannot shoot this at ƒ/1.4 and expect that the player will look sharp.

Arriving early means getting to the venue early in the morning for a night time game. It takes about two to three hours to put the lights up and be sure everything is working. I really needed to do this when no one is on the court. Approximately a few hours before the game it is quite common for the teams to be practicing, so you must arrive early or you may not have enough time.

I had to also attach a remote camera behind the backboard. This had to be fired by a radio remote and also use a radio remote to fire the flashes at the same time. Framing of the image I knew from playing basketball for years. I normally get an assistant to do a few layups to help me make the frame loose enough to capture most any play on this side of the basket.

Then I had to wait until during the game the players would be in place for me to fire the shot. Now at the time I did this I could only fire the camera once every three to four seconds. The flashes needed to recycle and any faster would give me underexposed images.

I had to anticipate the moment that would capture the peak action. Too soon or too late and the photo is not as dramatic.

As you can see from this photo, I did not pop out of my mothers womb and just have the innate skills to capture this moment.

In the very first photo at the Chattahoochee Nature Center I had to get up before sunrise to capture this moment. Also, I knew the sky would look blue even tho it looked black to the naked eye. This is capturing something that your eye doesn't even see.

Both of the examples I have given here are not what talent would see and just click a button to make it happen. Both took years of training and understanding about many technological gear to make them happen.

You don't make the photo above in the middle of a parking lot in the dark with pure talent. You must know from years of experience where to place the lights to get this effect.  How do you get a Rembrandt lighting affect on a punk rock bank? You just have to know how to do this from learning how to make it happen.

What about nature?

There is no question that some people have an innate ability to see and create wonderful work, but for the most part talent that goes under developed is no match for someone with persistence and willingness to put in the time and effort.

If the opportunity avails itself then a person with talent will have a good chance to make an incredible image. However, from my life experience it is the person who anticipates that gets the best image.

Nikon D2Xs, 600mm, ISO 200, ƒ/5.6, 1/1500
Anticipation

The reason great photographs are made is because the photographer anticipated the moment. If you wait till you see it and push the shutter button then you will have missed it.

Sports photographers know the teams and players so well they can almost tell you the next play. They get into position that gives them the best opportunity to get the moment.

Many sports photographers will put up multiple remote cameras to anticipate that something or someone may black their view and by having it covered from multiple angles will have the game winning shot.

Even the portrait photographer will talk with the subject and get their reaction to something. Just mentioning certain topics with a subject can elicit a good moment. It is said that Yousuf Karsh grabbed Winston Churchill's cigar from him to get that famous photo of him. He knew it would get a reaction.

Nature & Nurture

I believe it is the combination of nature and nurture that makes for the great photographers. What this means is that those who work hard and learn to plan for their photos will make some great ones, whereas those who just think they will just shoot whatever they see will rarely make great photos.

The Making of an Expert

According to K. Anders Ericsson, Michael J. Prietula, and Edward T. Cokely published paper in the Harvard Business Review in 2007:
New research shows that outstanding performance is the product of years of deliberate practice and coaching, not of any innate talent or skill. Consistently and overwhelmingly, the evidence showed that experts are always made, not born.

Friday, March 15, 2013

Photographers: You are what you read

These are just some of the books I have read in the past year.

You may have heard "you are what you eat," but I believe that "you are what you read is just as true."

Read what you want to cover

The photographer needs to become an expert on the subjects they cover. If you work in business then you need to be reading what those in that industry are reading.

If you are covering the faith community, then you need to be up on theology of the groups you are wanting to do work.

If you want to do work for NGOs then you need to be up on the areas that they address.

Osmosis

Osmosis does not require input of energy and therefore this is where most of us start our careers. We start covering what we are already familiar.

For me growing up in a minister's home where my father was involved with missions means through osmosis I was pretty knowledgeable about Baptist and Missions.

By taking the time out of my life to go to seminary I was able to take my knowledge to a whole new level of understanding. I studied theologians and worldviews which helped me communicate the nuances of faith to the audience.

What I am reading today

I do a lot of work with Chick-fil-A. To know how to help them communicate their story requires me to understand where they are going and not just where they have been.

One of the best places for a photographer to understand what business like Chick-fil-A is going is to attend a conference like Leadercast. Leaders from across the globe will attend this conference to learn how they can be better leaders for their organizations.

It is here that I was introduced to speakers like Patrick Lencioni and John C. Maxwell. I also learned that these leaders were also looking to other leaders like John Wooden, Tony Dungy and
Mike Krzyzewski who are all coaches.

I started reading all the books I could on leadership and how to build teams. I am confident to say that I am well versed now in the field and understand some of the current trends.

This helps me now sit at a table and recommend stories rather than being the person waiting on them to tell me stories they need covered.

Great storytellers recognize a good story

"If I only knew back then what I know now," has been said by many people. I know it took time for me to be able to understand now without experiences to build upon. 

If you spent 30 years of your life telling stories, then you too would be really good at knowing what makes a good story. I continue to recommend to my clients that my greatest asset to them is the creative idea. Once you have a good story idea getting a team to cover it is easy. It is finding the story that takes the most creativity.

Where do good ideas come from?

I would argue that very few great ideas come from the inexperienced. I think overnight sensations are actually 10+ year careers that finally bloomed.

When I get a great idea today it is because I am referencing something else in my brain from a history of stories I have covered, things that I have read and from experiences I have had. It is not from just hearing something fresh.

Steven Johnson: Where do good ideas come from?


I really recommend watching this 4 minute video to understand the framework for why I believe you need to expand your horizons for your business to grow.

The four minute video is a condensed version of the already condensed presentation Steven Johnson made a the TED Conference. Now I recommend you really watch this to understand how he came to the refined 4 minute package.


Steven Johnson is the best-selling author of six books on the intersection of science, technology and personal experience. The whole idea that we have these "eureka" moments is not by chance, but rather the colliding of ideas.

Living in Isolation

I believe that the more you isolate yourself the better the chances are for failure if you are in business.

It has been said that in business there are the 1) innovators, 2) imitators and 3) idiots.

The innovator is someone who is having "eureka" moment and has put together a few tidbits to get an edge on the competition.

The imitator is someone who recognizes change and adapts quickly and therefore their clients are benefiting as well.

The idiot is someone who decides to try and follow the well worn path only to find now it is now just a commodity making it difficult to make a profit.

Read, Get Out & Network

If you are struggeling with your business, then I have three recommendations.

Find some books that are trending in your area of interest that you want to photograph. These are not books on photography, but rather on the subjects. Besides reading them find someone or a group to discuss these topics with and get you to dive deep into the subject.

Get out and find a place to socialize. Maybe it is the local coffee shop and it will require you to do more than order your coffee and sit in the corner. Start a discussion group on one of your books is one way to get out there.

Find some groups to network with in your community. Hopefully this could be on what you like to cover with your camera. Join an association and go to their meetings and mixers. 

Still not successful

If you are one of those people doing everything I suggested and you are still having trouble, maybe you are one of the idiots. Not trying to insult you, but think about it. Are you one of 100 photographers standing on the sidelines of a major sporting event wondering why no one is buying your stuff? There are only about 20 or so outlets for those 100 photographers. The market is saturated.

Find the market where you are not one of many photographers and there you will have found a potential gold mine.

Thursday, March 14, 2013

Photography Ought To Be Fun

From an early e.Newsletter I sent out in June 2006. The photos are from my first digital camera--Nikon D100.
“Brain research has now proven conclusively that play is essential. It actually restores our intellectual capacities and renews our spirits. It’s essential to good mental health and physical health and to the reductions of tension.”
--Joined at the Heart: The Transformation of the American Family 

Deer antlers are among the fastest growing tissues known to man.
My family has always taken pictures. One of my earliest experiences is playing with an old camera that used flash bulbs and making photos. I would run around pretending to make photos.

My father had a darkroom where he would develop his black and white photos. It was so much fun to watch the photos appear on the paper in the trays of chemicals.

Nature and wildlife are probably two of my favorite subjects when I make photos for myself.

This past week I took a few days and met my uncle who is also a professional photographer and who taught me a great deal through the years. He has been widely published as a nature and wild life photographer.

The white tailed deer’s high degree of sensitivity of the smell, which us humans can’t even begin to understand, is used for protection as well as mating.
We decided to meet and camp at Cades Cove in The Great Smoky National Park which is located near Townsend, Tennessee.

We would get up really early before the park opened and be one of the first through the gate each morning and one of the last the leave the park at night. The animals like white tailed deer, turkeys, and coyote typically are more active in the morning and early evening.

The black bear is more unpredictable and could be active at any time. We hoped to see black bear and did. However they seldom would stay around once they spotted us and turned for the woods more than once.

We also noticed that when we used our binoculars more than one of the many bears we spotted turned into a tree stump. Sometimes when we were in the park you would hardly see any wildlife. We believed the heat kept many of the animals relaxing in the shade longer before venturing out to the meadows.

Before we would go into the park we would get a camera ready to go. I would use my Nikon digital camera with a 120-300mm ƒ/2.8 with a 1.4X teleconverter with a 2 gig flash card ready beside me. The lens was mounted on a monopod and the tripod was near by if the scene allowed for it.

Both my uncle and I commented how much more fun this was with digital over shooting film in the past. We shot more than we may have shot in the past, but there were many reasons we liked the digital.

The things we both commented about shooting digital was the pockets on our camera bags where we kept film were now empty or full of something useful. We also enjoyed being able to change the ISO as either it was getting darker due to us going into the woods or the time of day. We also enjoyed playing with the white balance. We experimented with different settings seeing what
we liked best.

In the campground at night I could download my images onto my laptop and see the results from the day. So the next day, we were picky about what we would stop to photograph.

The minute we saw a great lighting situation or black bear, we stopped. For these types of trips you choose a long lens like a 300mm to get close enough to photograph a black bear. Any other lens if you fill the frame with the bear—well you will have more problems with a bear than your photographing abilities.

A teleconverter like a 1.4X or 2X can easily make the 300mm into a 420mm or even a 600mm and add very little weight to the bag.

A moderate wide angle zoom will help you enjoy those scenic scenes with barns. I love using my Nikon 24-120mm lens for this.

There were not as many wildflowers this time of year as earlier in the spring, but I always have a macro 60mm lens for close-up pictures of flowers.

Stream near Great Smoky Mountains Institute at Tremont in the Great Smoky
National Park.
While I have a flash I use this as a last resort. But when inside an old farm house this can really help. I still prefer using a tripod, but there is always a possibility you might need one. Some of the cameras like my Nikon D100 have a pop up flash built into the camera and for just about anything they can help when you need a flash.

After shooting early morning, we would drive into Townsend, Tennessee for a good country breakfast. During the hotter time of the day was a great time to explore inside the woods the streams and water falls of the park.

For the really hot day we drove up to Clingmans Dome which is 20° cooler than the rest of the park.

Just seeing if you are paying attention. I photographed this Kangaroo and her Joey at the Kangaroo Conservation Center located in Dawsonville, Georgia June 17, 2006.
Our goal was to make photos and have fun—we exceeded our goal. Remember to just take photos for the fun of it.

Carter Shields Cabin--George Washington "Carter" Shields (1844-1924) bought this land and cabin from John Sparks in 1910. The cabin dates to 1830-40s. Shields lived in the cove until 1921.

Tuesday, March 12, 2013

Hand held light/flash meter


Flash/Light Meter simplifies lighting

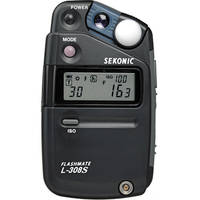
I think anyone using studio strobes will greatly benefit from a flash meter. Here is the older Sekonic Meter I use most of the time. 


The primary thing I use the flash meter for is getting the exposure for my subject. I always start here when shooting. The light I am measuring is the main light, because it is lighting my subject, not because of how bright it is.

Once you have this reading you can then take other readings. If you have two lights hitting the subject as in this photo below I wanted to control the contrast in the photo and using a flash meter was very helpful.

This is Masha, one of the School of Photography 1 students I was teaching in Hawaii a couple weeks ago. She was my model as I taught the class how to ratio lights.
In a very classic lighting setup like this the main light is 45º to the axis of the camera and subject. The second light is one the same axis as the camera, which is perpendicular to the background.

I took a reading first of the main light that is 45º to the right of the camera. ƒ/8 was the reading for the main light on ISO 100 and sync speed of 1/250.  I turned this light off and then worked at setting the second (fill light) behind the camera to ƒ/5.6, which is 1/2 the power of the first light.

Once this was set I turned both the lights on and took another reading and the combined ƒ-stop was ƒ/9.

Taking reading of the background for the top photo of the soldier
When I made the photo of the soldier I knew I wanted the background which was white to be two stops brighter than the subject. The subject was ƒ/16 and therefore background is ƒ/32.

Some people prefer to getting a reflective reading off the background, but either way the reading needs to be two stops greater than the subject.

Many photographer will measure the background with the lights on it at full power and then set the main light on the subject by under exposing by 2 ƒ-stops.

For the portrait of Masha, I had a black background and put a blue gel over the flash and metered the background to be 2 ƒ-stops under exposed as compared to the subject. In the photo of Masha the background was just a tad brighter than ƒ/4, which was 2 ƒ-stops darker than the ƒ/9 of the two lights combined hitting her face.

You can do all this using your histogram, but lets just say the explanation of how to do it is a lot more complex than this for using the flash meter.

Monday, March 11, 2013

Lighting Setup: Table-top Product Photography

White or even clear objects on a white background is very difficult to do and can become quite frustrating for even the experienced photographer.

This is a basic setup for a catalog photo shoot where the object needs to be stand out. 

I have couple of examples here. Next you will have the lighting diagram of the setup and finally there is a list of what I used.

Nikon D4, 28-300mm, ISO 100, 1/160, ƒ/20


Lighting Ratio

The trick in this lighting setup is the ratio of the background to the subject. I recommend you put 1 ƒ-stop more light on the background than on the subject.

How you measure this is with a flash meter. Always start with the light on the subject. I measured the light at ƒ/22 on the subject and then measured it on the background at ƒ/32. I then bracketed shots from ƒ/16 to ƒ/32 and pulled them up in Lightroom. After carefully looking at the detail in the subject and the background I chose to shoot at ƒ/20.

I also recommend evenly lighting the object for this type of catalog photography. This is why there are two 32" x 40" soft boxes at 45º angles from the camera to help wrap the object in light.

The middle 30" x 60" soft box in the diagram below is suspended flat over the table using the Manfrotto boom arm.

To avoid lens flare in this setup be sure the camera is ever so slightly not perpendicular to the background. Straight on can give you a lens flare.


Supplies

Here is a list of the supplies I used to make the photo.

I recommend using a vinyl floor or you can use
Sequentia 1/8-in x 4-ft x 8-ft White Fiberglass Reinforced Wall Panel that I bought at Lowes.  I use the backside which is smooth for the photos. You can also roll this up for storage.
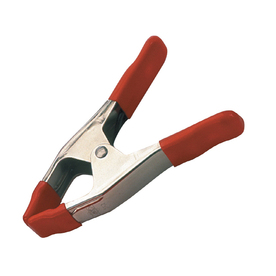
To hold the background in place I recommend BESSEY 2-in Metal Spring Clamps.  I have a bag of these I have handy for projects. They sell for just under $3 each.
You need something to hold up that background. You can get the Savage Background Port-A-Stand Kit for about $110.


The primary light for product work is a soft box. I have the 30" x 60" soft box from Paul C. Buff.  I like it for many reasons, but one of the reasons is how easy it is to setup and take down.
It works like an umbrella and has a lock that you screw tight to hold it in place.
I use the Alienbees B1600 monoblocs for my work. I like that the power is controlled with each head and I do not have to do math in my head as I did for power pack that split the power to different head. The Alienbees B1600 sell for $359.95 each. Since you are buying the directly from the manufacturer the price break is significant as compared to other lights that you buy from distributors.
Manfrotto 024B Boom is used to hang the large 30 x 60 soft box over objects. It sells for about $149.95 and comes with a 10 lb counterweight. I have a variety of other light stands I use. I put this on my JTL1200 Chrome Air Cushioned Stand (5016) which sells for $69.99.

Sekonic L-308S Flashmate - Digital Incident, Reflected and Flash Light Meter sells for $233.


Sunday, March 10, 2013

Photojournalism isn't trendy for a reason


"Migrant Mother" is one of a series of photographs that Dorothea Lange made of Florence Owens Thompson and her children in February or March of 1936 in Nipomo, California.
Every other type of photography other than photojournalism goes through trends. You can even look at the hottest trends for each year. Here is a link to "The hottest photography trends of 2012."

Once you start using gimmicks to draw the attention of viewers you are tampering with the authenticity of the moment.

Howard Chapnick former president of Black Star Photo Agency had over fifty years of experience behind him when he wrote "Truth Needs No Ally: Inside Photojournalism" back in 1994. 

Howard Chapnick wrote "For documentary photography to be gripping and absorbing it must be imbued with immediacy, concrete reality and emotional involvement."

Photojournalism is about photos being relevant. To be relevant the photographer needs to capture what is impacting our world.

You cannot have concrete reality and trying to set or follow trends.

What really makes great photojournalism is a photojournalist who is passionate about the subject. They have become emotionally involved. This is not to say they have lost their objectiveness, but they have captured a real moment in a way the reader is pulled into the moment.

One of my favorite photo stories of all time is Eugene Smith's Country Doctor. Here is a link to the Time Life website with that story.

This story was ground breaking because Eugene Smith broke from the script of shooting photos on a list. He followed the doctor and captured whatever he was doing. The doctor drinking coffee at the end of a long day wasn't part of the script. It works because of it's immediacy, reality and emotional involvement. Here is that photo.

Photojournalists today have better cameras and technology to help them capture moments that those before couldn't even do. Tri-X film was not released in 35mm format until 1954, seven years after the "Country Doctor" story ran in Life Magazine. Smith was shooting with an ISO of 125 at best in 1948.

Today photographers can shoot at ISO 100 to 12,800 with the Nikon D4 and can even extend this range to ISO 50 to 204,800. You can now almost shoot in the dark and capture a subject.

In the future the only thing that will change in photojournalism is our equipment will get even better, but how we tell stories will remain the same.

The keys to great photojournalism:
  • Story ideas - You need to be able to find stories and distill them down to the nuggets which engage an audience.
  • People person - You need to be able to talk to almost every kind of person from the homeless to those who live in castles. You need to carry on conversations with the high school dropout to the research scientist.
  • Understand body language - The nuances of a head tilt, gestures and subtle eye movements are necessary to help not just communicate what is necessary to the story, but be sure it is honest and true to the character of the people.
  • Solid understanding of the camera - Getting a good exposure and in focus picture the camera can do with anyone. The photojournalist must understand when to change an aperture or shutter speed. They must understand which lens is the best to use in a situation.
  • Know light - Mastering light can help a photojournalist know where to stand to make the light work for them rather than against them. They also know when they must use auxiliary flash to reveal a story more powerfully without changing it.
When you start to feel like your work has plateaued this is not the time to think about trying a gimmick. You need to ask yourself if you are maximizing the technology to capture the stories. If you are a master at this you might just need to find a story that ignites the fire you have let go out.

Who do you know that could use someone help them tell their story? Who can benefit the most from your skills as a storyteller?

Maybe you just don't know of anything and this is the time to find some way to get plugged back into your community. Be sure you are reading the news for your community, region, nation and world.

Sometimes the best thing you can do is just take a break and recharge yourself. Vacations are needed for the creative to keep them fresh. Who needs a burned out photojournalist telling their story?

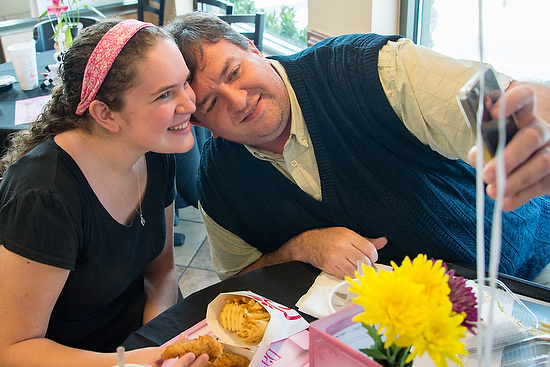
One of my favorite events to cover that will pull you out of a funk is Daddy Daughter Date Night at Chick-fil-A. This is from the event in Columbia, SC.
Photojournalism isn't about covering misery alone, it is about covering life. I suggest whatever kind of stories you have been covering to mix it up. Go and find a story on something outside your normal genre.


Friday, March 08, 2013

Black & White bails me out

Nikon D4, 70-200, ISO 12800, 1/1600, ƒ/2.8 with Custom White balance using ExpoDisc
I walked into the gym and I knew right away I was going to have problems. In an earlier post you will see a basketball shot in color that looks really good. To the untrained eye the gyms may look alike in their lighting, but they are far from it.

I talked about shooting under fluorescent lights earlier in a blog posting. You need to set your custom white balance while the shutter speed is below 1/100 to be sure the cycling of the lights don't affect the setting. Sodium Vapor lights, which these were are also cycling like the fluorescent lights.

The older the lights to more likely you will get color shifts and banding in the photos. One more factor that can affect the color shift is if the lights were not installed correctly. If some of the lights polarity is different from the others you will get banding.

While shooting this basketball game on this blog the minute I went above 1/100 I was getting color shift all through the image as you can see in the first photo. I was more interested in stopping the action than correct color.


By going to black and white I eliminate the color shifts in the photo. While I would prefer to have all the photos in color, unless you strobe the gym like I did here in this blog you really should just convert all the photos to black and white.

Nikon D4, 70-200, ISO 12800, 1/640, ƒ/2.8

Having the color off will make your work look amateurish. By eliminating the color you have now solved a problem with the color.

Nikon D4, 70-200, ISO 12800, 1/500, ƒ/2.8
Now please also note that while the ISO and the aperture never changed in all the photos, the shutter speed is different.

Here are my custom settings for this photo shoot from an earlier blog.  These are all for a Nikon D4
  • Auto ISO Low 100 - High 12,800
  • Minimum Shutter Speed set 1/2000
  • Shutter only when pushing release
  • Back button focusing
  • Auto Focus 21 pts centered and locked

Tuesday, March 05, 2013

Child Prodigy Photographer: Still Waiting


By definition a Child Prodigy is:
A child prodigy is someone who, at an early age, develops one or more skills at a level far beyond the norm for their age.[1] A prodigy has to be a child, or at least younger than 18 years, who is performing at the level of a highly trained adult in a very demanding field of endeavour.
Here is a formal list of child prodigies and as you can see there are no photographers. This past week I had some time to hang out with Dave Black. It was Dave that made this observation about there are no child prodigies in photography.

Why no prodigies?

Photography has been around now for two hundred years and you would think that if it were possible that we would have a prodigy by now.

While I do not know exactly why there are none I do have my hypothesis. Why even care if there are any prodigies? I believe the answer is that this is a learned field and that even if you have an artistic eye you still need to have some training to succeed.

No Degree Required

Photography does not require a degree or certification to practice. If you own a camera you can hang your shingle out as a professional photographer.

Many professionals have tried to create certificate programs to help them in their business. It doesn't work, because of one simple problem. People will look at your work and not your degree to hire you.

We look no further back in history than to 2012 to see what it takes to be a successful photographer. Why only last year? Well in many articles written about photography, many are saying that due to the camera phone that more photos are made than at any other time in history and that 2012 was the biggest of all time.

While many photos were made last year only some are rememberable. The great photos were not just made because the camera was set on "P" mode [professional mode].  Hopefully, you know I am joking. They are great because the photographer had a vision and knew how to manipulate the controls and/or light to capture what they were wanting.

Abstract Thought Required
"The formal operational stage begins at approximately age twelve [adolescence] and lasts into adulthood. During this time, people develop the ability to think about abstract concepts. Skills such as logical thought, deductive reasoning, and systematic planning also emerge during this stage.
While children tend to think very concretely and specifically in earlier stages, the ability to think about abstract concepts emerges during the formal operational stage. Instead of relying solely on previous experiences, children begin to consider possible outcomes and consequences of actions. This type of thinking is important in long-term planning.
In earlier stages, children used trial-and-error to solve problems. During the formal operational stage, the ability to systematically solve a problem in a logical and methodical way emerges. Children at the formal operational stage of cognitive development are often able to quickly plan an organized approach to solving a problem."
Formal Operational Stage of Cognitive Development
By Kendra Cherry, About.com Guide

While today's cameras allow you to point and shoot and come away with an image even for someone blessed with a visual eye needs to know how to manipulate the controls to give them an image that is superior.

Painters can include and exclude from the canvas much easier than a photographer can be selective with a camera. But both the painter and photographer must have a vision of what they are creating for the image to have impact.


Depth-of-field is a tool the photographer learns to use over time. How much will be in focus in front and behind the subject. There are varying degrees to which the photographer decides what is in focus and helps to create more impact by using this creative tool


Motion is either frozen or blurred in photography. While varying the shutter speed controls this the photographer can even choose to add motion to the camera during the exposure to keep a subject sharp and while at the same time blur the rest of the photograph.


Light is the greatest influence in photography. The absence of light alone means there is no photograph to be created. How the photographer chooses to use light helps improve the photograph. Sometimes they may choose to use the available light, light everything or only light part of the photo. They can also choose to vary the light values through out the photograph as well.  

Learning these technical tools and how to use them in conjunction with one another to create an artistic image requires abstract thought. 

Many photographers are masterful technicians who learn to use the aperture, shutter speed and light to give them different affects. 


Photographers who specialize photographing people must also master body language. Body language is everything from the very obvious smile down to the subtle pinky finger being raised while drinking tea.  To tell stories with people in the photos, the photographer must master the art of body language and all the technical skills of the camera to help make photos that impact the audience.

Photography is an acquired skill

The good news from all this is that even if someone feels like they do not have an artistic eye they can over time develop the skills to become an outstanding photographer. Those who do have an artistic eye must also study and learn how to master the camera and light to make photos or they will never be able to make photos—the camera will do it instead.

Great Visual Storytellers master these skills:
  1. Depth-of-field—You need to understand how the focal length of a lens and the lens opening in combination affect a photograph. After you understand how this works you need to then be able to look at a scene you want to photograph and consciously make a decision as to what you want in focus. 
  2. Shutter Speed—Not only does shutter speed help you freeze objects and blur parts of a photograph it can determine if you have color shifts in a photograph. You need to master how this impacts the photograph so you can choose how this tool with affect the photograph.
  3. Light—Seeing light and being able to capture the natural settings is a must. Once you have mastered capturing light as it is naturally, then you can manipulate it to help situations look more natural. You can add light to a scene to improve it. You can add light to overpower the natural light and make it what you want it to be. 
  4. Composition—Studying the masters in art will help you to know how to use compositional techniques to lead the viewer where you want in a photograph.
  5. Body Language—For the people photographer you need to understand what your subjects are communicating so you can control the message. You are able to anticipate the moment and capture the ones which help the message you want to communicate become clear and concise.
  6. Combining the techniques—After truly mastering each of these skills will you then be able to see how they are used in combination to create what you want, just like the painter who decides what will go onto the canvas.
While there are no prodigies, there are great photographers. Great photographers are self made through persistence. You can be a great photographer. You need only to master the skills and most importantly have a vision for what you want to appear on your canvas.

Monday, March 04, 2013

Portfolio Review

Tiare Nuualiitia (foreground) and Maile Powell listen to some of Stanley's instructions for lighting project for School of Photography 1 in Kona, Hawaii. Photo by Dennis Fahringer
Having your work reviewed can be a real nail biter for sure. While I was teaching in Kona, Hawaii Dennis Fahringer took this photo of the students listening to me. 

Each one of the students would be talking to me later about how difficult the assignments were, but now on the other side of them are grateful for the assignment.

Joanna Pinneo (center) reviews portfolios during the Southwestern Photojournalism Conference

During the Southwestern Photojournalism Conference students, pros and amateurs all wanted some time to have their work reviewed.  Here Joanna Pinneo is reviewing a photographers work.

You can even see in the guys body language how interested he is in her opinion.

Ayssa Fleming has her work reviewed by Bill Bangham during the School of Photography 1 in Kona, Hawaii.

Masha Shulgina has her work reviewed by Bill Bangham during the School of Photography 1 in Kona, Hawaii.

Franziska Escher has her work reviewed by Bill Bangham during the School of Photography 1 in Kona, Hawaii.
Stanley's Tips for a Portfolio Review
  • Let your work speak for itself. Please don't tell people all about the photos, if the photo doesn't do a good job of that on it's own then maybe it shouldn't be in the portfolio. If the person looking at the photos wants to know more they will ask.
  • Listen for what is not said as much as what is said. Often when reviewing a new photographer's work I am looking desperately for something good in the midst of snapshots. I want to encourage you, but I don't want you to think everything is great either. If I don't say anything about a photo, believe me it is because I am not impressed. If you ask me I might try to find something good to say, however, if you are fishing for compliments your work isn't that good.
  • Portfolio review isn't about praise of your work. If your work is the greatest of all time then maybe you will get a WOW and I wish I had your portfolio comment. You should be looking for pointers on what to do next time to make the photo better. 
  • Millimeters are critical for great photos. One example of how a millimeter can make or break a photo is just the difference in the camera's point of view and the subject's eyes. Just tad bit high and you look down at the subject. Eye level with the subject is something quite different than just a little lower and looking up. As you get better this is what you are looking for the little things to improve your work.
  • There are stages of growth in photography. Early in your career you may need some really basic tips to help improve your photography. At this point someone talking to you about a millimeter of difference will not help you. You have a lot of work to do before they can talk to you about those differences.
  • Establish a relationship if possible. You need to pick people to review your work that you can go back to later and show them again. They will be able to then see your growth and frankly if you paid attention.
  • Ask always if you can follow up and how. Plan to go out and shoot as soon as you can after your review. Work on the tips they pointed out to you and then somehow get them to see your revisions in that portfolio. You might just need to show them one project you are working on and get their feedback.
  • You never arrive at the top. There is always room for growth. Always seek out feedback on your work for the rest of your career. If you are not growing then you are dying. 
Justin and Ashley Veneman (on right) review a students work during the student workshop at the Southwestern Photojournalism Conference in Fort Worth, TX.

Dave Black, center, reviews a students work while other students look on and learn from the critique. In the back is Patrick Murphy-Racey (Tennessee hat) and Bob Carey who are also leaders in the workshop.

Anacleto Rapping (far left) and Joanna Pinneo (far right) review a student's work at the workshop.

This photo was take around 1:00 am. Dave Black stayed up until 2:00 am critiquing work of anyone who wanted his thoughts during the workshop.