Thursday, June 28, 2012

Multimedia coverage of a middle school service project


I drove up to Chattanooga, Tennessee yesterday to cover Roswell Presbyterian's Middle School Youth Group on their summer mission trip.  They partnered with SonServents on their Work Projects that also partnered with Widows Harvest Ministry to include: building wheelchair ramps and landings, scraping and painting houses, putting new roofs on homes, or landscaping and yard work.

Technical difficulties

Two lighting problems are: 1) under porch in middle of the day the youth were in some major shadows and 2) when they are painting the house they are facing the house and are always majorly back lit. While the house maybe white and act as a reflector, it is still a major light fall off. (photo by: Knolan Benfield)
 My solution for this problem was to put two hot shoe flashes up on light stands to light under the porch and even out the light.

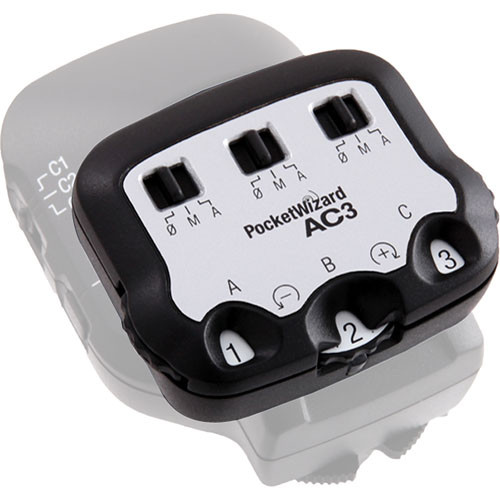
There is a Nikon SB-900 on the far left on a light stand with the PocketWizard TT5 to control the TTL output of the light. On the far right is a Nikon SB-800 on light stand using the same setup for TTL. I have on my Nikon D4 the PocketWizard Mini TT1 and AC3 to trigger and control the output of the flashes.  They output is set to 0.
This is my daughter being interviewed by me for the project. (photo by: Knolan Benfield)

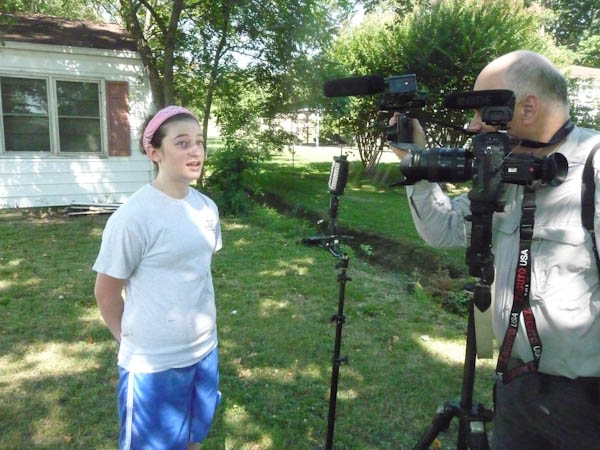
You can see the two camera setup here for the video interview. (Photo by: Knolan Benfield)
Video setup

I have a Nikon D4 with 28-300mm lens as the primary camera. I have the Zacuto’s Optical Viewfinder on the back of the camera to help with focusing. The microphone on the D4 is the Rode Video Pro. My second camera is the Nikon P7000 and I have the Rode Video microphone on it.

To help with lighting I have the LitePanel Micro Pro that helps with the shadows. The house behind her is in the sun and she is in the shade of the trees.  The light helps fill her face and by having her in the shade she is able to talk without squinting.

Editing

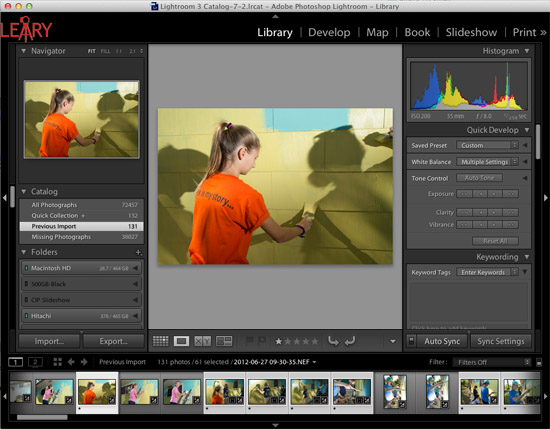
All the photos are edited using Adobe Lightroom 4.  I love this software because I can easily edit all the photos from a similar situation together.


For video editing I used Final Cut Pro X. I enjoy the simplicity of this software to help do things like synchronizing two cameras. I don't have to convert the files from the different cameras when I import them.


I really enjoy combining the still photos with the video interviews. I think the stills help the audience have a visual pause to absorb a moment, whereas a video blows right through these moments too quickly.

Start to finish on this project

Got in our van at 7:30 a.m. and drove up to Chattanooga, Tennessee.  Was at the first location by 9:15 a.m.

We wrapped up shooting all three locations by 12:30 p.m.  Drove back to Roswell and stopped by a Barbeque place for lunch. Was home by 3:30 p.m.

Finished editing all the still photos by 5:00 p.m. and finished the combined project by 11:00 p.m.

Took a dinner break for about an hour.

I had Final Cut to crash and lost about an hour of time.

There you have a quick one day multimedia project.

Tuesday, June 26, 2012

Lighting a conference room


When the ISO needs to stay low I will often light a conference room. A few years ago I owned the Nikon D2X camera.  This camera most people felt comfortable shooting up to ISO 800 with little noise, but above that was a concern.

While I could have shot these photos with the room light, there are a few things you would have to take into consideration. First of all mixed lighting. While the lights in the room with fluorescent, the room also had a large window where some daylight was spilling in.

For me the easiest solution was to over power the room lights just a little and clean up the color.

I put the lights down to 1/8 power to insure they would all fire. I didn't want to put a radio remote on every light. So I have a PocketWizard Plus II receiver on one light while I am triggering it with the PocketWizard Plus II transmitter. If I put the lights all the way to the lowest setting sometimes they do not always fire.

I was pleased overall with the results.  Good skins tones and colors throughout the photo. This was important because I wanted to show the diversity in the classroom, and if not careful some of the people would of been just a silhouette rather than seeing the skin tones that we do here.


Monday, June 25, 2012

Lighting African American on black background


This is one of my favorite photos that I have ever made. I think the model brought as much to this session as I did lighting her.

I love her hair, the turtle neck and her wonderful skin and smile.

Simplicity is what makes this work so well.  You need to have the background far away from the soft boxes.  There is easily 10 feet from the model to the background.  So the amount of light hitting the subject drops off pretty quickly and what little light is hitting the background isn't enough to register in the photo.

She is around f/8 on the Mamiya RZ 6x7 camera system. I was using a 100-200mm zoom lens and shooting with Provia 100 transparency film.  I didn't know how good it was until I got the film back from the lab a day or so later.

Sure I shot a test shot. I shot that with a Polaroid back using Fuji's Polaroid film.

Lighting a science lab


I love shooting in science labs.  I enjoy learning what the scientists and engineers are working on and creating that will impact our lives in the years ahead.

Here I used two color gels to help communicated "science." I used blue on the background and red on the foreground.

To get a gel to be the same color it is in the shot it needs to to -2 stops darker than the main light on the subject.  So here the main is f/11 and the background blue is metering at f/5.6.  The same for the foreground red at f/5.6.

You will notice the power for the blue is full power.  The reason for this is the blue gel absorbs more of the light than red does.

The main light is a 30º grid on a monobloc. This is the keep the light from spilling over onto the red or blue and watering down the light.


Sunday, June 24, 2012

When window light isn't enough

This was shot on a rainy day and to make the window light work, I added lighting.
Many times I am caught in a room on a cloudy or overcast day. The light from the window is just not enough.

To make the above photograph I put an Alienbees B1600 monobloc light with a white shoot through large umbrella just outside the professor's window. To trigger the light I used the PocketWizard Plus II reciever and the PocketWizard Plus II Transmitter. 

Inside the light needed just a little help to keep the shadows from going too dark. To soften the shadows I put another Alienbees B1600 with just a bare-bulb on a light stand and put it as close to the ceiling as I could.

The outside light was on full power and the bare-bulb light inside was at 1/8 - 1/16th power.

Below is the lighting diagram for the setup.

Next time you need sunlight through a window and you don't have a sunny day to help, use off camera flash to create it for you.

Wednesday, June 20, 2012

Shaping the light is how you light metal

Just throwing light on a metal object 

This is what you see a lot of on ebay and other websites of people selling metal objects. My examples are using my Yamaha YTR-734 Silver Trumpet, which I pulled out and started playing again.

After cleaning it up I didn't want to waste not preserving this for myself.

You would think just putting a metal object like this Silver Trumpet on a blue background and using two off the camera flashes at 45º angles (like copy stand) would give you perfect light. This is how this is lighted.
Here is the setup for the photo above.
I have two hotshoe Nikon Speedlights (1 SB900 & 1 SB800) lighting the trumpet. They are setup like a typical copy stand photo shoot. Works great for objects other than metal. Perfect for copying flat art work and books.

This is the same photo as above with just the room light and no flash.
This is the available light without the blue background
By removing the blue fabric the white table wrap the light around the metal and give it more shape.

Two flashes

My recommendation is Tent Lighting

Here I am using tent lighting. I pulled back the front panel so you could see inside.
When you wrap an object with light all around it you get much better results.

There are four flashes lighting this setup. Two Alienbees B1600 up in the ceiling pointing towards the back and two on umbrellas as you see here.
This is the setup with white seamless background.
I think you might do a better job of selling this trumpet on ebay with lighting like this than the light above.

Notice how in the bell the blue fabric is reflected. if you look really close you will see just a little black spec. This is the camera peaking thought the front panel.

Here the only difference in the above photo is using a blue fabric.
Somewhere in between?

Maybe you want something in between the top photo and light wrapped all around the object. Instead of tent lighting just use white foam board and cut it into different shapes. You can then put a black sheet out of the photo but blocking light. Then just place the strips of white foam board to place you want to add white verses the black. Slowly you can give different looks. Use different color foam board and you can add color to the reflections like the blue fabric is doing here, but just put it outside the view of the camera but in the reflection of the metal.

Rather than me showing you everything, go photograph something yourself and see what you come up with.

Monday, June 18, 2012

3 Light Modifiers for Flash

Bounced Light into Umbrella Silver/White 

These examples show using a bounced light into an umbrella outside and everything stays the same except the shutter is slowed down to allow more of the ambient light of the outdoors to light the background for us.

Using an Alien Bee B1600 on 1/32 with bound sliver/white umbrella

Nikon D4, Nikkor 28-30mm, ISO 200, f/5, 1/200

Nikon D4, Nikkor 28-30mm, ISO 200, f/5, 1/100

Nikon D4, Nikkor 28-30mm, ISO 200, f/5, 1/50

Nikon D4, Nikkor 28-30mm, ISO 200, f/5, 1/25

Shooting the light through a white umbrella 

Everything is the same in the example above but we changed the light modifier to shooting through the umbrella verses bouncing.  See if you can see a difference.

Nikon D4, Nikkor 28-30mm, ISO 200, f/5, 1/25

Nikon D4, Nikkor 28-30mm, ISO 200, f/5, 1/50

Nikon D4, Nikkor 28-30mm, ISO 200, f/5, 1/100

Nikon D4, Nikkor 28-30mm, ISO 200, f/5, 1/200


 Shooting with a 10º Spot Grid

This is going to another extreme of not lighting everything but mainly just the model's face. Other than the light not lighting the shirt can you see any other differences?
Nikon D4, Nikkor 28-30mm, ISO 200, f/5, 1/200

Nikon D4, Nikkor 28-30mm, ISO 200, f/5, 1/100

Nikon D4, Nikkor 28-30mm, ISO 200, f/5, 1/50
Nikon D4, Nikkor 28-30mm, ISO 200, f/5, 1/25

These are just wider shot of the same thing above so you can see the light fall off from the grid light.

Nikon D4, Nikkor 28-30mm, ISO 200, f/5, 1/25

Nikon D4, Nikkor 28-30mm, ISO 200, f/5, 1/50

Nikon D4, Nikkor 28-30mm, ISO 200, f/5, 1/100

Nikon D4, Nikkor 28-30mm, ISO 200, f/5, 1/200


I used the PocketWizard Mini TT1 to trigger the flash

I used the PocketWizard Plus receiver on the flash to trigger the flash
 Try this yourself and see what kind of results you get. Maybe try a large white bed sheet to shoot your flash through and bounce to see if you get different results using it over your umbrella or soft box.

Sunday, June 17, 2012

Hot Shoe Flash Lighting

Nikon D4, 28-300mm, ISO 200, f/5.0, Nikon SB900, Nikon SB800 fired using PocketWizard Mini TT1 , PocketWizard AC3 and PocketWizard Transceiver TT5.
I enjoying using our backyard as a background. First of all I don't have to light everything and we love the trees.

For this photo I wanted to tie our daughter playing her viola to the outdoors.

This is a wide shot to show the flashes.  They are on Manfrotto 5001B Nano Black Light Stands and the Manfrotto 175F Justin Spring Clamp with Flash Shoe to hold the flashes.
I am shooting in TTL mode and after I take a shot I am using the compensation dials on the camera and the PocketWizard AC3 to adjust my exposure.

In this photo of the PocketWizard AC3 A is set to a +1, B is set to +2 and C is set to a +3 compensation.
The PocketWizard AC3 sits on top of the PocketWizard Mini TT1 in it's hot shoe.  You can also use the Nikon SU-800 to do the same thing.
In the first photo I have the camera at -1 compensation and the flash on her face at 0 Compensation and the hair light at +2 compensation.

You really just have to play with this to get the results you want.

Here we are shooting more in the woods than in the first photo. Here the camera is -1 1/3 EV.  The flashes are at +1 EV.
She is getting some sunshine from the left and the flashes are lighting the shadow side of her face.

We moved again around the backyard to a different background.  Also changed the lighting a little here as well. The camera is set at -3 EV and the flashes are on the right set at +2 EV and the one on her left at +1 EV.
This is the actual lighting setup for the photo just above it.

I am using an -1 EV so as to not loose the background but just tone it down a bit. The flash to the right is +1 EV and the hair light flash is +2 to help separate her from the background.

The lighting setup for the above photo.
The idea with the two hot shoe flashes was to use them to compliment the lighting outside.  I used one light to help separate the viola player from the background by putting the flash up high and using it as a hair light would be used in the studio.  I am using the other flash as the main light and using the natural light to control the background.

Because I am outside I am using the PocketWizard radio remote system to be sure the signal is reaching the flashes. 

Once you master the use of the one off camera hot shoe flash and you are ready to expand try this exercise yourself. See what results you come up with using your camera and flashes.