Showing posts with label pocketwizard. Show all posts

Friday, November 06, 2015

Quick Passports using Nikon D750 and Sigma 24-105mm ƒ/4


Here is the gear I used to create these passport prints
  • Nikon D750
  • Sigma 24-105mm f/4 DG OS HSM Art Lens
  • 5 Alienbees B1600
  • 30º Honeycomb Grid for 7" reflector
  • Paul Buff Beauty Dish – 22-inch diameter, bright white reflector with white sock
  • Paul Buff 86" Extreme Silver PLM™ with On-Axis Speedring Mount
  • Pocketwizard Plus System
  • Epson PictureMate Charm to print
  • Adobe Lightroom CC
Here is the setup for you to see in my basement studio:


The lighting was set to the lowest output on all the flashes to start the process. After I did this the ƒ-stop was ƒ/8 on my face. The background was little brighter. After a few test shots I bumped the background up to just a little under ƒ/11. This gave me a pretty clean white background.


After ingesting the RAW photo I processed and output to a JPEG and this is the one I chose. Here is an birds eye view of the setup.


Go to this website created for US Passports.

http://travel.state.gov/content/passports/en/passports/photos/photo-composition-template.html
All the technical specs are here to help guide you. Notice in the far right lower corner is a "Start Photo Tool." Click on this and you will see this:


Click on the bottom button "Choose Photo" and then find the photo you took. Next after you do that you will see something like this:


Now use the slider to fit the head into the guide. 


Here is how it will look for you, unless you have hair. Well actually hair doesn't matter, keep the face the size of the outline.

Click on crop at the bottom.


Once your photo looks something like this then click on "Save Photo."

Click on photo to see bigger
Import this JPEG into Adobe Lightroom and go to the Print Module as I have done here. I chose the 4x6 print size since I will use the Epson PictureMate to print which prints 4x6 prints.

I dropped the photo into the print by dragging from the lower filmstrip to the working area. 


The in the Add to Package section on the right I adjusted the photo to 2.05 in. I printed the photo a few times till I got the setting just right. You can thank me later for saving you this time.


So the photo now meets the US Passport office guidelines for size.


Also to be sure it prints to the printer you need to select Printer under PrintJob otherwise you create a JPEG file.

Click to see larger
I would also save the print by clicking on "Create Saved Print" as shown by arrow above and then you can just use this as a template next time.

Also I let the color management be handled by the printer since I have already color calibrated the monitor and it looks good to me.

Hit print and then just wait for it to print on the Epson PictureMate Charm. Cost per 1 sheet of 4" x 6" is 27¢. That includes ink and paper.


Now that you have this system I recommend trying it and getting everything down. Maybe save this blog post or print it out. Make notes on the setup and then you are ready for business of shooting passports.

Monday, October 26, 2015

Learning to manage expectations

Nikon D750, AF-S NIKKOR 28-300mm f/3.5-5.6G ED VR, ISO 10000, ƒ/5.6, 1/250
The one thing that helps to calm my fears for an assignment is seeing what the client has gotten in the past from other photographers. I also love it when they tell me how they felt about that coverage.

The best thing you can do before you take on an assignment is to find out what the expectations are of the client for the project. I call this calibrating your creative juices.

Nikon D750, AF-S NIKKOR 28-300mm f/3.5-5.6G ED VR, ISO 12800, ƒ/5.6, 1/160
Before shooting this wedding the parents of the groom showed me the brides sister's wedding coverage from two years ago. I knew after seeing the other photographer's work what the standards for their wedding were for their photographer.

They were happy with the photos. I made mental note of the style and then decided to meet that and then to put my own touches onto the images. I was just adding icing to the cake.

Nikon D4, Nikon 85mm ƒ/1.8G,  ISO 2800, ƒ/1.8, 1/100
My strength is finding moments like these here. Capturing the "True Love" of a bride and groom is what I loved doing with this wedding.

Nikon D750, AF-S NIKKOR 28-300mm f/3.5-5.6G ED VR, ISO 100, ƒ/5.6, 1/60–Pocketwizard AC9 to combine with my Pocketwizard TT5 and then using the phone cord plug into the back of the Alienbees B1600.
I also love making the light look better when needed.

Do you know the expectations of your client? Are you able to not just meet those expectations but give them some images that take the coverage up a notch or two?

Thursday, February 13, 2014

Photographing the Island Breeze Luau cast on the beach of Hawaii

Nikon D4, 14-24mm ƒ/2.8, ISO 200, ƒ/16, 1/200 with 2 Alienbees with CTO 1 for off camera flash. These are triggered with the Pocketwizard Radio Remotes
I enjoyed shooting these photos of the Island Breeze Impact Tour cast at the Old Kona Airport State Park on the Big Island of Hawaii. In this setting I was able to take control of the situation as compared to the night before where I was photographing them while they were putting on a Luau.

While the stage lighting is nice, the amount of light they use in the show is minimal.

Fuji X-E2, XF 55-200mm, ISO 6400, ƒ/4.6, 1/125
The show I was shooting at ISO 6400 with ƒ/4.6 and a 1/125 setting as compared to the controlled shooting on the beach with ISO 200, ƒ/16 and 1/200.

Nikon D4, 14-24mm ƒ/2.8, ISO 200, ƒ/14, 1/320
I am in Hawaii teaching lighting to YWAM School of Photography students. We went to the beach for them to see me shoot mixed light where I am adding light to the scene to help make the photos better.

Nikon D4, 14-24mm ƒ/2.8, ISO 200, ƒ/14, 1/400 no flash
As you can see in the photo where their is no flash it is more of a silhouette.

Photo by David White
In this photo you can see that was taken by my assistant David White how I set this up using the Alienbees B1600 flash with CTO 1 over the strobes to warm up the subject and then I color corrected for the light which then made the sky even more blue.

Two Alienbees B1600 at full power on the right at 45º with CTO Gels.


Nikon D4, 14-24mm ƒ/2.8, ISO 200, ƒ/22, 1/20
This is a photo of my friend and former photo student Brooke Valle.  I worked with her for having her friends and family in the cast to come and help us with the photo shoot.

Brooke is spinning the "POI" [it is the Maori word for "ball" on a cord].

Nikon D4, 14-24mm ƒ/2.8, ISO 200, ƒ/16, 1/400
Due to working around other events we did not have the ability to shoot right at the sunset. We shot had to stop about 30 minutes before the sunset.  Had we been able to go later the sky would have been a little darker and more vibrant than in these photos.

I am under exposing the subject about 2 stops to get the background to saturate and be darker. I then am over exposing the subject by 2 stops with the strobes. The combination of the under exposure on the camera and the over exposure with the lights makes the subject well exposed the background slightly under exposed and a little more saturated than what the naked eye was seeing.


Nikon D4, 14-24mm ƒ/2.8, ISO 200, ƒ/8, 1/400
Had we been able to wait a little longer then flame would also have shown up even more.

Nikon D3S, 14-24mm ƒ/2.8, ISO 200, ƒ/7.1, 1/100
Two years ago I did a similar shot and by waiting till the sun dipped below the horizon I was able to capture the flame much better because the sky was darker.

The class had fun by watching and seeing all the lights setup and also taking some of their own photos of the cast in costume.


Fuji X-E2, 18-55mm, fill flash -1 EV, ISO 6400, ƒ/5, 1/15

Tuesday, February 04, 2014

What did you shoot the last few days? Here are some of mine

Fuji X-E2, XF 55-200mm, ƒ/8, 1/2000, ISO 5000
What did you photograph the last couple of days? Please don't say nothing. There are opportunities everyday even out your back window.

This is out our back window and while I shared some photos before and even wrote about how I captured them here. Does this mean I shot it and just moved on?

I find that sometimes just going back to something over and over helps you get better and just because it is a different time you may just get a surprise.

Fuji X-E2, XF 55-200mm, ƒ/8, 1/2000, ISO 5000
What I like about these photos is the attitude that you sense of the birds and how they interact with each other.

Fuji X-E2, XF 18-55mm, ƒ/3.6, 1/500, ISO 5000
Our family decided to celebrate Valentines Day this past weekend by driving to Truett's Luau in Fayetteville, GA. It is so new the website is not completely up. This is one of a kind restaurant that Truett Cathy, founder of Chick-fil-A, at the age of 92 decided to open up. He had a big hand in everything about it.

Fuji X-E2, XF 18-55mm, ƒ/3.2, 1/125, ISO 640 with fill flash set at -1 EV
These are not Pulitzer Prize worthy photos, but they are keeping my eye fresh. I am also working on being sure everything I do is second nature. Like in this photo of my daughter playing the Ukulele at the restaurant I popped in a little fill flash at -1 EV so as not to overpower the natural light, but just fill in her face that was backlit.

Nikon D4, 14-24mm, ISO 400, ƒ/5.6, 1/100, also three Alienbees B1600 @ 1/32 power to just wink enough light to clean up the color of the mixed lighting. One light is in the ceiling over the counter and the two others are in the far corners behind the camera left and right. They are triggered with the PocketWizard radio remotes.
I shot photos of the new Chick-fil-A restaurant that is at Charleston Southern University in North Charleston yesterday.  The reason I shot them on the Nikon is Fuji 10-24mm is still not out and I really prefer to work with super wide angle lenses more than any other focal length, because I want the viewers to feel like they are there.

I had a John Amis as a photo assistant who helped with the lights and getting model releases for every person that came into the restaurant that morning as guests and employees. You need a team to make these photos happen.

Fuji X-E2, XF 18-55mm, ƒ/5.6, 1/500, ISO 640
After the shoot I drove by The Citadel in Charleston to get some photos of the Ring that was added to the parade field this past year.

Fuji X-E2, XF 18-55mm, ƒ/5.6, 1/500, ISO 640
The overcast sky made the colors pop and give a nice tent-lighting to the ring.

I walked around the ring and shot a lot of varieties which we will maybe use a few for a book I am working on with my wife on The Citadel. She has a blog that we think many will want some of the content in a book form.

What are you going to shoot today?

Thursday, June 28, 2012

Multimedia coverage of a middle school service project


I drove up to Chattanooga, Tennessee yesterday to cover Roswell Presbyterian's Middle School Youth Group on their summer mission trip.  They partnered with SonServents on their Work Projects that also partnered with Widows Harvest Ministry to include: building wheelchair ramps and landings, scraping and painting houses, putting new roofs on homes, or landscaping and yard work.

Technical difficulties

Two lighting problems are: 1) under porch in middle of the day the youth were in some major shadows and 2) when they are painting the house they are facing the house and are always majorly back lit. While the house maybe white and act as a reflector, it is still a major light fall off. (photo by: Knolan Benfield)
 My solution for this problem was to put two hot shoe flashes up on light stands to light under the porch and even out the light.

There is a Nikon SB-900 on the far left on a light stand with the PocketWizard TT5 to control the TTL output of the light. On the far right is a Nikon SB-800 on light stand using the same setup for TTL. I have on my Nikon D4 the PocketWizard Mini TT1 and AC3 to trigger and control the output of the flashes.  They output is set to 0.
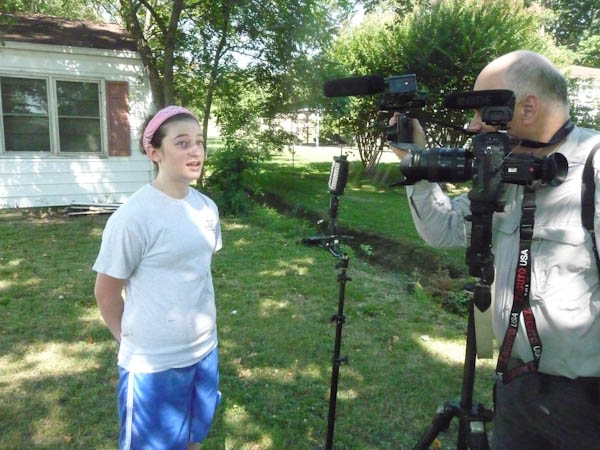
This is my daughter being interviewed by me for the project. (photo by: Knolan Benfield)

You can see the two camera setup here for the video interview. (Photo by: Knolan Benfield)
Video setup

I have a Nikon D4 with 28-300mm lens as the primary camera. I have the Zacuto’s Optical Viewfinder on the back of the camera to help with focusing. The microphone on the D4 is the Rode Video Pro. My second camera is the Nikon P7000 and I have the Rode Video microphone on it.

To help with lighting I have the LitePanel Micro Pro that helps with the shadows. The house behind her is in the sun and she is in the shade of the trees.  The light helps fill her face and by having her in the shade she is able to talk without squinting.

Editing

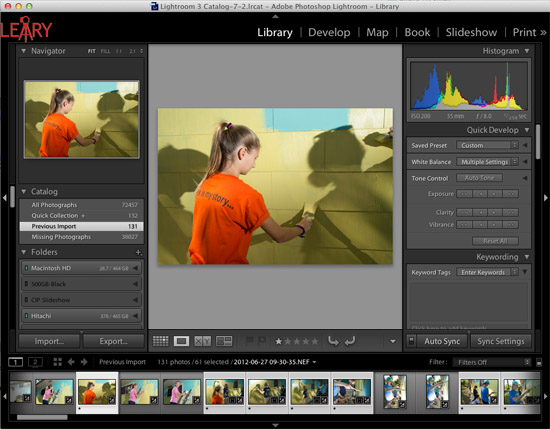
All the photos are edited using Adobe Lightroom 4.  I love this software because I can easily edit all the photos from a similar situation together.


For video editing I used Final Cut Pro X. I enjoy the simplicity of this software to help do things like synchronizing two cameras. I don't have to convert the files from the different cameras when I import them.


I really enjoy combining the still photos with the video interviews. I think the stills help the audience have a visual pause to absorb a moment, whereas a video blows right through these moments too quickly.

Start to finish on this project

Got in our van at 7:30 a.m. and drove up to Chattanooga, Tennessee.  Was at the first location by 9:15 a.m.

We wrapped up shooting all three locations by 12:30 p.m.  Drove back to Roswell and stopped by a Barbeque place for lunch. Was home by 3:30 p.m.

Finished editing all the still photos by 5:00 p.m. and finished the combined project by 11:00 p.m.

Took a dinner break for about an hour.

I had Final Cut to crash and lost about an hour of time.

There you have a quick one day multimedia project.

Sunday, June 24, 2012

When window light isn't enough

This was shot on a rainy day and to make the window light work, I added lighting.
Many times I am caught in a room on a cloudy or overcast day. The light from the window is just not enough.

To make the above photograph I put an Alienbees B1600 monobloc light with a white shoot through large umbrella just outside the professor's window. To trigger the light I used the PocketWizard Plus II reciever and the PocketWizard Plus II Transmitter. 

Inside the light needed just a little help to keep the shadows from going too dark. To soften the shadows I put another Alienbees B1600 with just a bare-bulb on a light stand and put it as close to the ceiling as I could.

The outside light was on full power and the bare-bulb light inside was at 1/8 - 1/16th power.

Below is the lighting diagram for the setup.

Next time you need sunlight through a window and you don't have a sunny day to help, use off camera flash to create it for you.